Few things are as frustrating as switching on your electric fan, only to be met with a persistent hum and motionless blades. That buzzing sound tells you there’s power flowing, yet your fan is failing to deliver the refreshing breeze you expect. Don’t resign yourself to a stuffy room or rush to buy a new unit just yet. With a bit of patience and some simple diagnostic steps, you can often pinpoint and fix the problem yourself, getting your fan back in working order.
This guide will walk you through the most common reasons an electric fan hums but doesn’t spin, offering clear, actionable solutions. You’ll learn how to safely inspect and repair your fan, saving you time, money, and the discomfort of a malfunctioning appliance.
Understanding Why Your Electric Fan Hums But Doesn’t Spin
When your fan hums, it’s a clear signal that electricity is reaching the motor, but the absence of blade movement indicates a mechanical or electrical issue preventing the motor from initiating or sustaining rotation. Think of it like a car engine trying to turn over but failing to catch. The hum is the effort, but something is blocking the successful start. Recognizing this distinction is the first step in effective troubleshooting.
Safety First: Essential Precautions Before You Begin
Before attempting any inspection or repair on your electric fan, safety is paramount. Failing to take proper precautions can lead to electrical shock or further damage to your appliance. Always follow these critical steps:
- Unplug the Fan: For all portable fans (table, standing, box fans), simply pull the power cord from the wall outlet.
- Cut Power at the Breaker: For ceiling fans or built-in ventilation units, locate your home’s electrical service panel and switch off the circuit breaker that supplies power to the fan. Do not rely solely on the wall switch.
- Allow to Cool: If the fan has been humming for a while, the motor may be hot. Give it time to cool down before touching any internal components.
Once you’ve ensured the fan is completely de-energized and cool, you can proceed with confidence.
Common Culprits Behind the Hum and How to Identify Them
Several issues, both mechanical and electrical, can cause your electric fan to hum without spinning. Understanding these common problems will help you effectively diagnose the fault.
Dust and Debris Obstruction
One of the most frequent and easiest-to-fix causes is a physical obstruction. Over time, dust, lint, pet hair, and other airborne particles can accumulate around the motor shaft, fan blades, or within the motor housing. This buildup creates friction, making it difficult for the motor to turn the blades.
- How to Identify:
- Visually inspect the fan blades, the gap around the motor shaft, and any accessible vents for noticeable clumps of dust or foreign objects.
- Attempt to manually spin the fan blades (with power off). If they feel stiff, sluggish, or don’t move freely, an obstruction is likely.
 Accumulated dust and debris obstructing a fan motor shaft, preventing the blades from spinning
Seized Motor Bearings or Lack of Lubrication
Inside your fan’s motor, bearings allow the shaft to rotate smoothly. Over years of use, the lubricant in these bearings can dry out, or dust and grime can work their way in, causing them to seize or become excessively stiff. This increased friction prevents the motor from spinning the blades, even though it’s receiving power and humming.
- How to Identify:
- Again, manually turn the fan blades with the power off. If there’s significant resistance, a grinding sensation, or if the blades stop almost immediately after you let go, seized bearings are a strong possibility.
- The fan might also feel hot around the motor housing after humming.
Faulty Start Capacitor
The start capacitor is a critical electrical component in many electric fans. Its job is to provide an initial burst of energy (a “kick-start”) to the motor to get the blades moving. If this capacitor fails or weakens, the motor will receive continuous power (hence the hum) but won’t have that crucial initial jolt to overcome inertia and start spinning.
- How to Identify:
- Turn the fan on so it hums, then (carefully, using a stick or brush handle, never your bare hand) give one of the fan blades a gentle push. If the blades then start to spin normally and continue to do so, a faulty capacitor is almost certainly the culprit.
- Visually, a bad capacitor might appear bulging, cracked, or show signs of leakage, though often there are no external signs.
Loose or Damaged Wiring
Even if the fan is humming, indicating power, a loose or corroded wire connection within the fan’s internal circuitry or at the wall switch could be preventing the full current from reaching the motor windings necessary for rotation.
- How to Identify:
- This can be harder to diagnose without opening the fan. If other components seem fine, loose wiring should be investigated.
- Sometimes, flickering lights (if the fan has a light kit) or intermittent operation can point to wiring issues.
Overheating Motor
A motor that hums but won’t spin is under stress, which can lead to overheating. While overheating is often a symptom of another problem (like seized bearings or an obstruction), it can also be a cause of the fan shutting down to prevent damage.
- How to Identify:
- If the motor housing feels excessively hot to the touch after a brief period of humming, it’s overheating. This usually means something is causing extreme resistance or an electrical short.
Worn Bushings or Motor Issues
Beyond bearings, other internal motor components like bushings can wear out, leading to increased friction. In more severe cases, the motor itself could have an internal short circuit or be otherwise damaged beyond simple repair.
- How to Identify:
- These issues are usually suspected if all other, simpler troubleshooting steps fail. If the blades are stiff even after cleaning and lubrication, or if a new capacitor doesn’t resolve the issue, deeper motor problems might be present.
Step-by-Step Troubleshooting Process for a Humming, Non-Spinning Fan
Ready to get your fan working again? Follow this systematic guide. Remember to prioritize safety at every step.
Step 1: Disconnect Power and Perform External Checks
- Unplug the Fan: Always disconnect the fan from its power source. For ceiling fans, switch off the corresponding circuit breaker.
- Visual Inspection: Look for any obvious obstructions around the fan blades, motor shaft, and intake/exhaust vents. Remove any large dust bunnies, hair, or debris.
- Manual Blade Rotation Test: Gently try to spin the fan blades by hand.
- Smooth and Free-Spinning? This points towards an electrical issue, most commonly a faulty capacitor.
- Stiff or Resistant? This indicates a mechanical issue like seized bearings or a physical obstruction.
Step 2: Disassemble and Clean Thoroughly
If your blades were stiff or you found external debris, it’s time to get inside.
- Remove Fan Guards/Grilles: Use a screwdriver or release clips to take off the front and back guards.
- Remove Fan Blades: Carefully unscrew the retaining nut (often reverse-threaded, meaning you turn it clockwise to loosen) and pull the blades off the motor shaft. Pay attention to how they were installed for proper reassembly.
- Clean All Components:
- Wipe down the fan blades and guards with a damp cloth to remove dust.
- Use a dry cloth, a small brush, or compressed air to clean the motor housing, motor shaft, and any accessible internal areas. Focus on removing any accumulated dust, hair, or grime, especially where the shaft enters the motor housing.
Step 3: Lubricate the Motor Bearings
If the blades were stiff even after cleaning, lubrication is key.
- Access Bearings: The bearings are typically located where the motor shaft exits the motor housing, both at the front and sometimes at the back. You may need to remove additional motor housing screws to access them fully.
- Apply Lubricant:
- Initially, spray a penetrating lubricant like WD-40 onto the bearings. This helps break down old, dried gunk. Spin the shaft manually a few times to work it in.
- Follow up with a few drops of a lighter, more permanent lubricant like 3-in-1 household oil or motor oil. Avoid thick greases that can attract more dust.
- Spin the shaft manually again to distribute the oil. It should now turn much more freely.
“Many fans fail because the lubricant turns to gunk over time, seizing the bearings. A bit of oil can often bring them back to life.” – John Heisz, Woodworker & DIY Expert
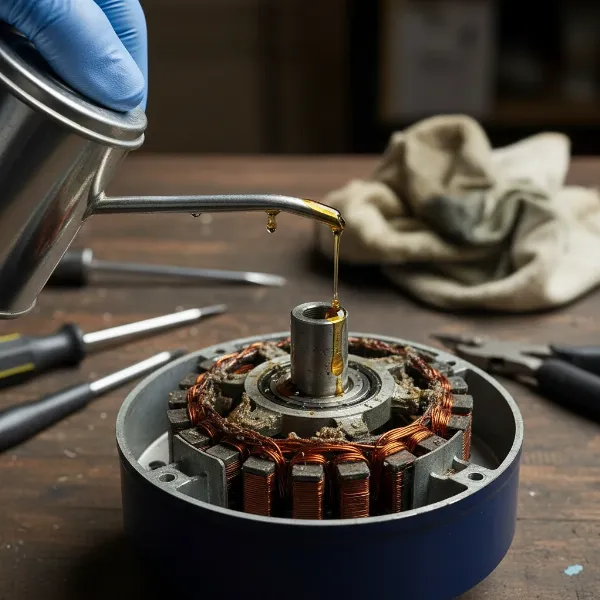 Applying lubricant to fan motor bearings with an oil can to free seized components and restore smooth rotation
Step 4: Inspect and Potentially Replace the Start Capacitor
If your fan blades spun freely but wouldn’t start, the capacitor is a prime suspect.
- Locate the Capacitor: The capacitor is typically a small rectangular or cylindrical component connected to the motor with two or more wires. It’s usually found inside the motor housing or control panel.
- Visual Check: Look for any signs of damage like bulging, leaks, or discoloration. These indicate a failed capacitor.
- Test (Optional, but recommended with a multimeter): If you have a multimeter with a capacitance setting, you can test the capacitor’s value. A reading significantly lower than the rated value (printed on the capacitor) confirms it’s faulty.
- Replace the Capacitor: If faulty, disconnect the old capacitor (note wire connections) and replace it with a new one that has the exact same microfarad (µF) rating and a voltage rating that is equal to or higher than the original. Capacitors are relatively inexpensive and widely available. Secure all connections.
Step 5: Check Wiring and Connections
After addressing mechanical and capacitor issues, if the fan still hums but won’t spin, examine the electrical connections.
- Inspect All Visible Wiring: Look for any loose, frayed, or burnt wires inside the motor housing, at the switch, and along the power cord.
- Tighten Connections: Secure any loose wire nuts or terminal connections. If a wire is damaged, replace it or professionally repair it.
- Test the Switch (for ceiling fans): If the fan has a wall switch, you can use a multimeter to check for continuity. A faulty switch can sometimes provide enough power for a hum but not for full motor operation.
When to Call a Professional or Consider Replacement
While many humming fan issues are DIY-friendly, there are times when professional help or even replacement is the best course of action.
- Complex Electrical Issues: If you suspect internal motor damage, a short circuit, or if you’re uncomfortable working with electrical components beyond basic wiring, it’s best to consult a licensed electrician. Electrical repairs can be dangerous if not performed correctly.
- Worn-Out Motor: If the motor itself is severely worn, making grinding noises even after lubrication, or if repeated repairs don’t last, the motor might be at the end of its life. Replacing a fan motor can sometimes be as expensive as buying a new fan, especially for older or cheaper models.
- Older Fan Models: For very old fans, parts might be difficult to find, and the efficiency may not match modern units. In such cases, a new, energy-efficient fan could be a more economical long-term investment.
Preventative Maintenance: Keeping Your Fan Spinning Smoothly
A little preventative care can go a long way in extending your fan’s lifespan and preventing future troubleshooting headaches.
- Regular Cleaning: At least once a season, disassemble your fan and thoroughly clean the blades, guards, and motor housing to prevent dust and debris buildup.
- Occasional Lubrication: If your fan has accessible bearings, a few drops of 3-in-1 oil annually can keep them well-lubricated and prevent seizing.
- Proper Storage: When storing your fan for extended periods, cover it to protect it from dust and place it in a dry environment.
Conclusion
A humming electric fan that refuses to spin is a common household annoyance, but it’s often a fixable one. By systematically checking for dust obstructions, lubricating seized bearings, and replacing a faulty start capacitor, you can restore your fan’s functionality and enjoy cool air once more. Remember to always prioritize safety by unplugging the unit or cutting power at the breaker before starting any repair. While some issues may warrant professional attention or even a new purchase, embracing a DIY approach for these common problems empowers you to keep your appliances running efficiently and sustainably.
What steps will you take to troubleshoot your humming fan this weekend?
Frequently Asked Questions
Why does my fan motor hum but not spin?
Your fan motor hums because it’s receiving electrical power, but something is preventing the blades from turning. This is typically due to a faulty start capacitor, seized motor bearings from dried lubricant or dust, or a physical obstruction jamming the fan blades or motor shaft.
Can I fix a fan that hums but doesn’t spin myself?
Yes, many common issues that cause a fan to hum without spinning can be fixed with basic DIY skills. Cleaning accumulated dust, lubricating seized bearings, or replacing a faulty capacitor are all repairs typically within the scope of a homeowner. Always ensure the fan is unplugged first.
How do I know if my fan capacitor is bad?
A strong indicator of a bad capacitor is when your fan hums but won’t start on its own, yet it begins spinning if you give the blades a manual push with a stick or similar object. Visually, a bulging or leaking capacitor is also a clear sign of failure.
What kind of oil should I use to lubricate my fan motor?
For lubricating fan motor bearings, a light household oil like 3-in-1 oil or specific motor oil is recommended after first using a penetrating oil like WD-40 to loosen any seized parts. Avoid heavy greases, which can attract more dust and hinder rotation over time.
When should I replace my electric fan instead of repairing it?
Consider replacing your fan if the motor itself is damaged (e.g., internal short, excessive grinding noise), if replacement parts are hard to find or costly (often nearing the price of a new fan), or if you are uncomfortable with the complexity of the repair required. An old, inefficient fan might also be worth replacing with a modern, energy-efficient model.