Few things are as frustrating as reaching for your ceiling fan remote, pressing a button, and getting no response. A silent, unmoving fan in a stuffy room can quickly turn a comfortable space into an annoyance. While a non-responsive ceiling fan remote might seem like a significant problem, the good news is that many issues are surprisingly simple to diagnose and fix with a little patience and a systematic approach.
This comprehensive guide will walk you through common causes, basic and advanced troubleshooting steps, and even when it might be time to consider a replacement. We’ll help you pinpoint the problem and get your ceiling fan back to providing that much-needed breeze and light.
Understanding How Your Ceiling Fan Remote System Works
Before diving into fixes, it’s helpful to understand the basic components at play. A remote-controlled ceiling fan system primarily consists of two parts: the remote control (a transmitter) and a receiver unit located within the fan’s canopy, near the ceiling. The remote sends a signal, usually radio frequency (RF) or sometimes infrared (IR), which the receiver then interprets to control the fan’s speed, light, and sometimes even its direction. Power is essential for both the remote (batteries) and the receiver (electrical wiring from your home).
Common Culprits: Why Your Ceiling Fan Remote Stops Working
When your ceiling fan remote isn’t working, it’s often due to one of several common issues. Identifying the root cause is the first step toward a solution.
Battery Issues
This is, by far, the most frequent reason for a remote control malfunction.
- Dead or Weak Batteries: Batteries lose charge over time. If the remote’s indicator light doesn’t illuminate or is dim, this is a strong sign.
- Incorrectly Inserted Batteries: Even seasoned users can accidentally insert batteries the wrong way, preventing proper electrical contact.
- Corrosion: Over time, battery terminals can corrode, hindering the electrical flow.
Signal Interference & Range Problems
Your remote communicates wirelessly, making it susceptible to various signal disruptions.
- Obstructions: Physical barriers between the remote and the fan, such as large furniture or even walls, can block the signal.
- Distance: While many remotes boast a decent range, being too far from the fan can weaken the signal, causing intermittent or no response.
- Electronic Interference: Other electronic devices in your home, like Wi-Fi routers, smart home hubs, or even other ceiling fan remotes, can sometimes interfere with the signal.
Incorrect Pairing / Dip Switch Settings
Many ceiling fan remotes and receivers use a coded frequency to communicate.
- Misaligned Codes: Older or simpler remote systems often use “dip switches” – tiny physical switches that must be set to the same combination on both the remote and the receiver. If these don’t match, the remote won’t control the fan.
- Loss of Pairing: Newer, more advanced remote systems might lose their pairing after a power outage or battery change, requiring a re-pairing procedure.
Power Supply Problems
Even if your remote is working perfectly, the fan won’t respond if it’s not receiving power.
- Tripped Circuit Breaker: The circuit breaker supplying power to your fan might have tripped, cutting off electricity.
- Wall Switch is Off: If your fan is connected to a wall switch, ensure it’s in the “on” position.
- Pull Chain: Some fans have pull chains for speed or light control. Ensure these are in a position that allows remote operation (often “on” or highest speed for the fan, “on” for the light).
- Loose Wiring: Though less common, loose wiring connections within the fan’s canopy can interrupt power to the receiver.
Remote or Receiver Malfunction
Sometimes, the components themselves can fail.
- Physical Damage: Dropping the remote, exposing it to moisture, or significant wear and tear can damage its internal components.
- Internal Component Failure: Like any electronic device, the remote or the fan’s receiver unit can simply fail due to age or manufacturing defects.
Step-by-Step Basic Troubleshooting for Your Ceiling Fan Remote
Start with the simplest solutions, as they often resolve the issue.
1. Check and Replace Batteries
This is your first and most crucial step.
- Open the Battery Compartment: Locate and open the battery cover on the back of your remote.
- Inspect Batteries: Check if the batteries are inserted correctly, matching the positive (+) and negative (-) terminals.
- Replace with Fresh Batteries: Even if the old batteries seem fine, replace them with a fresh set. Low battery power can lead to intermittent or weak signals.
- Clean Contacts: While the batteries are out, inspect the metal contacts inside the compartment. If you see any corrosion, gently clean it off using a cotton swab dipped in isopropyl alcohol or a pencil eraser.
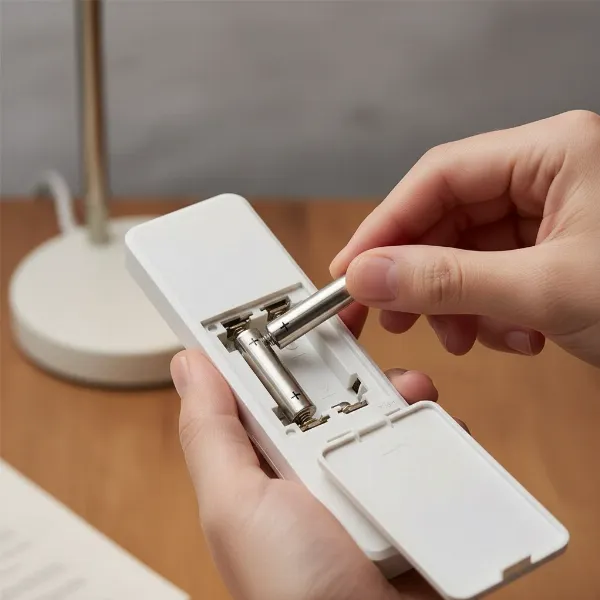 person replacing batteries in ceiling fan remote, ensuring correct polarity and clean contacts
2. Verify Power Supply to the Fan
Ensure your fan is receiving power.
- Wall Switch: Confirm that any wall switch controlling the fan is in the “on” position.
- Pull Chains: If your fan has pull chains, make sure they are set to allow remote control. For the fan, this often means setting it to the highest speed via the chain, and for the light, ensuring it’s “on.”
- Circuit Breaker: Go to your home’s electrical panel and check the circuit breaker for the room or area where the fan is located. If it’s tripped (usually halfway between “on” and “off”), flip it completely off, then back on.
3. Test Remote Range and Clear Obstructions
Evaluate if anything is blocking the signal or if you’re too far away.
- Move Closer: Stand directly beneath the ceiling fan and try operating the remote. If it works from a close distance but not from further away, it could indicate weak batteries, interference, or a failing receiver.
- Remove Obstructions: Ensure there are no large objects, like tall bookshelves or even other people, directly between you and the fan when attempting to use the remote.
4. Reset the System (Power Cycle)
A simple power cycle can often resolve temporary glitches.
- Turn Off Power: Flip the wall switch controlling the fan to the “off” position, or turn off the corresponding circuit breaker.
- Wait: Leave the power off for at least 30 seconds to a minute. This allows the receiver’s internal memory to clear.
- Restore Power: Turn the wall switch or circuit breaker back on.
- Test: Try using your remote again.
Advanced Troubleshooting: Diving Deeper into Remote and Receiver Issues
If basic steps haven’t worked, it’s time to investigate the internal settings and components. Always turn off power at the circuit breaker before performing any work inside the fan canopy for safety.
Matching Dip Switch Settings
Many ceiling fan remotes and receivers use dip switches to set a unique frequency code, preventing interference with other fans.
- Locate Dip Switches on Remote: These are usually found inside the battery compartment. You might need to remove the batteries to see them. They are tiny switches, often four in a row, that can be slid up or down.
- Locate Dip Switches on Receiver: This step requires accessing the fan’s receiver, which is typically housed within the ceiling canopy (the decorative cup where the fan mounts to the ceiling).
- Turn off power at the circuit breaker. Verify power is off.
- Carefully lower the canopy by loosening the screws that secure it to the mounting bracket.
- Locate the receiver unit, usually a small black box, nestled above the downrod. The dip switches will be on its side.
- Match the Codes: The pattern of the dip switches (e.g., up, down, up, down) on both the remote and the receiver must be identical. If they don’t match, adjust them carefully with a small screwdriver or pen tip.
- Reassemble and Test: Once matched, carefully tuck the receiver back into the canopy, reattach the canopy, and restore power. Test your remote.
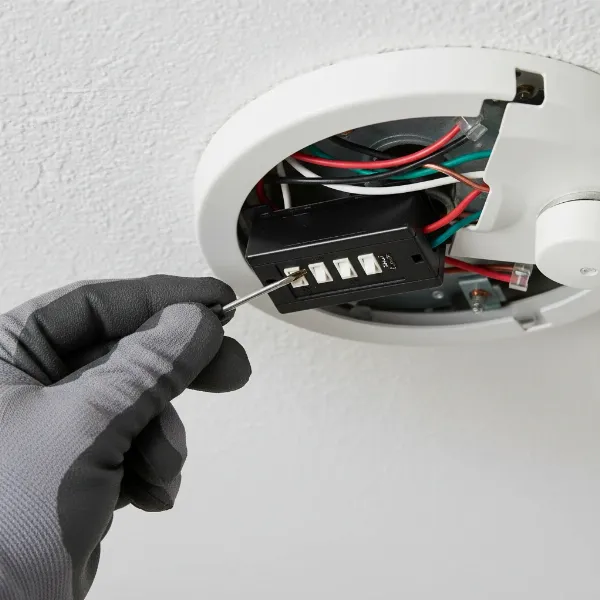 electrician adjusting dip switches on a ceiling fan receiver inside canopy for pairing
Reprogramming/Pairing Modern Remotes
Some newer fans with advanced remote systems don’t use physical dip switches but instead have a “learn” function or specific pairing sequences.
- Consult Your Manual: The exact procedure varies significantly by manufacturer. Refer to your fan’s instruction manual for specific pairing instructions.
- Common Pairing Methods:
- “Learn” Button: After a power cycle, you might need to press and hold a “learn” button inside the remote’s battery compartment or on the receiver itself.
- Specific Button Sequence: Some fans require you to turn the power off and on, then within a specific timeframe (e.g., 10-30 seconds), press and hold a particular button on the remote (e.g., “Fan Off” or a designated “Pair” button) for several seconds. The fan lights may flash to confirm successful pairing.
Inspecting Receiver Wiring
While less common for a remote issue, loose or damaged wiring can prevent the receiver from functioning.
- With power OFF at the breaker, carefully inspect the wire connections going into and out of the receiver unit. Look for any wires that appear loose, disconnected, or show signs of burning or corrosion.
- Caution: Unless you are comfortable and knowledgeable about electrical wiring, it’s best to call a professional for any wiring repairs.
Cleaning Remote Contacts (for Specific Button Issues)
If only certain buttons on your remote are not working, the issue might be with the remote’s internal contacts.
- Disassemble Remote: Carefully open the remote control (you might need a small screwdriver).
- Clean Contacts: Using a cotton swab lightly dampened with isopropyl alcohol, gently clean the rubber contact pads on the buttons and the corresponding circuit board traces. Allow to dry completely before reassembling.
Troubleshooting Table: Quick Reference for Common Problems
| Problem | Potential Cause | Quick Fix |
|---|---|---|
| Remote unresponsive/No indicator light | Dead batteries, incorrect insertion | Replace batteries, check polarity |
| Remote works close, not far | Weak batteries, signal interference, failing receiver | Replace batteries, clear obstructions, power cycle |
| Fan/Light doesn’t respond at all | Power off to fan, unmatched dip switches, un-paired | Check breaker/wall switch, match dip switches, re-pair remote |
| Only some remote buttons work | Dirty remote contacts, damaged remote | Clean remote contacts, consider remote replacement |
| Remote works intermittently | Signal interference, weak batteries, loose wiring | Power cycle, replace batteries, check wiring (if comfortable) |
| Fan hums but doesn’t spin | Not typically remote issue, could be motor/capacitor | Check fan’s pull chain, consult manual for motor troubleshooting |
When to Call a Professional Electrician
While many remote issues are DIY-friendly, some situations warrant professional help to ensure safety and proper function.
- Persistent Electrical Problems: If your circuit breaker repeatedly trips when you restore power to the fan, or if you detect burning smells or sparks, immediately turn off the power and call an electrician.
- Uncertainty with Wiring: If you’re uncomfortable accessing the fan canopy or dealing with electrical connections, it’s always safer to hire a licensed electrician. Incorrect wiring can be dangerous.
- Fan Motor Issues: If the fan receives power but still won’t spin (even manually) or makes unusual noises, the problem might be with the motor itself, not the remote system.
- Inability to Access Receiver: Some fan designs make accessing the receiver challenging. An electrician can safely handle this.
“Many minor ceiling fan remote problems can be resolved with simple steps, but always prioritize safety. If you’re unsure about any electrical work, don’t hesitate to contact a qualified professional.” – Electrical Safety Foundation International
Replacing Your Ceiling Fan Remote or Receiver
If all troubleshooting steps have failed, it might be time to replace a component.
When to Replace
- Physical Damage: If the remote has visible damage (e.g., broken casing, liquid damage), or the receiver shows signs of burning or charring.
- Age and Wear: Electronic components degrade over time. If your fan system is very old, the remote or receiver may have simply worn out.
- Troubleshooting Exhausted: If you’ve diligently followed all troubleshooting steps and the issue persists.
Replacement Options
- Original Equipment Manufacturer (OEM) Replacement: The best option for perfect compatibility. Contact the fan’s manufacturer or check their website for exact replacement remotes or receivers for your model.
- Universal Remote Kits: These typically come with a new remote and a new receiver. You’ll need to install the new receiver in your fan’s canopy, which involves some wiring. Ensure the universal kit is compatible with your fan’s motor type (AC or DC).
Preventative Maintenance for Remote-Controlled Ceiling Fans
A little proactive care can keep your remote-controlled fan running smoothly for years.
- Regular Battery Checks: Replace batteries annually, or as soon as you notice a dip in remote performance.
- Keep Remote Clean and Dry: Protect your remote from spills and impacts. Clean it periodically to prevent dust and grime from affecting button contacts.
- Minimize Interference: If possible, try to keep other strong signal-emitting devices away from the immediate vicinity of your ceiling fan.
- Gentle Handling: Handle both the remote and the fan’s pull chains (if present) with care to avoid damage.
Conclusion
A malfunctioning ceiling fan remote doesn’t have to be a source of ongoing frustration. By systematically checking common culprits like batteries, power supply, and dip switch settings, you can resolve most issues yourself. Remember to always prioritize safety by turning off power at the circuit breaker when working with internal fan components. With these troubleshooting steps, you can confidently diagnose and fix the problem, restoring comfort and control to your living space. What simple fix ultimately brought your ceiling fan back to life?
Frequently Asked Questions
Why does my ceiling fan remote stop working after a power outage?
Power outages can sometimes cause the fan’s receiver or the remote itself to lose its programming or pairing settings. After a power surge or interruption, you may need to re-pair the remote with the receiver, often by matching dip switch settings or performing a specific “learn” procedure outlined in your fan’s manual.
Can I use a universal remote with my ceiling fan?
Yes, many universal remotes are available, but they typically require installing a new universal receiver unit inside the fan’s canopy. The original receiver will need to be replaced with the one included in the universal remote kit. Ensure the universal kit is compatible with your fan’s motor type (AC or DC).
Where is the receiver located in a ceiling fan?
The receiver unit for a remote-controlled ceiling fan is usually located within the fan’s canopy, which is the decorative housing that covers the wiring connections where the fan mounts to the ceiling. You’ll need to turn off power at the circuit breaker and carefully lower the canopy to access it.
How often should I change the batteries in my ceiling fan remote?
It’s a good practice to replace your ceiling fan remote batteries annually, even if they seem to be working. If you notice a decrease in remote range or responsiveness, change them sooner. Fresh batteries ensure a strong, reliable signal.
What if only some buttons on my remote are working?
If only specific buttons on your remote are non-responsive, the issue might be dirty or worn contacts beneath those buttons. You can often fix this by carefully disassembling the remote and cleaning the contact pads with isopropyl alcohol. If cleaning doesn’t work, the remote itself may be damaged and require replacement.