Few household annoyances rival the persistent, rhythmic wobble of a loose ceiling fan. Beyond being an irritation, a wobbly fan can indicate a safety hazard, potentially leading to damaged components or even posing a falling risk. Fortunately, addressing this common issue often comes down to a simple, DIY fix: tightening the fan’s setscrews and other key fasteners. This comprehensive guide will walk you through the essential steps, from understanding why your fan wobbles to performing the necessary adjustments for a smooth, quiet operation.
Understanding Why Your Ceiling Fan Wobbles
A perfectly still ceiling fan is a beautiful thing. When it starts to shimmy and shake, it’s usually a sign that something has come loose. Over time, constant rotation and vibration can cause screws to loosen, leading to imbalance and noticeable wobble. While blade imbalance or warping are common culprits, the often-overlooked setscrews and other connecting fasteners play a critical role in maintaining the fan’s structural integrity. These small but mighty screws are designed to hold various components tightly in place, such as the downrod within its housing or the blade arms to the motor. When they slacken, the fan’s entire equilibrium is compromised, resulting in that aggravating sway. Identifying the source of the looseness is the first step toward a lasting solution.
Safety First: Essential Precautions
Before you begin any work on your ceiling fan, your safety is paramount. Working with electrical appliances, especially those mounted high above the ground, requires careful adherence to safety protocols. Neglecting these steps can lead to serious injury or electrical shock. Always prioritize preparation over haste to ensure a secure and uneventful repair process.
First and foremost, turn off the power to the fan at the circuit breaker. This is not merely switching off the fan at the wall switch, but cutting the electrical supply entirely. Locate your home’s main electrical panel and identify the breaker switch that controls the ceiling fan circuit. Flip it to the “off” position. If you’re unsure which breaker controls the fan, turn off the main breaker to your home to ensure no electricity is flowing. Confirm the power is off by attempting to turn the fan on with its wall switch or pull chain.
Next, use a sturdy and stable step ladder or stepladder that allows you to comfortably reach all parts of the ceiling fan without overextending. Ensure the ladder is placed on a flat, even surface and is properly locked open. Never stand on chairs or unstable objects. Having a second person to steady the ladder can provide an extra layer of security, especially if you anticipate needing to reach difficult angles. Always keep your work area clear to prevent trips and falls.
Tools You’ll Need
Gathering the right tools before you start will make the tightening process much smoother and more efficient. Most of the items required are standard household tools, easily accessible in any basic toolkit. Having them on hand will prevent unnecessary interruptions while you’re on the ladder.
You will primarily need a screwdriver set, which should include both Phillips head and flathead screwdrivers. Many ceiling fan setscrews, particularly those on downrods, often require an Allen key (hex wrench). It’s advisable to have a set of these on hand, as their size can vary by fan model. A flashlight can be incredibly helpful for illuminating dark areas and ensuring you locate all screws. While not strictly for tightening, a ceiling fan balancing kit can be useful if wobble persists after all screws are tightened; these kits typically include weights to redistribute mass evenly.
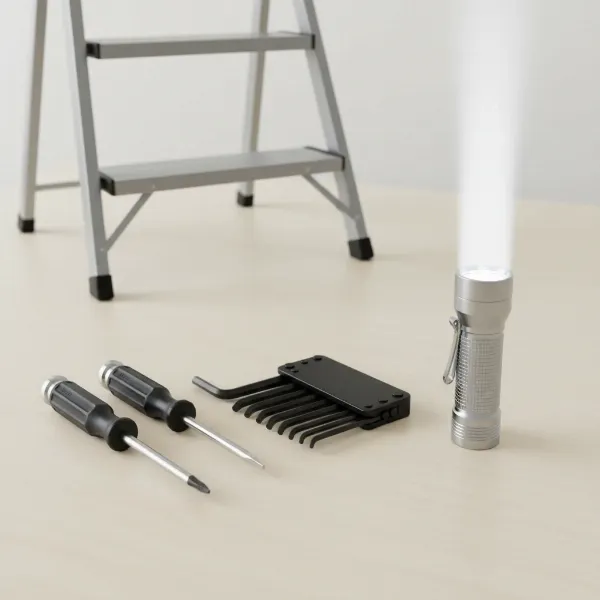 Essential tools for tightening a ceiling fan, including screwdrivers, Allen keys, and a step ladder, laid out on a clean surface.
Identifying Key Screw Locations on Your Ceiling Fan
A typical ceiling fan has several points where screws can loosen, contributing to a wobble. It’s crucial to systematically check each of these areas. While your primary focus is on setscrews, understanding the function of all fasteners will help you achieve a stable fan.
Blade Arm Screws
|
Our Picks for the Best electric fan in 2026
As an Amazon Associate I earn from qualifying purchases.
|
||
| Num | Product | Action |
|---|---|---|
| 1 | Dreo Fan for Bedroom, 12 Inches, 70ft Powerful Airflow, 28db Quiet Table Air Circulator Fans for Whole Room, 120° Adjustable Tilt, 3 Speeds, Desktop Fan for Home, Office, Kitchen |

|
| 2 | Amazon Basics 20\" High Velocity Industrial Fan, Floor Fan, with 3 Speeds, Tilt Head, ETL-Listed Safety Compliance, Metal Housing/Blades, Ideal for Industrial/Commercial Space/Garage/Gym, 125W, Black |
|
| 3 | Dreo Tower Fan for Bedroom, 90° Oscillating Standing Fans for Room with 4 Speeds, 3 Modes, 28dB Quiet for Sleep, 25ft/s Velocity, 8H Timer, Remote, Living Room, Office, Home, Black |
|
| 4 | Dreo Fan for Bedroom, 120° Oscillating Standing Fans, Quiet Floor Fan with DC Motor, 100ft Pedestal Fans for Room, 9 Speeds, 4 modes, 20dB, 120° Manual Vertical, 37-42\" Adjustable Height, 9H Timer |
|
| 5 | Amazon Basics 16\" Pedestal Fan with Remote, Floor Fan, Standing Fan for Bedroom, Living Room, Office, with 3 Speeds, 3 Modes, Timer, Dual-Layered Blades, Adjustable Height, Tilt Head, 60W, Black |
|
| 6 | 10\" Modern Standing Fan for Bedroom, Sleek Oscillating Pedestal Fan, 3-Speed & Height Adjustable Compact Floor Fan for Home Office & Dorm |
|
| 7 | Dreo Tower Fan for Bedroom, 25ft/s Velocity Quiet Floor Fan, 90° Oscillating Fans for Indoors with 4 Speeds, 4 Modes, 8H Timer, Standing Fans, Bladeless Fan, Black, Nomad One (DR-HTF007) |
|
| 8 | Lasko 2520 Oscillating Stand Fan,White 16 Inch |
|
| 9 | LEVOIT Tower Fan for Bedroom, 25ft/s Velocity Standing Fan with 28dB Quiet for Sleep, Remoter, 12H Timer, 5 Speeds, 4 Modes, 90° Oscillation for Home, Office, Indoor, Bladeless 36 inch, White |
|
| 10 | Amazon Basics Air Circulator Fan, Desk Fan for Bedroom, Home and Office, With 90-Degree Tilt Head, 3 Speed Settings, Lightweight (3 LBS), 35 Watts, Black, 11.1\"W x 6.3\"D x 10.9\"H |
|
These are the most visually apparent screws. Each blade attaches to a blade arm, which then attaches to the fan’s motor housing. You’ll typically find two or three screws securing the blade to the arm, and another two screws attaching the blade arm to the motor. These are usually standard Phillips head or flathead screws. Over time, vibrations can cause these to back out, leading to individual blades becoming loose and creating an imbalance. A thorough inspection of these fasteners on every blade arm is a critical first step.
Downrod Setscrews
The downrod is the metal pipe that connects the fan’s motor housing to the ceiling canopy and mounting bracket. This is a common location for setscrews. These are often smaller, headless screws that are threaded into one component (like the motor housing) and press against another (the downrod) to hold it firmly in place by friction. You will typically find them where the downrod enters the motor housing and sometimes where it connects to the hanger ball inside the ceiling canopy. These setscrews are vital for preventing rotational movement of the downrod within its housing. They almost always require an Allen key (hex wrench) to tighten.
Mounting Bracket Screws
The mounting bracket is the component that securely fastens the entire ceiling fan assembly to the electrical box and ceiling joists. While not setscrews, the screws that attach this bracket to the ceiling are fundamental to the fan’s stability. If these are loose, the entire fan can sway. You’ll usually find these hidden beneath the decorative canopy that covers the electrical box at the ceiling. Gaining access may require removing small decorative screws on the canopy itself.
Step-by-Step Guide to Tightening Ceiling Fan Screws
With safety precautions in place and tools at the ready, you can now systematically tighten your ceiling fan. Follow these steps carefully to ensure every potential source of wobble is addressed.
Step 1: Power Down and Secure Your Workspace
Reiterate and confirm that the power to the ceiling fan is completely off at the circuit breaker. Place your stable step ladder beneath the fan. If your fan has light covers or decorative elements that obstruct access, carefully remove them and set them aside in a safe place. Ensure all components you are about to work on are cool to the touch if the fan or light was recently in use.
Step 2: Inspect and Tighten Blade Arm Screws
Start with the fan blades. Using the appropriate screwdriver (usually Phillips head), check every screw that attaches each fan blade to its respective blade arm. Tighten them firmly, but be careful not to overtighten, which could strip the screw threads or crack the blade material. Next, move to the screws that secure each blade arm to the central motor housing. These are also typically Phillips head screws. Ensure all of these are snug. As you tighten, observe the blade arms for any signs of bending or damage, which might indicate a deeper issue.
Step 3: Access and Tighten Downrod Setscrews
This step focuses on the critical setscrews that the keyword emphasizes. Carefully slide the decorative canopy (the dome-shaped cover at the ceiling) down the downrod to expose the hanger ball and mounting bracket. You may need to loosen a few small screws on the canopy itself to do this. Inside, or sometimes directly on the motor housing where the downrod inserts, you will find one or more small setscrews. These are usually hex-head (Allen key) screws. Insert the correct size Allen key and turn clockwise to tighten them securely against the downrod. These setscrews prevent the downrod from rotating or shifting within the motor housing or hanger ball, which is a common cause of severe wobble. Also, check any other bolts or screws that secure the downrod to the hanger ball within the canopy.
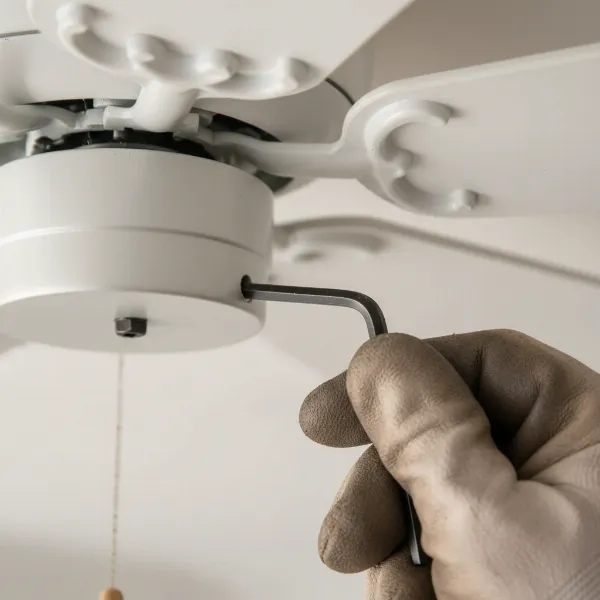 A close-up of a ceiling fan downrod being tightened with an Allen key, focusing on the setscrews near the motor housing connection point.
Step 4: Verify Mounting Bracket Security
With the canopy still lowered, inspect the screws that secure the mounting bracket to the electrical box and the ceiling. These are often larger screws, and you might need a Phillips head screwdriver or even a wrench. Tighten these until they are snug, ensuring the entire bracket assembly is firm against the ceiling. It’s rare for these to come completely loose, but even a slight movement here can translate into significant fan wobble. Once satisfied, carefully slide the canopy back into place and secure it with its decorative screws.
Step 5: Address Remaining Wobble (Blade Balancing)
If, after tightening all accessible screws and setscrews, your ceiling fan still exhibits a wobble, the issue likely lies with the blades themselves. Blades can become unbalanced due to slight manufacturing variations, accumulation of dust on one side, or even subtle warping over time. A fan balancing kit, available at most hardware stores, can help. These kits typically include clip-on weights and instructions for identifying the problem blade and applying weight to counteract the imbalance. This process involves trial and error, moving weights until the fan runs smoothly.
Step 6: Restore Power and Test
Once all tightening and balancing (if necessary) is complete, step off the ladder and clear your workspace. Go back to your circuit breaker panel and restore power to the ceiling fan. Turn the fan on at its highest speed and observe it carefully. Listen for any unusual noises and watch for any persistent wobble. If the fan now runs smoothly and quietly, you’ve successfully addressed the issue. If wobble remains, you might need to re-inspect your work, consider deeper blade issues, or consult a professional electrician.
What If the Wobble Persists? Troubleshooting Tips
Even after meticulously tightening every screw and setscrew, some ceiling fans might still have a stubborn wobble. This indicates that the problem extends beyond simple loose fasteners. Don’t be discouraged; there are still further troubleshooting steps you can take.
The most common culprit after tightening is blade imbalance or warping. As mentioned, a blade balancing kit is your next line of defense. Follow the kit’s instructions to identify the unbalanced blade and apply small weights to counteract the imbalance. Sometimes, a blade might be slightly warped, meaning it’s not perfectly flat or at the same pitch as the others. You can try to gently bend a warped blade holder back into alignment, but be very cautious to avoid snapping it. Another check involves using a yardstick to measure the distance from the ceiling to the tip of each blade; all measurements should be consistent. If you notice significant discrepancies, it could point to a warped blade or a bent blade arm.
If you’ve exhausted all DIY options and the fan still wobbles, or if you feel uncomfortable performing any of these steps, it’s always best to hire a qualified electrician or a professional handyman. They have the expertise and specialized tools to diagnose and fix more complex issues, ensuring your fan operates safely and efficiently. Never compromise safety by attempting repairs beyond your comfort or skill level.
Maintaining Your Ceiling Fan for Long-Term Stability
Preventing future wobbles is often simpler than fixing an existing one. Regular maintenance can significantly extend the life of your ceiling fan and ensure it continues to operate quietly and efficiently. Incorporating a few simple checks into your home maintenance routine can save you time, effort, and potential headaches down the line.
It’s advisable to inspect your ceiling fan every six months, or at least once a year, to ensure all parts remain secure. During this inspection, repeat the steps of checking and tightening the blade arm screws, downrod setscrews, and mounting bracket screws. This proactive approach helps to catch any loosening components before they develop into a noticeable wobble. Additionally, regularly clean your fan blades and motor housing to prevent dust accumulation. Dust can add uneven weight to blades, contributing to imbalance over time. Use a soft cloth or a vacuum attachment to gently remove dust from the blades, ensuring an even distribution of weight.
“A well-maintained ceiling fan is not just about comfort; it’s about prolonging the life of your appliance and ensuring the safety of your living space. Small, regular checks can prevent major problems.” – John Doe, Home Appliance Repair Specialist
Conclusion
A wobbly ceiling fan is more than just an aesthetic issue; it’s a clear signal that your fan requires attention to maintain its safety and performance. By understanding the critical role of setscrews and other fasteners, and following a methodical approach to tightening them, most homeowners can effectively restore their fan’s stability. From ensuring the power is off to meticulously checking blade arms, downrod setscrews, and mounting brackets, each step contributes to a smoother, quieter operation. Regular maintenance checks further extend the lifespan of your ceiling fan, providing consistent comfort without the distracting wobble. Don’t let a minor vibration turn into a major problem. Take the initiative to secure your ceiling fan today. What other maintenance tasks do you think are most commonly overlooked in household appliances?
Frequently Asked Questions
How often should I check my ceiling fan screws?
It is generally recommended to inspect your ceiling fan’s screws, including setscrews and blade attachment screws, every six months. This routine check helps identify and address any loosening components due to vibration before they cause a noticeable wobble, ensuring long-term stability and safe operation.
Can a loose ceiling fan be dangerous?
Yes, a loose ceiling fan can indeed be dangerous. Beyond the annoyance of a wobble, prolonged looseness can lead to further damage to the fan’s motor or mounting hardware, potentially causing electrical issues, components to detach, or even the entire fan to fall, posing a significant safety risk.
What’s the difference between a setscrew and a regular screw on a fan?
A setscrew is typically a headless screw designed to hold two parts together by pressing against one of them, often used to secure a shaft (like a downrod) within a hub. Regular screws, like those attaching blades, have heads and are designed to fasten parts by threading into corresponding holes, providing clamping force.
Do all ceiling fans have setscrews?
Most ceiling fans that utilize a downrod (the pole connecting the fan to the ceiling) will have setscrews to secure the downrod in place within the motor housing and sometimes at the hanger ball connection. Fans that are “flush-mount” or hugger style may not have a downrod and thus might not have these specific setscrews, though they will have other fastening screws.
Can I use threadlocker on ceiling fan screws?
While threadlocker can prevent screws from vibrating loose, it’s generally not recommended for most ceiling fan applications by manufacturers. If screws repeatedly loosen, it might indicate an underlying issue like excessive vibration. Using threadlocker could make future disassembly difficult or damage components. Consult your fan’s manual before considering.