As the crisp autumn air begins to replace the lingering warmth of summer, our faithful cooling companions deserve a well-earned rest. But before you simply tuck your fan away in a closet, it’s crucial to know How To Store Electric Fan Safely. This isn’t just about saving space; it’s about preserving your investment, ensuring peak performance for next season, and guaranteeing safety when you plug it back in. Here at Electric Fant, we see fans as more than just appliances; they are partners in your comfort. Think of this off-season period as a spa retreat for your fan—a time for it to be cleaned, protected, and stored correctly so it can return rejuvenated and ready to create those perfect breezes you love.
Why Proper Fan Storage is a Non-Negotiable
You might be thinking, “It’s just a fan, right? What’s the big deal?” Well, improper storage is one of the leading causes of reduced fan lifespan and performance issues. Over the months it sits idle, a neglected fan can become a haven for dust, a victim of moisture, or suffer physical damage.
Here’s what you’re preventing with proper storage:
- Dust Buildup: Dust doesn’t just settle on the blades and grille; it works its way into the motor housing. This can clog vents, cause the motor to overheat, and become a serious fire hazard.
- Corrosion and Rust: Storing a fan in a damp environment like a basement or shed can lead to rust on metal components and grilles, and can even damage the sensitive electrical parts inside.
- Physical Damage: A fan tossed haphazardly into a crowded garage can end up with cracked blades, a dented base, or a frayed power cord, all of which compromise its safety and functionality.
- Unpleasant Odors: Dust and moisture can create a musty smell that will be blasted all over your room the first time you turn the fan on next year.
Taking a few extra minutes now saves you from potential headaches, repair costs, or even needing to buy a new fan altogether.
Your Pre-Storage Ritual: A Step-by-Step Cleaning Guide
Before your fan goes into hibernation, a thorough cleaning is the most critical step. This ensures you’re not sealing in months of accumulated dust and grime.
- Safety First: Unplug Everything!
This might seem obvious, but it’s the most important rule. Before you do anything else, disconnect your fan from the power source completely. Never attempt to clean or disassemble an electric fan while it is plugged in. - Careful Disassembly (If Applicable)
Most pedestal fans and some desk fans are designed for easy disassembly. Typically, you can unclip or unscrew the front grille. Some models allow you to remove the fan blade as well. Always consult your user manual if you’re unsure. For a tower fan or box fan, you likely won’t be able to take it apart, and that’s okay—we’ll cover that. - Clean the Grilles and Blades
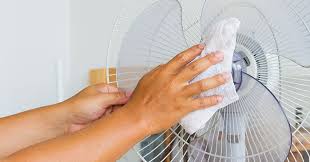
For removable parts, a simple bath in warm, soapy water works wonders. Use a soft cloth or sponge to gently wipe away all the grime. For non-removable grilles, like those on a tower fan, a vacuum cleaner with a brush attachment is your best friend. Use it to suck out dust from the vents. A can of compressed air is also fantastic for blasting out stubborn particles from hard-to-reach spots. - Wipe Down the Body and Base
Use a soft, damp cloth (damp, not soaking wet!) with a bit of mild detergent to wipe down the motor housing, the stand, and the base. Pay special attention to the vents around the motor, ensuring they are clear of any blockages to allow for proper air circulation when in use.
“A common mistake people make is forgetting to clean the rear motor vents,” notes Eleanor Vance, a Senior Product Engineer at Electric Fant. “These vents are crucial for cooling the motor. When they’re clogged with dust and stored, that dust can get packed in, leading to overheating and reduced energy efficiency when summer rolls around again.”
- Let It Dry Completely
This is absolutely essential. Before reassembling or packing your fan, ensure every single component is bone dry. Trapping even a small amount of moisture can lead to mold, mildew, or rust during storage. Let the parts air dry for a few hours. - Reassemble with Care
Once everything is dry, carefully put your fan back together. Make sure all screws are tightened and clips are securely fastened. This is a good time to inspect the power cord for any signs of fraying or damage. If you find any, it may be time for a professional repair or replacement.
How to Choose the Perfect Hibernation Spot for Your Fan
Where you store your fan is just as important as how you clean it. The ideal storage location should be cool, dry, and free from extreme temperature fluctuations.
Ideal Storage Locations:
- The top shelf of a bedroom or hall closet.
- A climate-controlled storage unit.
- Under a bed in a spare room.
Locations to Avoid at All Costs:
- Damp Basements: The number one enemy is moisture.
- Hot Attics: Extreme heat can warp plastic components and degrade internal wiring over time.
- Garages or Sheds: These areas often experience wild temperature swings and are prone to pests and excess dust.
Packing and Protection: The Final Step in How to Store Electric Fan Safely
The final step is to protect your clean fan from the elements while it’s stored. You want to create a barrier against dust and moisture.
- The Original Box is Best: If you still have the box your fan came in, this is the perfect solution. It was designed to hold your specific model securely. Place the fan and its components inside, and seal the box.
- No Box? No Problem: If the original box is long gone, a large, heavy-duty plastic bag is the next best thing. Place the fan inside and use a twist tie or tape to seal the top, preventing dust from getting in. An old sheet or a canvas cover also works well as a dust barrier.
- Mind the Cord: Gently loop the power cord and secure it with a twist tie or a Velcro strap. Avoid wrapping it tightly around the base or motor, as this can put stress on the connection points and cause internal wire damage over time.
Special Considerations for Different Fan Types
While the general principles apply to all, different fans have unique needs.
Pedestal and Stand Fans
These are often the easiest to store since they can be disassembled. If space is tight, consider taking the fan head off the stand to store them as two more compact pieces.
Tower Fans
Their tall, slim design makes them a bit awkward. Store them upright if possible to prevent any stress on the housing. Since you can’t easily clean the internal blades, using compressed air before storage is highly recommended. For more tips, you can [read our complete fan maintenance guide].
Box Fans
These are simple and sturdy. Their square shape makes them easy to stack or slide into tight spaces. The biggest challenge is cleaning the grille; a good vacuuming is essential.
Frequently Asked Questions (FAQ)
Q: Can I store my electric fan in the garage?
A: It is not recommended. Garages are often not climate-controlled and can expose the fan to moisture, extreme temperatures, and pests, which can damage the motor and electrical components. A closet or a dry storage room is a much safer choice.
Q: Do I really need to clean my fan before storing it?
A: Absolutely. Storing a dirty fan allows dust and grime to settle into the motor, which can become a fire hazard and will negatively impact the fan’s performance and the air quality in your home next season.
Q: What is the best way to store the power cord?
A: The best way to store the cord is to loop it loosely and secure it with a Velcro strap or twist tie. Avoid wrapping it tightly around the fan’s body, as this can strain the cord and cause damage over time.
Q: I lost the original box. What’s the best alternative for storing my fan?
A: A large, durable plastic garbage bag that you can seal at the top is an excellent alternative. It will keep dust and moisture out effectively. An old, clean sheet also works well as a simple dust cover.
Q: How often should I perform this deep cleaning and storage prep?
A: You should follow this process at the end of every season of use. This annual ritual is key to understanding how to store electric fan safely and will significantly extend the life and performance of your cooling fan.
A Well-Deserved Rest for Your Hardworking Fan
By investing a small amount of time and effort now, you are ensuring that when the first heatwave of next year arrives, your Electric Fant will be ready to perform flawlessly. You’ll be greeted with a clean, quiet, and powerful breeze, not a dusty, noisy, or hazardous appliance. Following this guide on how to store electric fan safely is the ultimate way to protect your comfort, your home, and your investment for years to come.