Is your once-powerful ceiling fan now barely stirring the air, or has it stopped spinning entirely? Don’t rush to replace the entire unit. Often, the culprit is a small, inexpensive component: the ceiling fan capacitor. This guide will walk you through everything you need to know about diagnosing a faulty capacitor, choosing the right replacement, and performing a DIY installation, bringing your fan back to full speed and saving you money.
Understanding Your Ceiling Fan Capacitor
Before diving into the replacement process, it’s helpful to understand the role this crucial component plays in your fan’s operation.
What is a Ceiling Fan Capacitor?
|
Our Picks for the Best electric fan in 2026
As an Amazon Associate I earn from qualifying purchases.
|
||
| Num | Product | Action |
|---|---|---|
| 1 | Amazon Basics Air Circulator Fan, Desk Fan for Bedroom, Home and Office, With 90-Degree Tilt Head, 3 Speed Settings, Lightweight (3 LBS), 35 Watts, Black, 11.1\"W x 6.3\"D x 10.9\"H |

|
| 2 | LEVOIT Tower Fan for Bedroom, 25ft/s Velocity Standing Fan with 28dB Quiet for Sleep, Remoter, 12H Timer, 5 Speeds, 4 Modes, 90° Oscillation for Home, Office, Indoor, Bladeless 36 inch, White |
|
| 3 | Dreo Fan for Bedroom, 120° Oscillating Standing Fans, Quiet Floor Fan with DC Motor, 100ft Pedestal Fans for Room, 9 Speeds, 4 modes, 20dB, 120° Manual Vertical, 37-42\" Adjustable Height, 9H Timer |
|
| 4 | Dreo Tower Fan for Bedroom, 90° Oscillating Standing Fans for Room with 4 Speeds, 3 Modes, 28dB Quiet for Sleep, 25ft/s Velocity, 8H Timer, Remote, Living Room, Office, Home, Black |
|
| 5 | Dreo Fan for Bedroom, 12 Inches, 70ft Powerful Airflow, 28db Quiet Table Air Circulator Fans for Whole Room, 120° Adjustable Tilt, 3 Speeds, Desktop Fan for Home, Office, Kitchen |
|
| 6 | Dreo Tower Fan for Bedroom, 25ft/s Velocity Quiet Floor Fan, 90° Oscillating Fans for Indoors with 4 Speeds, 4 Modes, 8H Timer, Standing Fans, Bladeless Fan, Black, Nomad One (DR-HTF007) |
|
| 7 | Amazon Basics 16\" Pedestal Fan with Remote, Floor Fan, Standing Fan for Bedroom, Living Room, Office, with 3 Speeds, 3 Modes, Timer, Dual-Layered Blades, Adjustable Height, Tilt Head, 60W, Black |
|
| 8 | Amazon Basics 20\" High Velocity Industrial Fan, Floor Fan, with 3 Speeds, Tilt Head, ETL-Listed Safety Compliance, Metal Housing/Blades, Ideal for Industrial/Commercial Space/Garage/Gym, 125W, Black |
|
| 9 | Lasko 2520 Oscillating Stand Fan,White 16 Inch |
|
| 10 | 10\" Modern Standing Fan for Bedroom, Sleek Oscillating Pedestal Fan, 3-Speed & Height Adjustable Compact Floor Fan for Home Office & Dorm |
|
A ceiling fan capacitor is an electrical component designed to store and release electrical energy. Its primary functions are to provide the necessary starting torque to get the fan motor turning and to maintain consistent speed once it’s running. It achieves this by creating a phase shift in the motor’s windings, which is essential for single-phase AC motors to start and operate smoothly. Without a properly functioning capacitor, your fan simply won’t perform as intended.
Signs of a Faulty Capacitor
Identifying a failing capacitor is the first step in troubleshooting your fan. Here are the most common indicators:
- Fan Not Starting: The fan may hum loudly but refuse to spin its blades, or it might not respond at all when switched on.
- Slow or Inconsistent Speeds: Your fan might operate at a noticeably slower pace on all settings, or some speed settings might work while others are sluggish or non-functional.
- Requires Manual Push to Start: If the blades need a manual push to begin rotating, it’s a strong sign the capacitor isn’t providing the initial kick.
- Erratic Blade Movement: The fan blades might wobble or spin unevenly.
- Physical Damage: Visually inspect the capacitor for any signs of bulging, leaking, melting, or rust. These are clear indicators of failure.
Types of Ceiling Fan Capacitors and How to Choose a Replacement
Most ceiling fans utilize single-phase capacitors, which can function as both start and run capacitors. These components are typically non-polarized, meaning they can be connected in any orientation within the circuit.
When selecting a replacement, two key specifications are paramount:
- Capacitance (µF): Measured in microfarads (µF), this value must precisely match the original capacitor. This specification dictates how much energy the capacitor can store.
- Voltage Rating (VAC): This indicates the maximum voltage the capacitor can safely handle. While you must match the µF rating exactly, using a capacitor with an equal or slightly higher voltage rating is acceptable and often recommended for improved durability.
Common types include CBB61 film capacitors, often made from metallized polypropylene or polyester film, and dry motor run capacitors. Always check the existing capacitor for its printed specifications. Taking a photo of the old unit before removal is an excellent way to ensure you purchase the correct replacement.
Essential Tools and Materials for the Job
Performing this repair yourself requires a few basic tools, most of which you might already have around the house.
- Screwdriver Set: Both Phillips and flathead screwdrivers will be needed to remove the fan canopy, light kit, and other components.
- Wire Cutters/Strippers: Essential for safely disconnecting the old capacitor and preparing the wires for the new one.
- Needle-Nose Pliers (Optional): Useful for manipulating wires or crimped connectors.
- Voltage Tester/Multimeter: Crucial for confirming the power is off before you begin work and for safely discharging the old capacitor.
- New Replacement Capacitor: Ensure it matches the microfarad (µF) and voltage (VAC) ratings of your old one.
- Electrical Tape and/or Wire Nuts: For making secure electrical connections.
- Camera: A smartphone camera is perfect for documenting the existing wiring before disconnection.
- Step Stool or Ladder: For safe access to your ceiling fan.
- Safety Glasses and Gloves: Always recommended when working with electricity.
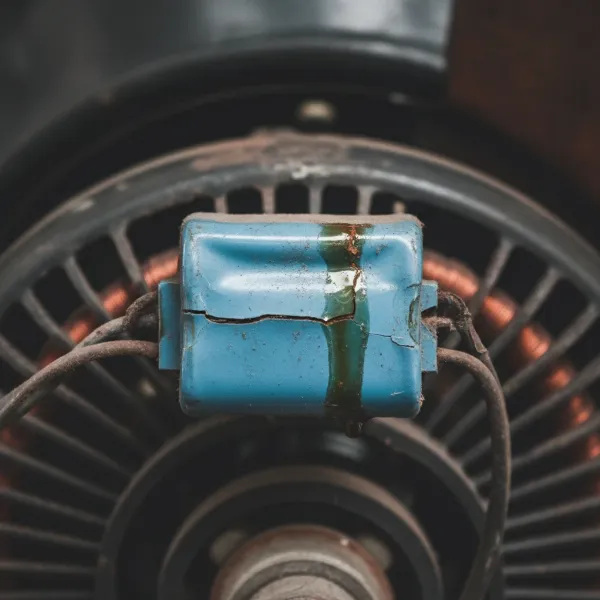 A close-up of a damaged, bulging ceiling fan capacitor signaling replacement.
Step-by-Step Guide: Replacing Your Ceiling Fan Capacitor
Replacing a ceiling fan capacitor is a straightforward process, but it requires careful attention to safety and detail. Follow these steps for a successful repair.
Step 1: Prioritize Safety – Disconnect Power
This is the most critical step. Before touching any part of your ceiling fan, go to your home’s electrical panel and turn off the circuit breaker that controls the fan. This usually means flipping a switch labeled for the room or “ceiling fan.” To be absolutely certain, use a non-contact voltage tester on the fan’s wiring or pull chains to confirm there’s no power.
Step 2: Access the Fan’s Motor Housing
Carefully climb your ladder and begin by removing any light kit attached to the fan. Unscrew the bulbs and detach the light fixture housing, if applicable. Next, locate the screws securing the fan’s canopy—the decorative cover that hides the wiring connections where the fan meets the ceiling. Remove these screws and gently lower the canopy to expose the motor wiring and the capacitor. The capacitor is typically a small, rectangular or cylindrical box, often black, located near the fan’s pull chain switch or tucked within the wiring.
Step 3: Document and Disconnect the Old Capacitor
Before disconnecting any wires, take several clear photos of how the old capacitor is wired. Pay close attention to the color coding of the wires and which terminals they connect to. Manufacturer color codes can sometimes differ, so your photos are your most reliable guide.
With your documentation complete, use wire cutters to snip the wires connected to the old capacitor. Cut as close to the capacitor body as possible, leaving plenty of wire length on the fan’s side for easier connection of the new component.
Safety Note: Capacitors can sometimes store an electrical charge even after power is off. While ceiling fan capacitors are usually small and self-discharge quickly, it’s a good practice to discharge it by briefly touching the leads of an insulated screwdriver across the capacitor’s terminals. You might see a small spark.
Step 4: Connect the New Capacitor
Carefully strip a small amount of insulation (about ½ inch) from the ends of the wires you just cut from the fan’s side. Do the same for the wires on your new capacitor. Now, connect the wires from the new capacitor to the corresponding fan wires, matching them exactly as documented in your photos. Use wire nuts to secure each connection, ensuring they are tight and secure, or use electrical tape for insulation. If your new capacitor has fewer wires than the old one, refer to the manufacturer’s diagram or follow the primary speed wires.
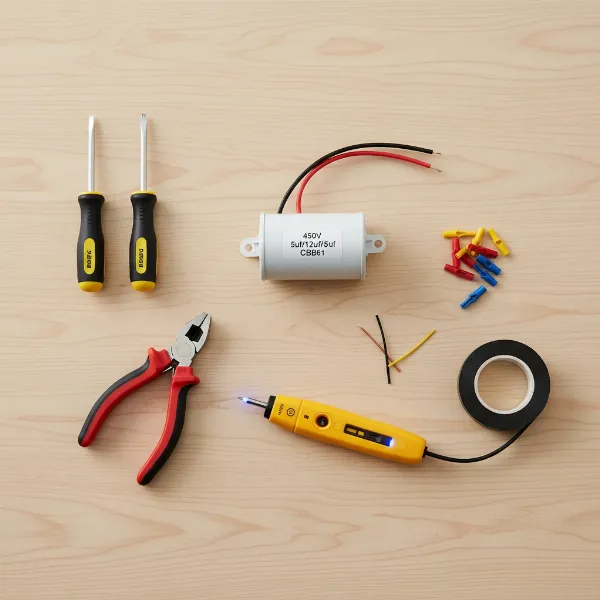 Essential tools laid out for a DIY ceiling fan capacitor replacement.
Step 5: Reassemble the Fan
Once all connections are made and secured, carefully tuck the wires back into the fan’s motor housing, ensuring they won’t interfere with the fan’s rotation or become pinched. Reattach the canopy, securing it with its screws, then reinstall the light fixture and bulbs if you removed them. Double-check that all components are tightly fastened.
Step 6: Restore Power and Test
Descend your ladder and return to your electrical panel. Flip the circuit breaker back to the “on” position. Now, test your ceiling fan. Turn it on and cycle through all the speed settings. If the replacement was successful, your fan should now spin at full speed on all settings, quietly and efficiently, just like new!
Troubleshooting Common Issues After Replacement
Even with careful execution, sometimes issues can persist. Here’s what to check:
- Fan still not working or running slow: Double-check all wire connections. Ensure the new capacitor’s µF and voltage ratings precisely match the original. Sometimes, other components like the pull chain switch or motor windings might be faulty.
- Humming noise: This could indicate loose wiring, incorrect connections, or an underlying motor issue not related to the capacitor. Recheck your wiring carefully.
Extending Your Ceiling Fan’s Lifespan: Maintenance Tips
While capacitor replacement is a great fix, a few simple maintenance practices can help prolong the life of your fan and its components:
- Regular Cleaning: Dust and grime can accumulate on fan blades and within the motor housing, potentially leading to overheating. Clean your fan regularly.
- Ensure Proper Ventilation: Make sure the area around the fan motor is not obstructed, allowing for adequate airflow to prevent overheating.
- Check for Loose Connections: Periodically inspect electrical connections within the fan to prevent fluctuations in power that could stress components like the capacitor.
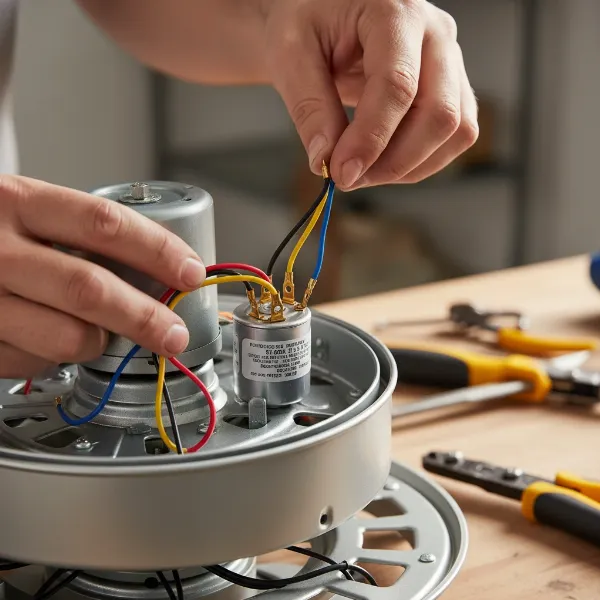 Hands connecting wires to a new ceiling fan capacitor during installation.
Conclusion
A slow or non-functioning ceiling fan doesn’t have to be a major headache or an expensive replacement. By understanding the role of the capacitor, recognizing the signs of its failure, and following a few careful steps, you can confidently replace this small but mighty component yourself. This DIY repair not only saves you money on professional service but also empowers you with the knowledge to tackle common household electrical fixes. So, grab your tools and get ready to enjoy a perfectly functioning ceiling fan once again. What other home repairs are you ready to conquer next?
Frequently Asked Questions
How do I know if my ceiling fan capacitor is bad?
Common signs include the fan not starting, running very slowly on all or some settings, making a humming noise without spinning, or needing a manual push to start. You might also observe physical damage like bulging or leaking on the capacitor itself.
Can I use a capacitor with a different µF rating?
No, it is crucial to use a new capacitor with the exact same microfarad (µF) rating as the original. Using a different µF rating can damage the fan motor or cause it to operate incorrectly. You can use a capacitor with an equal or slightly higher voltage rating.
What tools do I need to replace a ceiling fan capacitor?
You’ll need a screwdriver, wire cutters/strippers, wire nuts or electrical tape, a voltage tester for safety, and the new capacitor. A camera for documenting wiring and a sturdy ladder are also highly recommended.
Is replacing a ceiling fan capacitor dangerous?
Any electrical work carries risks. However, if you strictly follow safety precautions, especially turning off the power at the circuit breaker and verifying with a voltage tester before starting, the process is generally safe for DIY enthusiasts. If you are uncomfortable, consider hiring a professional.
Where can I find the correct replacement capacitor?
You can typically find replacement capacitors at hardware stores, home improvement centers, or online retailers. Make sure to match the microfarad (µF) and voltage (VAC) ratings precisely to your old capacitor, which are usually printed on its casing.
My fan works after replacement, but a certain speed is still slow. What could be wrong?
If a specific speed remains slow, it could indicate that the new capacitor’s specifications aren’t perfectly matched, or there might be an issue with the fan’s speed selector switch or internal wiring related to that particular speed. Double-check all connections and the capacitor’s ratings.