Your old electric fan, a steadfast companion against the heat, might be showing its age with dull, chipped, or outdated blades. Instead of replacing the entire unit, which can be both costly and unnecessary, consider a transformative DIY project: painting the fan blades. This simple refresh can dramatically alter the aesthetics of your room, breathing new life into a functional fixture and allowing you to customize it to perfectly match your evolving decor. With a little effort and the right approach, you can turn an eyesore into an attractive design element.
Why Update Your Fan Blades? The Benefits of a Fresh Coat
|
Our Picks for the Best electric fan in 2026
As an Amazon Associate I earn from qualifying purchases.
|
||
| Num | Product | Action |
|---|---|---|
| 1 | Dreo Fan for Bedroom, 12 Inches, 70ft Powerful Airflow, 28db Quiet Table Air Circulator Fans for Whole Room, 120° Adjustable Tilt, 3 Speeds, Desktop Fan for Home, Office, Kitchen |

|
| 2 | 10\" Modern Standing Fan for Bedroom, Sleek Oscillating Pedestal Fan, 3-Speed & Height Adjustable Compact Floor Fan for Home Office & Dorm |
|
| 3 | Dreo Fan for Bedroom, 120° Oscillating Standing Fans, Quiet Floor Fan with DC Motor, 100ft Pedestal Fans for Room, 9 Speeds, 4 modes, 20dB, 120° Manual Vertical, 37-42\" Adjustable Height, 9H Timer |
|
| 4 | LEVOIT Tower Fan for Bedroom, 25ft/s Velocity Standing Fan with 28dB Quiet for Sleep, Remoter, 12H Timer, 5 Speeds, 4 Modes, 90° Oscillation for Home, Office, Indoor, Bladeless 36 inch, White |
|
| 5 | Amazon Basics 16\" Pedestal Fan with Remote, Floor Fan, Standing Fan for Bedroom, Living Room, Office, with 3 Speeds, 3 Modes, Timer, Dual-Layered Blades, Adjustable Height, Tilt Head, 60W, Black |
|
| 6 | Amazon Basics 20\" High Velocity Industrial Fan, Floor Fan, with 3 Speeds, Tilt Head, ETL-Listed Safety Compliance, Metal Housing/Blades, Ideal for Industrial/Commercial Space/Garage/Gym, 125W, Black |
|
| 7 | Amazon Basics Air Circulator Fan, Desk Fan for Bedroom, Home and Office, With 90-Degree Tilt Head, 3 Speed Settings, Lightweight (3 LBS), 35 Watts, Black, 11.1\"W x 6.3\"D x 10.9\"H |
|
| 8 | Dreo Tower Fan for Bedroom, 25ft/s Velocity Quiet Floor Fan, 90° Oscillating Fans for Indoors with 4 Speeds, 4 Modes, 8H Timer, Standing Fans, Bladeless Fan, Black, Nomad One (DR-HTF007) |
|
| 9 | Dreo Tower Fan for Bedroom, 90° Oscillating Standing Fans for Room with 4 Speeds, 3 Modes, 28dB Quiet for Sleep, 25ft/s Velocity, 8H Timer, Remote, Living Room, Office, Home, Black |
|
| 10 | Lasko 2520 Oscillating Stand Fan,White 16 Inch |
|
Updating your fan blades offers several compelling advantages beyond mere aesthetics. A fresh coat of paint can protect the blade material from further wear and tear, extending the life of your fan. It’s an incredibly cost-effective way to achieve a significant visual impact, giving your space a modern or personalized touch without a major renovation budget. Furthermore, choosing a new color or finish can complement other elements in your room, tying the overall design together seamlessly. This DIY project empowers you to express your creativity and achieve a custom look that off-the-shelf fans simply can’t provide.
Assessing Your Fan Blades: Material Matters
Before diving into paint, it’s crucial to understand the material of your fan blades. Most fan blades are made from wood (often MDF), plastic, or metal, and each material requires slightly different preparation and paint choices to ensure optimal adhesion and durability. Identifying the material will guide your selection of primers, paints, and sanding techniques, contributing to a professional-looking finish that stands the test of time.
Wood, Plastic, or Metal?
- Wood/MDF Blades: Often appear solid or have a wood grain finish. These are generally easy to paint but may require specific primers, especially if they are a laminate-covered MDF.
- Plastic Blades: Can vary in flexibility and surface texture. Some plastic blades may be designed to mimic wood. Certain paints adhere well to plastic without extensive prep, while others might require a special primer.
- Metal Blades: Typically found on industrial or older fan models. Metal surfaces need proper cleaning to remove rust and often require a rust-inhibiting primer to prevent future corrosion.
When to Repaint vs. Replace
While painting is an excellent solution for cosmetic issues, there are instances when replacement is the better option. If your fan blades are severely warped, cracked, or structurally damaged, painting won’t solve the underlying problem, and replacement blades or a new fan might be necessary. Similarly, if your blades are made from MDF and the finish is peeling significantly, covering them with a wood-grain vinyl or replacing them might be more effective than attempting to paint over the damage. Evaluate the extent of the damage; minor scratches, fading, or outdated colors are perfect candidates for a repaint.
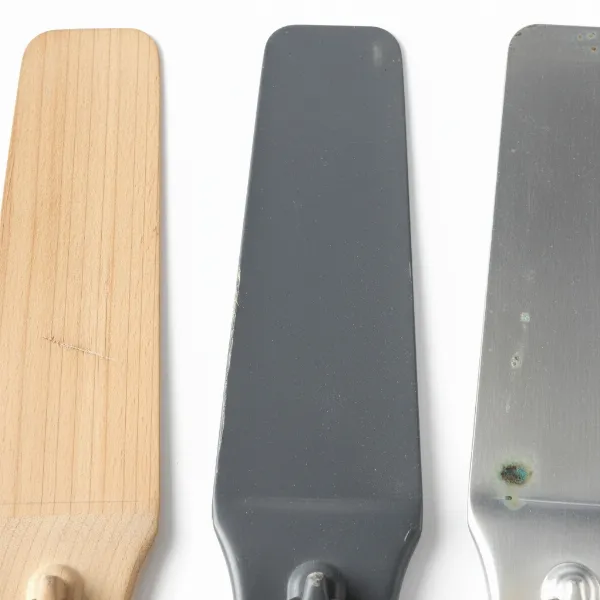 A close-up of different ceiling fan blades showing wood, plastic, and metal materials with varying wear.
Gather Your Arsenal: Essential Tools and Materials
A successful fan blade painting project starts with having the right tools and materials on hand. Preparation is key, so don’t skip this step.
Disassembly & Cleaning Supplies
- Screwdrivers/Wrench: To remove blades and possibly the entire fan from the ceiling.
- Plastic Baggies: For organizing screws and small parts.
- All-Purpose Cleaner/Mild Soap and Water: For degreasing and cleaning the blades.
- Clean Rags/Microfiber Cloths: For wiping and drying.
- Drop Cloths or Newspaper: To protect your work surface from paint.
Sanding & Priming Essentials
- Sanding Block or 80-120 Grit Sandpaper: To scuff the surface for better paint adhesion.
- Deglosser (Optional, for wood/laminate): If your wood blades have a glossy finish and you prefer not to sand heavily.
- Primer: A good quality all-surface primer, or a specialized primer for plastic/metal if necessary. Some paints include primer, like Rust-Oleum Universal Metallic Paint & Primer In One.
- Painter’s Tripods (Optional): Helpful for elevating blades during painting and drying.
Choosing the Right Paint
- Spray Paint: Highly recommended for achieving a smooth, even finish and helping to maintain blade balance [cite: 2 (Del Mar), 4 (Quora)]. Look for enamel spray paint, often with built-in primer for convenience. Rust-Oleum 2X Ultra Cover Primer and Behr Premium Black Satin Spray Paint are popular choices [cite: 5 (The DIY Guide)].
- Chalk Paint: Offers a matte, soft finish and can be applied with a brush, creating unique textures [cite: 1 (Down Bliss Lane)].
- Specialty Ceiling Paint: Products like Zinsser Covers Up Stain Sealing Ceiling Paint are formulated for superior adhesion and stain-blocking on ceiling surfaces and moving parts, ideal for covering discoloration or yellowing [cite: 2 (Best Paint Options)].
- Paint Brushes/Rollers (for non-spray paints): If using brush-on paints, ensure you have appropriate sizes for even application.
Safety Gear & Workspace Protection
- Safety Glasses: To protect your eyes from dust and paint.
- Gloves: To protect your hands from chemicals and paint.
- Mask/Respirator: Especially important when sanding or using spray paint in a well-ventilated area.
- Ventilated Workspace: Essential for spray painting to prevent paint mist from settling on other surfaces [cite: 4 (Nani’s Notebook)]. A garage with the door open is ideal [cite: 5 (Sunshine and Rainy Days)].
The Step-by-Step Guide to Painting Fan Blades
Transforming your fan blades is a rewarding DIY project that can be completed in a few straightforward steps. Follow this guide for a durable and aesthetically pleasing result.
Step 1: Safely Disassemble Your Fan
Safety first! Before beginning, ensure the power to your fan is completely cut off at the circuit breaker. Once the power is off, carefully remove the fan from the ceiling, if it’s a ceiling fan, or unplug it if it’s a standing fan. Next, detach the blades from the fan motor or brackets. Keep all screws and small components organized in a plastic baggie—this will save you headaches during reassembly. Taking the fan down and working in a separate, well-ventilated area like a garage is highly recommended, especially when using spray paint, to prevent overspray from coating your furniture and walls [cite: 4 (Nani’s Notebook)].
Step 2: Thorough Cleaning for Optimal Adhesion
Dust, grime, and oils accumulate on fan blades over time, and these must be completely removed for paint to adhere properly. Use an all-purpose cleaner or a mixture of mild soap and water with a scrub sponge or cloth to thoroughly clean both sides and the edges of each blade [cite: 1, 2, 5 (Sunshine and Rainy Days)]. Pay close attention to any caked-on residue. After cleaning, rinse them well and allow them to air dry completely. Any leftover debris or moisture can compromise the paint finish.
Step 3: Prepare the Surface with Sanding (and Deglossing if needed)
Proper surface preparation is crucial for paint adhesion. Lightly sand the entire surface of each blade with 80 to 120-grit sandpaper or a sanding block [cite: 1, 2, 5 (Sunshine and Rainy Days)]. This process “roughs up” the surface, creating microscopic etches for the primer and paint to grip. For wooden blades, sand in the direction of the grain. After sanding, wipe away all dust with a clean, damp cloth and let the blades dry again. If your blades have a very glossy finish and you’re reluctant to sand extensively, a deglosser can be used, particularly for wood blades.
Step 4: Prime for a Flawless Finish
Priming is a non-negotiable step for a professional and long-lasting finish, especially if you’re making a drastic color change or painting over stained or discolored blades [cite: 2 (Del Mar)]. Apply one to two thin, even coats of an all-surface primer. If your paint has built-in primer, you might be able to skip a separate priming step, but a dedicated primer often offers superior adhesion and stain-blocking, particularly for covering yellowing or old stains [cite: 2 (Best Paint Options)]. Hold the spray can 8-12 inches away and use a steady, sweeping motion [cite: 1 (True Value)]. Allow adequate drying time between coats as specified by the manufacturer.
Step 5: Apply Your Chosen Color
Once the primer is dry, it’s time for the color. If using spray paint, maintain a distance of 8-12 inches from the surface and apply light, even coats with a consistent side-to-side sweeping motion [cite: 1 (True Value), 2 (Del Mar)]. This technique prevents drips and ensures an even finish. Start by painting the “top” side of the blades (the side facing the ceiling), then once dry, flip them over to paint the “bottom” side and carefully cover all edges [cite: 5 (Sunshine and Rainy Days)]. Apply multiple thin coats rather than one thick one, allowing each coat to dry to the touch before applying the next. Don’t forget to paint the heads of any exposed screws for a cohesive look [cite: 5 (The DIY Guide)].
Step 6: Allow for Proper Drying and Curing
Patience is a virtue in painting. While the paint may feel dry to the touch within an hour, it needs more time to fully cure and harden. Allow at least 24 hours for the paint to fully dry before handling or reassembling the fan [cite: 1 (True Value)]. Rushing this step can lead to smudges, fingerprints, or even paint peeling when the fan is put back into use. Check the paint manufacturer’s recommendations for specific drying and curing times, especially before reassembly.
Step 7: Reassemble and Reinstall with Care
Once the blades are completely dry and cured, carefully reattach them to the fan brackets, using the screws you saved. Ensure all screws are tightened securely. Then, reinstall the fan, reconnecting all wiring as it was initially. Before turning on the power, double-check all connections and confirm that the blades are firmly in place and correctly oriented.
Creative Flair: Ideas for Stunning Fan Blade Designs
Painting your fan blades is an opportunity to let your creativity shine. Beyond a simple solid color, you can explore various designs to make your fan a true statement piece.
Classic Solid Colors
A fresh solid color can dramatically update an old fan. Choose a neutral shade like matte black, crisp white, or a muted gray for a sophisticated, modern look that blends seamlessly with most decors. For a pop of color, select a shade that complements your room’s accent colors, turning the fan into a focal point.
Modern Patterns and Geometrics
Masking tape can be your best friend for creating eye-catching patterns. Apply painter’s tape to create stripes, chevron patterns, or other geometric designs. Paint over the tape, allow it to dry, and then carefully peel the tape away to reveal sharp, clean lines. This approach can give your fan a custom, artistic feel.
Gradient and Ombre Effects
For a softer, more artistic touch, consider an ombre or gradient effect. This involves blending two or more colors seamlessly along the length of the blade, transitioning from light to dark or one hue to another. This technique requires a bit more practice but can result in a uniquely elegant finish.
“A well-painted fan isn’t just a functional item; it’s an elevated design detail that reflects your personal style and attention to your living space.” – Eleanor Vance, Interior Design Consultant
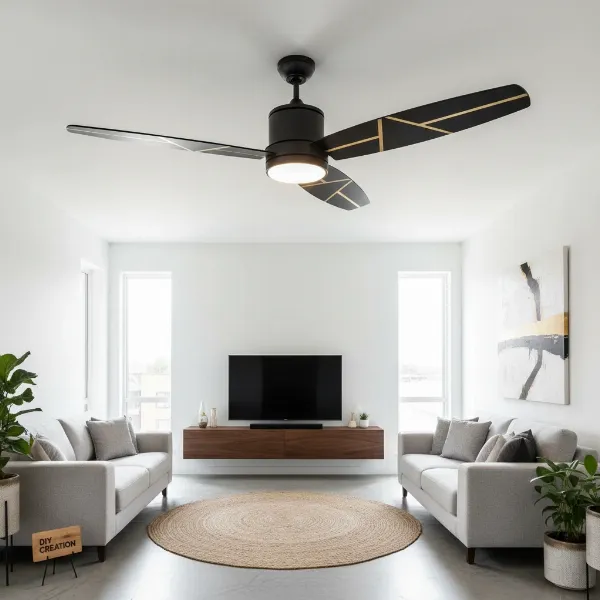 A beautifully painted ceiling fan with custom geometric patterns, showcasing a modern and refreshed aesthetic.
Troubleshooting Common Painting Pitfalls
Even with careful preparation, issues can arise. Knowing how to troubleshoot common painting problems can save your project.
Uneven Coverage or Streaks
This often results from applying paint too thickly, not enough coats, or inconsistent spray distance/brush strokes.
- Fix: If the paint is still wet, you might be able to smooth it out with another light, even coat. If dry, gently sand the uneven areas and reapply thin coats until the coverage is uniform.
Drips, Runs, and Bubbles
These are usually caused by applying too much paint at once, holding the spray can too close, or painting in humid conditions. Bubbles can also indicate inadequate surface cleaning or insufficient drying time between coats.
- Fix: For drips and runs, allow the paint to fully dry, then carefully sand them smooth before reapplying a light coat. For bubbles, sand them down and ensure the surface is clean and dry before repainting.
Peeling Paint: Prevention and Fixes
Peeling paint is almost always due to improper surface preparation, such as not cleaning or sanding adequately, or not using a primer appropriate for the blade material.
- Prevention: Thorough cleaning, proper sanding, and a good quality primer are your best defense.
- Fix: You’ll need to strip the peeling paint, re-prep the surface meticulously (clean, sand, prime), and then repaint. This highlights the importance of initial preparation.
Maintaining Your Newly Painted Fan Blades
Once your fan blades are beautifully repainted, a little ongoing care will keep them looking new for years to come.
Regular Cleaning for Longevity
Dust and grime will inevitably accumulate on fan blades. Regular, gentle cleaning is essential. Use a soft, damp cloth to wipe down the blades every few weeks. Avoid abrasive cleaners or harsh scrubbing, which can damage the paint finish. For stubborn spots, a mild soap solution should suffice.
Protecting the Finish
While most paints are durable, direct impacts or sharp objects can chip the finish. Be mindful when cleaning or moving furniture around the fan. If you notice any small chips or scratches, a quick touch-up with your leftover paint can prevent them from worsening and keep your blades looking pristine.
Conclusion: A Simple DIY for a Big Impact
Painting your old fan blades is a wonderfully effective and affordable DIY project that can dramatically refresh the look of your home. From careful disassembly and meticulous cleaning to strategic sanding, priming, and painting, each step contributes to a durable, beautiful finish. Whether you opt for a sleek solid color or an intricate pattern, a newly painted fan becomes a testament to your personal style and a testament to the power of a creative home makeover. Why settle for an outdated fan when a vibrant new look is just a few steps away?
Frequently Asked Questions
What type of paint is best for fan blades?
Spray paint, particularly enamel-based formulas with built-in primer, is highly recommended for fan blades. It provides an even coating and helps maintain blade balance. Chalk paint offers a unique matte finish, and specialty ceiling paints can provide excellent adhesion and stain-blocking properties.
Do I need to sand fan blades before painting?
Yes, light sanding with 80-120 grit sandpaper is generally crucial. It creates a slightly roughened surface, allowing the primer and paint to adhere much better and preventing peeling. Some specific paints for plastic or those with integrated primer might require less sanding, but it’s always recommended for durability.
How do I prevent my painted fan blades from wobbling?
Wobbling usually isn’t caused by the paint itself, but uneven paint application could theoretically contribute. Using spray paint and applying thin, even coats helps maintain the original weight distribution of the blades. Always ensure the blades are reattached securely and the fan housing is properly installed and balanced after painting.
Can I paint fan blades while they are still installed?
It is strongly advised against painting fan blades while they are still installed. This can lead to overspray settling on furniture, walls, and potentially damaging the fan’s motor. Always disassemble the fan and remove the blades to paint them in a well-ventilated area for the best and safest results.
How long do painted fan blades last?
With proper preparation, quality paint, and good maintenance, painted fan blades can last for many years. The longevity depends on factors like the type of paint used, the thoroughness of the preparation, and how regularly they are cleaned and protected from damage. Regular, gentle cleaning helps preserve the finish.