Is your electric fan stuck in overdrive, refusing to offer anything but a powerful blast of air? This common frustration often means your fan only operates at its highest setting, denying you the gentler breezes of lower speeds. Before you relegate that noisy powerhouse to the scrap heap, know that this issue is frequently repairable with a bit of troubleshooting and a few simple steps. From identifying a failing speed control component to addressing underlying mechanical problems, understanding the root cause is the first step toward restoring your fan’s full functionality. This guide will walk you through diagnosing and fixing your electric fan, helping you enjoy customized cooling once again.
Understanding Fan Speed Control Mechanisms
Electric fans utilize various methods to regulate their speed, depending on the fan type and its power source. Most household AC-powered fans, like pedestal, box, and ceiling fans, typically rely on a capacitor to initiate motor rotation and maintain consistent speeds. The capacitor stores electrical energy and releases it to create a phase shift in the motor’s windings, which is crucial for starting and running at different speeds. A failing capacitor often results in a fan that starts slowly, struggles to reach full speed, or, notably, only runs on its highest setting because the direct high-speed circuit bypasses the compromised capacitor.
Conversely, many automotive cooling fans or certain HVAC blower motors, which are often DC-powered, use a blower motor resistor (BMR) to control speed. The BMR reduces the voltage supplied to the motor for lower speed settings. High speed usually bypasses this resistor entirely, receiving full voltage. When the resistor fails, due to overheating or excessive current draw, the lower speed circuits are interrupted, leaving only the high-speed setting functional. Understanding which mechanism your fan employs is key to an accurate diagnosis and effective repair.
Common Culprits Behind High-Speed-Only Operation
When your electric fan refuses to work on anything but its highest setting, several components could be at fault. Identifying the specific cause is crucial for a targeted repair.
Faulty Speed Control Switch
|
Our Picks for the Best electric fan in 2026
As an Amazon Associate I earn from qualifying purchases.
|
||
| Num | Product | Action |
|---|---|---|
| 1 | Dreo Fan for Bedroom, 120° Oscillating Standing Fans, Quiet Floor Fan with DC Motor, 100ft Pedestal Fans for Room, 9 Speeds, 4 modes, 20dB, 120° Manual Vertical, 37-42\" Adjustable Height, 9H Timer |

|
| 2 | Dreo Tower Fan for Bedroom, 90° Oscillating Standing Fans for Room with 4 Speeds, 3 Modes, 28dB Quiet for Sleep, 25ft/s Velocity, 8H Timer, Remote, Living Room, Office, Home, Black |
|
| 3 | Lasko 2520 Oscillating Stand Fan,White 16 Inch |
|
| 4 | Amazon Basics 16\" Pedestal Fan with Remote, Floor Fan, Standing Fan for Bedroom, Living Room, Office, with 3 Speeds, 3 Modes, Timer, Dual-Layered Blades, Adjustable Height, Tilt Head, 60W, Black |
|
| 5 | Dreo Fan for Bedroom, 12 Inches, 70ft Powerful Airflow, 28db Quiet Table Air Circulator Fans for Whole Room, 120° Adjustable Tilt, 3 Speeds, Desktop Fan for Home, Office, Kitchen |
|
| 6 | 10\" Modern Standing Fan for Bedroom, Sleek Oscillating Pedestal Fan, 3-Speed & Height Adjustable Compact Floor Fan for Home Office & Dorm |
|
| 7 | Amazon Basics Air Circulator Fan, Desk Fan for Bedroom, Home and Office, With 90-Degree Tilt Head, 3 Speed Settings, Lightweight (3 LBS), 35 Watts, Black, 11.1\"W x 6.3\"D x 10.9\"H |
|
| 8 | LEVOIT Tower Fan for Bedroom, 25ft/s Velocity Standing Fan with 28dB Quiet for Sleep, Remoter, 12H Timer, 5 Speeds, 4 Modes, 90° Oscillation for Home, Office, Indoor, Bladeless 36 inch, White |
|
| 9 | Amazon Basics 20\" High Velocity Industrial Fan, Floor Fan, with 3 Speeds, Tilt Head, ETL-Listed Safety Compliance, Metal Housing/Blades, Ideal for Industrial/Commercial Space/Garage/Gym, 125W, Black |
|
| 10 | Dreo Tower Fan for Bedroom, 25ft/s Velocity Quiet Floor Fan, 90° Oscillating Fans for Indoors with 4 Speeds, 4 Modes, 8H Timer, Standing Fans, Bladeless Fan, Black, Nomad One (DR-HTF007) |
|
The most straightforward culprit is often the speed control switch itself. This component is responsible for connecting different circuits to regulate the motor’s voltage, and thus its speed. Over time, mechanical wear, corrosion, or burnt contacts within the switch can prevent the lower speed settings from engaging properly. If the switch feels loose, unresponsive, or visually damaged, it’s a strong candidate for replacement. Testing the switch with a multimeter for continuity across its various settings can confirm if it’s failing to complete the circuits for lower speeds.
Failed Blower Motor Resistor (BMR)
Common in automotive heating and cooling systems or some larger industrial fans, a blower motor resistor (BMR) is designed to create resistance in the electrical circuit, thereby reducing the voltage to the motor for lower speeds. The highest speed setting typically bypasses the resistor entirely. If the BMR fails, usually due to overheating, the lower speed circuits are broken, and only the highest speed will work. Repeated BMR failures can often indicate a more significant issue, such as a seizing blower motor drawing excessive current. Therefore, when replacing a BMR, it is advisable to also check the blower motor for any signs of stiffness or resistance to rotation.
Worn or Damaged Capacitor
For most household AC-powered fans, the capacitor is a critical component for smooth operation at all speeds. A capacitor provides the necessary phase shift to start the motor and maintain efficient rotation. When a capacitor begins to degrade or fails entirely, the fan motor loses its ability to generate sufficient starting torque or maintain lower speeds effectively. Symptoms of a bad capacitor can include the fan requiring a manual push to start, running sluggishly on all speeds, or operating solely on the highest setting. Visually, a bulging or leaking capacitor is a clear sign of failure, though many fail without obvious external damage.
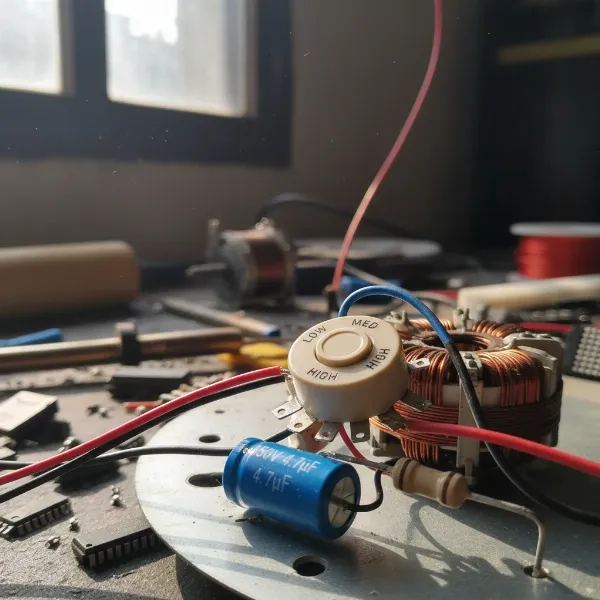 Electric fan speed control components showing resistors and capacitor
Seized or Worn Motor Bearings
Internal motor issues, particularly with the bearings, can also contribute to a fan only working on high speed. When motor bearings become worn, dry, or seized, the motor has to exert much more effort to turn the fan blades. This increased friction and resistance can cause the motor to draw excessive current, potentially leading to overheating and damage to speed control components like resistors. In some cases, the motor simply can’t overcome the friction at lower power settings, only managing to spin when receiving full voltage on high speed. Signs of worn bearings include grinding noises, difficulty starting, or the fan blade feeling stiff when turned by hand.
Damaged Wiring or Connections
Less common but still possible, damaged or loose wiring within the fan’s speed control circuit can interrupt the flow of electricity to lower speed settings. Frayed wires, corroded terminals, or loose connections can prevent the appropriate voltage from reaching the motor when a lower speed is selected. A thorough visual inspection of all wiring and connections, especially around the speed switch, capacitor, or resistor, can help identify such issues.
Step-by-Step Troubleshooting and Repair Guide
Addressing a fan that only works on high speed requires a systematic approach. Always prioritize safety before beginning any repairs.
1. Safety First: Disconnect Power
Absolutely paramount: Before you touch any internal components, unplug the fan from the power outlet. For ceiling fans, also switch off the corresponding circuit breaker. This prevents electrical shock and potential damage to the fan. If your fan has a capacitor, it might retain a charge even after unplugging. It’s wise to discharge it by carefully touching both terminals with an insulated screwdriver (ensure the screwdriver handle is properly insulated and your hands are dry) before handling the capacitor directly.
2. Visual Inspection and Basic Cleaning
Begin by visually inspecting the fan. Accumulated dust and debris can impede motor function and airflow.
- Clean the blades and guards: Use a damp cloth to remove any grime.
- Check for obstructions: Ensure nothing is physically blocking the fan blades.
- Inspect wiring: Look for any frayed, burnt, or loose wires. Tighten any visible loose connections.
- Motor housing: Check for signs of overheating like discolored plastic or a burning smell.
3. Test the Speed Control Switch
For fans with a mechanical switch (not remote-controlled or digital), this is a good place to start.
- Access the switch: You’ll need to disassemble part of the fan housing to get to it.
- Visual check: Look for physical damage, melted plastic, or corrosion on the terminals.
- Continuity test (with a multimeter): With the fan unplugged, set your multimeter to continuity mode. Test the switch positions. The high-speed setting should show continuity, and ideally, lower speeds should also show continuity through different terminals or resistors. If lower speeds show no continuity, the switch is likely faulty.
- Replacement: If the switch is bad, replace it with an identical part, matching voltage and amperage ratings.
4. Inspect and Test the Capacitor (for AC Household Fans)
The capacitor is a frequent cause for AC fans.
- Locate the capacitor: It’s usually a cylindrical or rectangular component, often black, gray, or silver, located near the motor. It will have two or more wires connected to it.
- Visual check: Look for bulging, leaks, or burnt marks. These are clear indicators of failure.
- Capacitance test (with a multimeter): If your multimeter has a capacitance setting, you can test the capacitor’s microfarad (µF) rating. First, ensure it’s discharged. Disconnect at least one wire from the capacitor, then connect the multimeter probes to its terminals. Compare the reading to the stated µF value on the capacitor. A reading significantly lower than specified indicates a failing capacitor.
- Replacement: If faulty, replace the capacitor with one that has the exact same µF rating and an equal or higher voltage rating. Incorrect µF ratings can damage the motor.
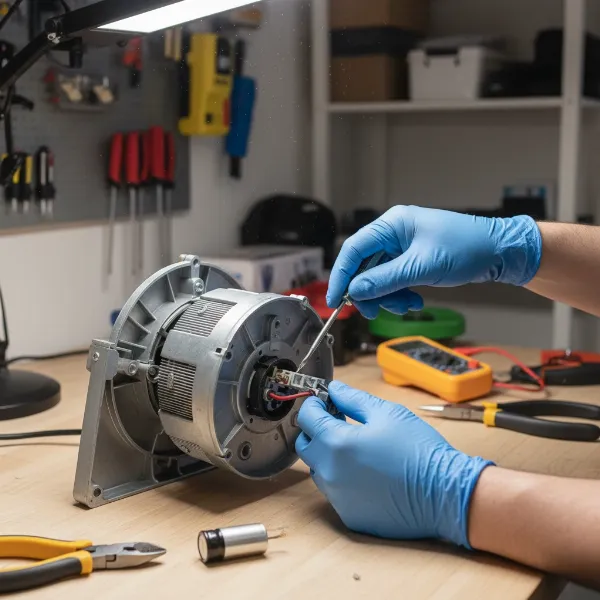 Steps to safely replace a fan's capacitor for speed repair
5. Check and Lubricate Motor Bearings
Stiff bearings increase motor resistance.
- Disassemble the motor: Carefully remove the fan blades and motor housing to expose the motor shaft and bearings. The instructables.com guide provides excellent detail for this.
- Clean the bearings: Use a degreaser or rubbing alcohol to clean any old, gummy grease or dirt from the bearing points on the motor shaft and within the bearing housing.
- Lubricate: Apply a few drops of light machine oil (e.g., 3-in-1 oil, or specialized motor oil) or a small amount of multi-purpose lithium grease to the bearings. Do NOT use WD-40, as it’s a penetrant, not a long-term lubricant, and can attract dust.
- Test rotation: Manually spin the motor shaft to ensure it turns freely without resistance.
- Reassemble: Carefully put the motor and fan back together, ensuring all wires are reconnected properly and not pinched.
 Lubricating electric fan motor bearings to restore proper speed
6. Examine the Blower Motor Resistor (if applicable)
If you suspect this is for an automotive or HVAC blower fan:
- Locate the BMR: It’s usually found in the air duct housing near the blower motor.
- Visual check: Look for signs of burning, corrosion, or a broken coil.
- Continuity test: With the fan unplugged, use a multimeter to check continuity across the resistor’s terminals. A broken circuit indicates failure.
- Check the blower motor: Before replacing a BMR, ensure the blower motor itself spins freely. If it’s stiff or seizing, it will likely cause the new resistor to fail again.
- Replacement: Replace with an exact match.
7. Check for Damaged Wiring
Even if a specific component is the primary failure, damaged wiring can contribute or be a separate issue. Trace all wires leading to and from the speed control, capacitor, and motor. Look for cuts, crimps, or areas where insulation has melted or worn away. Repair any damaged wires with electrical tape or heat-shrink tubing, or replace sections if severely damaged.
When to Call a Professional
While many fan repairs are DIY-friendly, some situations warrant professional help:
- Lack of experience or comfort with electrical work: If you’re unsure about handling electrical components, especially with higher voltage AC fans, it’s safer to consult an electrician or appliance repair technician.
- Complex fan designs: Some modern smart fans or intricate ceiling fans can be difficult to disassemble and troubleshoot.
- Motor winding issues: If the problem lies deep within the motor windings (e.g., a short or open circuit), this usually requires specialized tools and expertise to repair or rewind, making replacement often more cost-effective.
- Persistent issues: If you’ve tried the common fixes and the problem persists, a professional can offer a more in-depth diagnosis.
Maintenance Tips to Prevent Future Issues
Regular maintenance can extend your fan’s lifespan and prevent common problems:
- Regular Cleaning: Dust and dirt are enemies of fan motors and components. Clean your fan blades, guards, and motor housing regularly.
- Keep Vents Clear: Ensure the motor’s ventilation openings are free from obstruction to prevent overheating.
- Periodic Lubrication: For fans with accessible bearings, a light application of appropriate lubricant every few years can prevent seizing.
- Proper Storage: If storing a fan for an extended period, ensure it’s clean and covered to prevent dust accumulation.
Conclusion
An electric fan that only works on high speed can be a nuisance, but it’s a problem with clear and often fixable causes. By systematically troubleshooting components like the speed control switch, capacitor, or blower motor resistor, and addressing mechanical issues like seized bearings, you can likely restore your fan to full functionality. Remember to always prioritize safety by disconnecting power before any repairs. With a little patience and the right tools, you can avoid unnecessary replacements and enjoy a full range of cooling options. What steps will you take to bring your fan back to all its speeds?
Frequently Asked Questions
How do I know if my fan capacitor is bad?
A fan capacitor is likely bad if your fan struggles to start, runs slower than usual on all settings, or only works on the highest speed. Visually, look for bulging, leaks, or burn marks on the capacitor itself. You can also test its microfarad (µF) rating with a multimeter; a reading significantly lower than specified indicates failure.
Can a dirty fan motor cause speed problems?
Yes, a dirty fan motor can absolutely cause speed problems. Accumulated dust and grime on the motor, bearings, or fan blades increase friction and resistance. This forces the motor to work harder, drawing more current, which can lead to overheating and strain on speed control components, ultimately affecting lower speed performance.
Is it safe to use a fan that only works on high speed?
While it might seem harmless, a fan that only works on high speed could be a symptom of an underlying issue like a failing capacitor or overheating resistor. Using it could put undue stress on the motor or other components, potentially leading to further damage or, in rare cases, a fire hazard if overheating is severe. It’s best to diagnose and fix the problem.
What tools do I need to fix my fan?
Common tools for fixing fan speed issues include a set of screwdrivers (Phillips and flathead), needle-nose pliers, a wire stripper/cutter, electrical tape, and a multimeter for testing continuity and capacitance. Depending on the repair, you might also need specific replacement parts like a new capacitor, resistor, or speed switch, and light machine oil or grease for lubrication.
Can I repair a fan motor if it’s seized?
Repairing a seized fan motor often involves disassembling the motor to clean and lubricate the bearings. If the bearings are severely worn or damaged, they may need replacement, which can be a more complex task. In some cases, if the motor windings themselves are damaged, repairing it might be more expensive or difficult than replacing the entire motor or fan unit.