Is your old ceiling fan still reliant on pull chains or a wall switch, leaving you longing for the modern convenience of remote control? You’re not alone. Many homeowners cherish their classic ceiling fans but desire an effortless way to adjust settings from anywhere in the room. The good news is, upgrading most older ceiling fans with a remote control is a straightforward DIY project that can dramatically enhance your comfort and the functionality of your space. This comprehensive guide will walk you through everything you need to know, from selecting the right kit to wiring and testing your new remote, ensuring a seamless and safe upgrade.
Understanding Remote Control Kits for Ceiling Fans
Before you begin, it’s helpful to understand the core component that makes this upgrade possible: the universal remote control kit. These kits typically include two main parts: a receiver and a handheld remote transmitter. The receiver is a small electrical module that gets wired into your fan’s canopy, nestled between the household wiring and the fan’s motor and light kit. It interprets signals from the remote and translates them into commands for your fan, controlling speed and light functions.
Most modern universal kits are designed to work with a wide array of ceiling fans, even those that weren’t originally equipped with remote capabilities. However, compatibility is key. Your existing ceiling fan generally needs to have separate wiring for the fan motor and the light kit (if it has one) for optimal integration. Fans with combined fan and light wiring might still be compatible with certain kits, but the installation can be slightly more complex. Flush-mount fans, which sit very close to the ceiling, might pose a challenge due to limited space within the canopy for the receiver. Always check the dimensions of the receiver and the available space in your fan’s canopy before purchasing.
Essential Tools and Materials for the Upgrade
Before you climb that ladder, ensure you have all the necessary tools and materials on hand. Safety and efficiency depend on being well-prepared.
Tools You’ll Need:
- Sturdy Stepladder: Absolutely crucial for safely reaching your ceiling fan.
- Screwdriver Set: Philips head and flathead screwdrivers for removing fan canopy screws and accessing battery compartments.
- Non-Contact Voltage Tester: A vital safety device to confirm the power is off before you begin working on electrical wires.
- Wire Strippers: For cleanly stripping insulation from electrical wires.
- Needle-Nose Pliers: Useful for twisting wires together and securing connections.
- Electrical Tape: To further insulate and secure wire connections.
- Wire Nuts: To create safe and secure connections between wires.
- Flashlight or Headlamp: To illuminate the work area inside the fan canopy.
- Multimeter (Optional but Recommended): For advanced electrical testing and troubleshooting.
Materials You’ll Need:
- Universal Ceiling Fan Remote Control Kit: Choose a kit that includes both a receiver and a remote transmitter. Ensure it’s compatible with your fan’s voltage and features (e.g., fan speed control, light dimming).
- AAA or CR2032 Batteries: For the remote control, as specified by the kit manufacturer.
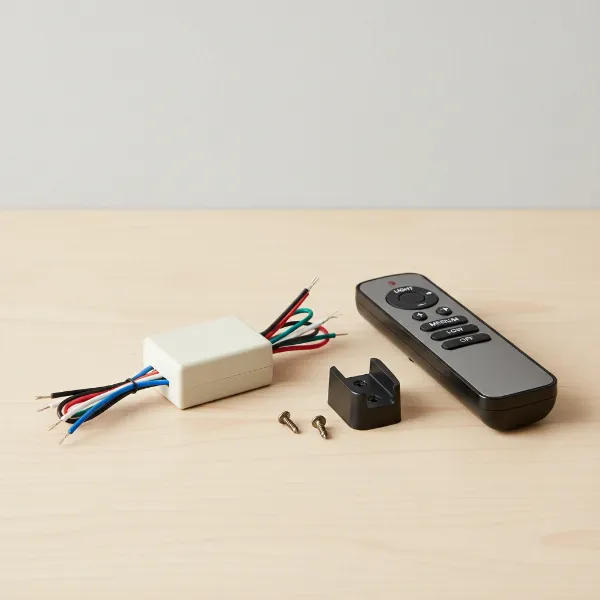 A universal ceiling fan remote control kit with receiver and handheld remote.
Step-by-Step Installation Guide
Upgrading your old ceiling fan with a remote control involves a series of careful steps. Prioritize safety throughout the entire process.
Step 1: Prioritize Safety – Cut the Power!
This is the most critical step. Locate the circuit breaker that controls the power to your ceiling fan and switch it to the “OFF” position. Don’t rely solely on the wall switch.
“Always verify the power is off at the breaker and use a voltage tester. Skipping this step can lead to serious electrical hazards.” – John Doe, Master Electrician
Once the breaker is off, use your non-contact voltage tester to confirm that no power is flowing to the fan’s wiring. Touch the tester to the wires leading into the fan’s junction box. If the tester remains silent and dark, you’re safe to proceed.
Step 2: Prepare Your Fan for the Upgrade
Before dismantling anything, if your fan has pull chains, set the fan speed to “HIGH” and turn the light to the “ON” position. This ensures the fan and light receive full power once the remote receiver is installed, allowing the remote to regulate them. Turn off the wall switch that controls the fan.
Step 3: Access the Fan’s Wiring Canopy
Carefully climb your sturdy stepladder to reach the ceiling fan. The “canopy” is the decorative cover at the top of the fan, where it connects to the ceiling. Loosen or remove the screws securing the canopy to the mounting bracket. Gently slide the canopy down the downrod to expose the wiring connections.
Step 4: Disconnect Existing Wiring
You’ll see several wires connected with wire nuts. Typically, you’ll find:
- Green or Bare Copper: Ground wire.
- White: Neutral wire.
- Black (or Red): Hot wire for the fan motor.
- Blue (or another color): Hot wire for the light kit.
Carefully untwist the wire nuts to disconnect the fan’s wires from the house wiring. You might need to gently pull them apart. Take a moment to note which wires go where, or even take a photo for reference, although your remote kit will provide its own wiring diagram.
Step 5: Install the Remote Receiver
The remote receiver is the brain of your new system. It typically has color-coded wires that match standard electrical wiring.
- Connect the Receiver’s Input Wires (from house power):
- Connect the Black (AC IN L) wire from the receiver to the Black (hot/power) supply wire from your ceiling.
- Connect the White (AC IN N) wire from the receiver to the White (neutral) supply wire from your ceiling.
- Connect the Receiver’s Output Wires (to fan):
- Connect the Black (TO MOTOR L) wire from the receiver to the Black fan motor wire.
- Connect the Blue (FOR LIGHT) wire from the receiver to the Blue fan light wire.
- Connect the White (TO MOTOR N) wire from the receiver to the White fan neutral wire.
- Connect Ground Wires:
- Connect all Green or Bare Copper (ground) wires together: from the house, the fan, and the receiver (if it has one).
Use new wire nuts to secure each connection, twisting them tightly. After securing, gently tug on each wire to ensure the connection is firm and won’t come loose. Wrap each wire nut connection with electrical tape for added insulation and security.
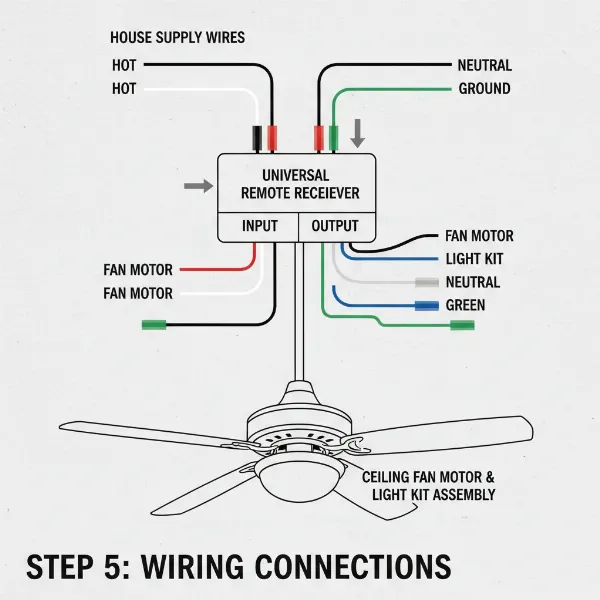 Detailed wiring diagram for connecting a ceiling fan remote receiver to fan and house wires.
Step 6: Position the Receiver
Once all connections are made, carefully tuck the remote receiver into the fan canopy. It needs to fit snugly without pinching any wires or interfering with the fan’s rotation or canopy reattachment. Some canopies offer more space than others, which is why checking receiver dimensions beforehand is important.
Step 7: Reinstall the Fan Canopy
Slide the canopy back up into its original position, covering the wiring and receiver. Secure it with the screws you removed earlier. Ensure it’s flush with the ceiling and securely fastened.
Step 8: Restore Power and Program the Remote
Return to your circuit breaker box and switch the power back to the “ON” position.
Insert the batteries into your remote control. Most universal remote kits have “dip switches” inside the battery compartment or on the receiver itself. These switches allow you to set a unique frequency code to prevent interference with other remotes in your home. Ensure the dip switch settings on your remote match those on the receiver. If your kit doesn’t have dip switches, it might use a pairing button.
To pair the remote:
- Cycle the power to the fan. Turn it off at the wall switch for at least 10-15 seconds, then turn it back on.
- Within a specific timeframe (usually 30 seconds to 3 minutes, check your kit’s manual), press and hold a designated “PAIR” button on your remote. Some remotes require pressing a combination of buttons (e.g., “Fan Off” and “High” simultaneously).
- You should see the fan light blink or hear a beep, indicating successful pairing.
Step 9: Test All Functions
Thoroughly test all functions of your new remote:
- Turn the fan on and off.
- Adjust the fan speeds (low, medium, high).
- Turn the light on and off.
- Test dimming functions if your kit supports it.
If any function doesn’t work, re-check your wiring connections, the dip switch settings, and the remote’s battery. Refer to your kit’s instruction manual for specific troubleshooting steps.
Troubleshooting Common Issues
Even with careful installation, you might encounter a few hiccups. Here are some common issues and their solutions:
The Fan Does Not Respond to the Remote
- Power Check: Double-check that the circuit breaker is on and the wall switch for the fan is in the “ON” position. Use a voltage tester to confirm power is reaching the fan.
- Battery Check: Ensure the remote’s batteries are fresh and inserted correctly, with the positive and negative ends aligned properly.
- Dip Switches/Pairing: Verify that the dip switch settings on the receiver and remote match exactly. If your remote uses a pairing button, repeat the pairing process carefully following the manufacturer’s instructions.
- Wiring Connections: Turn off the power at the breaker, open the canopy, and re-check all wire connections. Ensure they are secure and correctly matched according to the wiring diagram. Loose wires are a common culprit.
Fan Works, But Light Doesn’t (or Vice Versa)
- Specific Wire Connection: This usually points to a specific wiring error for either the fan motor or the light kit. Turn off power and re-examine the connections for the fan’s black wire (motor) and blue wire (light) to the receiver’s output wires.
- Pull Chain Position: Ensure the light’s pull chain is in the “ON” position and the fan’s pull chain is on “HIGH.”
Remote Only Works When Held Close to the Fan
- Receiver Placement: The receiver might be too tightly packed, or its antenna could be obstructed. Turn off power, adjust the receiver’s position within the canopy, ensuring the antenna is not bent or covered by metal.
- Interference: Other electronic devices or even structural elements can sometimes cause interference. Try testing the remote from different locations in the room.
When to Consider Professional Help
While adding a remote control to an old ceiling fan is a manageable DIY project for most, there are situations where calling a qualified electrician is the safest and smartest choice:
- Unusual or Complex Wiring: If your fan’s wiring doesn’t match standard color codes or appears unusually complex, it’s best to consult a professional.
- No Existing Wiring for Light: If your fan originally had no light kit, adding a remote that controls both fan and light may require running new wiring, which an electrician can handle safely.
- Electrical Box Issues: If the existing electrical box in your ceiling isn’t rated for the weight and movement of a ceiling fan, it needs to be replaced. This often involves working within the ceiling joists and is best left to an expert.
- Discomfort with Electrical Work: If you are at all uncomfortable working with electricity, or if you encounter unexpected issues, don’t hesitate to call an electrician. Your safety is paramount.
Conclusion
Upgrading your old ceiling fan with a remote control is a fantastic way to blend classic aesthetics with modern convenience. By carefully following these steps, prioritizing safety, and ensuring correct wiring, you can enjoy the comfort of adjusting your fan’s settings with the touch of a button. This simple enhancement not only adds ease to your daily life but also breathes new life into a beloved fixture, making your home more comfortable and functional.
Ready to take control of your comfort? With a universal remote kit and a bit of DIY spirit, you can transform your old fan into a modern marvel. What feature of your newly remote-controlled fan are you most excited to use?
Frequently Asked Questions
Can I add a remote control to any old ceiling fan?
While most ceiling fans manufactured in the last few decades can be upgraded with a universal remote kit, some very old or basic models may not be compatible. Key factors include having separate wiring for the fan and light, and sufficient space in the fan canopy for the receiver.
Do I need an electrician to install a ceiling fan remote kit?
For most DIY enthusiasts with basic electrical knowledge, installing a remote kit is achievable. However, if you’re uncomfortable working with electrical wiring, your fan’s wiring is unusual, or the ceiling box needs replacement, hiring a professional electrician is highly recommended for safety.
What if my remote and receiver have dip switches?
If your remote kit uses dip switches, ensure the settings (the pattern of switches being “on” or “off”) on the remote control exactly match those on the receiver module. This ensures proper communication and prevents interference with other remote-controlled devices.
My fan light isn’t dimming, even though the remote has a dimming button. Why?
First, ensure your light bulbs are “dimmable” type. Standard LED or incandescent bulbs that are not dimmable will not respond to dimming commands. Also, check your remote kit’s instructions, as some receivers may have a setting or dip switch to enable/disable the dimming function.
How do I know if my ceiling fan has separate wires for the fan and light?
Typically, fans designed to accommodate separate fan and light control will have distinct colored wires for each, usually black for the fan motor and blue for the light kit, in addition to white (neutral) and green/bare (ground). You’ll typically see these wires once you open the fan canopy.
Can I install a remote if my fan currently uses pull chains only?
Yes, most universal remote kits are designed to work with pull-chain fans. The key is to set the fan speed to “HIGH” and the light to “ON” using the pull chains before installing the receiver. This provides constant power to the fan and light, allowing the remote to take over control.