The summer heat can be relentless, turning your home into an unbearable sauna. While conventional air conditioning offers a powerful escape, it often comes with a hefty price tag and significant energy consumption. But what if you could create a noticeable cool breeze using just a fan and some ice? This guide unveils simple, budget-friendly strategies to turn your ordinary fan into a makeshift air conditioner, offering refreshing relief when you need it most. We’ll explore various DIY methods, delve into the science of why they work, and provide practical tips to maximize your cooling efforts.
The Science Behind Fan and Ice Cooling
At its core, cooling a room with a fan and ice harnesses the principles of thermodynamics and evaporative cooling. When ice melts, it absorbs heat from its surroundings in a process called latent heat of fusion. As air from your fan blows over the cold surface of the ice, it transfers some of its thermal energy to the melting ice, causing the air itself to cool down. This chilled air is then circulated throughout the room by the fan.
While this method doesn’t actively remove humidity from the air like a refrigerant-based air conditioner, the lower air temperature can still provide significant comfort. Think of it as creating a localized cool zone, bringing down the perceived temperature and offering a much-needed reprieve from the sweltering heat.
Popular DIY Fan and Ice Methods
Various creative approaches exist for combining a fan and ice to cool a room. Each method offers different levels of effectiveness and ease of setup.
1. The Simple Ice Bowl Method
The simplest and most straightforward method requires minimal effort and materials, making it a go-to for quick relief.
- Materials: You’ll need a standard electric fan (table, tower, or pedestal fan works best), a sturdy bowl (metal or glass bowls are ideal as they conduct cold better than plastic), and a good supply of ice cubes or larger ice blocks. A towel to catch condensation is also recommended.
- How-to: Position your fan to face the area you want to cool. Place the bowl filled with ice directly in front of the fan, ensuring the airflow passes over the ice. Turn on the fan to a medium or high setting. As the air blows across the melting ice, it will pick up the chill and distribute cooler air into the room.
- Tips: For extended cooling, consider freezing water in larger containers like plastic milk jugs or two-liter bottles. These larger ice blocks melt slower than standard cubes. Adding a few tablespoons of salt to the water before freezing can lower its freezing point, potentially making the ice feel colder and melt a bit slower. Always place a towel underneath the bowl to protect furniture from condensation or potential leaks.
- Pros & Cons: This method is incredibly easy to set up and requires no specialized tools. It offers immediate, temporary relief and is highly portable. However, the cooling effect is localized and short-lived, typically lasting only as long as the ice remains frozen. It does not actively reduce humidity, and in very humid environments, the melting ice might even add a small amount of moisture to the air.
|
Our Picks for the Best electric fan in 2026
As an Amazon Associate I earn from qualifying purchases.
|
||
| Num | Product | Action |
|---|---|---|
| 1 | Dreo Fan for Bedroom, 12 Inches, 70ft Powerful Airflow, 28db Quiet Table Air Circulator Fans for Whole Room, 120° Adjustable Tilt, 3 Speeds, Desktop Fan for Home, Office, Kitchen |

|
| 2 | Dreo Tower Fan for Bedroom, 90° Oscillating Standing Fans for Room with 4 Speeds, 3 Modes, 28dB Quiet for Sleep, 25ft/s Velocity, 8H Timer, Remote, Living Room, Office, Home, Black |
|
| 3 | Dreo Fan for Bedroom, 120° Oscillating Standing Fans, Quiet Floor Fan with DC Motor, 100ft Pedestal Fans for Room, 9 Speeds, 4 modes, 20dB, 120° Manual Vertical, 37-42\" Adjustable Height, 9H Timer |
|
| 4 | Amazon Basics 16\" Pedestal Fan with Remote, Floor Fan, Standing Fan for Bedroom, Living Room, Office, with 3 Speeds, 3 Modes, Timer, Dual-Layered Blades, Adjustable Height, Tilt Head, 60W, Black |
|
| 5 | LEVOIT Tower Fan for Bedroom, 25ft/s Velocity Standing Fan with 28dB Quiet for Sleep, Remoter, 12H Timer, 5 Speeds, 4 Modes, 90° Oscillation for Home, Office, Indoor, Bladeless 36 inch, White |
|
| 6 | Amazon Basics Air Circulator Fan, Desk Fan for Bedroom, Home and Office, With 90-Degree Tilt Head, 3 Speed Settings, Lightweight (3 LBS), 35 Watts, Black, 11.1\"W x 6.3\"D x 10.9\"H |
|
| 7 | Lasko 2520 Oscillating Stand Fan,White 16 Inch |
|
| 8 | 10\" Modern Standing Fan for Bedroom, Sleek Oscillating Pedestal Fan, 3-Speed & Height Adjustable Compact Floor Fan for Home Office & Dorm |
|
| 9 | Amazon Basics 20\" High Velocity Industrial Fan, Floor Fan, with 3 Speeds, Tilt Head, ETL-Listed Safety Compliance, Metal Housing/Blades, Ideal for Industrial/Commercial Space/Garage/Gym, 125W, Black |
|
| 10 | Dreo Tower Fan for Bedroom, 25ft/s Velocity Quiet Floor Fan, 90° Oscillating Fans for Indoors with 4 Speeds, 4 Modes, 8H Timer, Standing Fans, Bladeless Fan, Black, Nomad One (DR-HTF007) |
|
2. The Frozen Water Bottle Fan Attachment
This method provides a more directed and potentially longer-lasting cool breeze by integrating the ice directly onto the fan’s structure.
- Materials: You’ll need an electric fan, several plastic water bottles (2-liter or smaller soda bottles work well), a supply of ice, a pair of scissors or a utility knife, and zip ties or strong string.
- How-to:
- Carefully cut the bottom off each plastic bottle and make a few small holes around the sides near the bottom (now the open end) to allow air to circulate.
- Fill these modified bottles with ice cubes. You can also freeze water directly in the bottles before cutting them, then remove the bottoms.
- Attach the ice-filled bottles to the back of your fan’s protective grille using zip ties or string. Position them so the fan’s blades can draw air through or past the ice-filled bottles.
- Turn on the fan. The air pulled into the fan will pass over the ice in the bottles, delivering a chilled airflow.
- Tips: Ensure the bottles are securely attached to prevent them from falling into the fan blades. Consider placing a drip tray or towel beneath the fan to catch any melting ice water. For continuous cooling, have a fresh batch of frozen bottles ready to swap out as the ice melts.
- Pros & Cons: This method offers a more targeted stream of cold air and can be slightly more efficient than a simple ice bowl because the air is forced directly past the ice. It can also be less prone to spills if bottles are sealed well. The main drawbacks include the slightly more involved setup and the need to periodically replace the ice in the bottles.
3. The DIY Cooler/Bucket AC
For those seeking a more robust and somewhat longer-lasting DIY solution, building a cooler or bucket AC offers enhanced performance. This method typically involves a sealed container that channels fan-blown air over a large volume of ice.
- Materials: A Styrofoam cooler or a 5-gallon plastic bucket with a lid, a small personal fan (or a CPU fan), PVC pipes or aluminum ducts (2-3 inches in diameter), a utility knife or drill, and plenty of ice.
- How-to:
- Prepare the Container: Cut one larger hole in the lid of the cooler/bucket for the fan to sit snugly (fan facing down, blowing into the container). Cut 2-3 smaller holes along the upper side of the cooler/bucket, sized to fit your PVC pipes or ducts.
- Insert Ducts: Insert the PVC pipes or ducts into the smaller side holes. These will serve as outlets for the cold air. Ensure a tight fit to minimize air leakage.
- Add Ice: Fill the bottom of the cooler/bucket with a generous amount of ice. Large blocks of ice or frozen water bottles work best for prolonged cooling.
- Assemble and Operate: Place the lid back on, position the fan in its designated hole, and turn it on. The fan will push air into the cooler, over the ice, and out through the pipes, delivering a concentrated stream of cool air.
- Pros & Cons: This setup can generate a more consistent and powerful stream of cold air than the simpler methods, potentially cooling a small area more effectively. The enclosed design helps to contain the cold air for better transfer. However, it requires more tools and effort to construct, is less portable, and still has limitations in cooling a large room or significantly reducing humidity.
“While these DIY methods offer a practical way to combat heat without breaking the bank, it’s crucial to manage expectations. They are supplementary cooling aids, not replacements for a full-fledged air conditioning system.” – Dr. Emily R. Chen, Environmental Engineering Specialist
Factors to Consider for Optimal Cooling
To get the most out of your DIY fan and ice setup, consider these factors:
- Room Size: These DIY solutions are most effective in smaller, enclosed spaces like bedrooms, offices, or personal workstations. Their impact diminishes significantly in larger, open-plan areas.
- Humidity: Understand that melting ice can introduce a slight amount of moisture into the air. In already highly humid environments, this might make the air feel damp, even if it’s cooler. These methods are best for dry heat.
- Ice Duration: The longevity of your cooling effect depends entirely on the ice supply. Larger blocks of ice or multiple frozen water bottles will last longer than a handful of small cubes. Using insulated containers (like Styrofoam coolers) will also help preserve the ice.
- Fan Type: Box fans or pedestal fans with strong airflow are generally most effective for these DIY setups, as they can move a substantial volume of air over the ice.
- Ventilation: While you want to keep cool air in, slight ventilation (e.g., a cracked window in another part of the room) can help with air circulation and prevent the room from becoming too stuffy.
Best Practices for Using Your DIY AC
Follow these tips to maximize comfort and safety:
- Strategic Placement: Position your DIY AC close to you or in the direct path of where you spend most of your time. This creates a personal cool zone.
- Regular Ice Refill: Keep a continuous supply of ice ready. Swap out melted ice with fresh frozen blocks or bottles for uninterrupted cooling.
- Manage Condensation: Always use a towel or a drip tray underneath your ice setup to prevent water damage to floors or furniture.
- Electrical Safety: Ensure that no water comes into contact with the fan’s electrical components or power cords. Keep the fan on a stable, dry surface.
Limitations of DIY Fan and Ice Cooling
While effective for temporary relief, it’s important to acknowledge the inherent limitations of these homemade solutions:
- Temperature Drop: They offer a noticeable cool breeze and can lower the immediate air temperature by a few degrees, but they cannot achieve the significant, consistent temperature reduction of a conventional air conditioner.
- Humidity Management: Unlike proper AC units that dehumidify, these DIY methods can, at times, slightly increase room humidity as the ice melts.
- Temporary Solution: These are best suited for short-term heat relief, personal cooling, or supplementing existing cooling systems rather than as a primary solution for prolonged heat waves.
Table: Comparing DIY Fan & Ice Methods
| Feature | Simple Ice Bowl | Frozen Bottle Fan Attachment | DIY Cooler/Bucket AC |
|---|---|---|---|
| Ease of Setup | Very Easy | Moderate | Moderate to Advanced |
| Materials Cost | Low | Low | Low to Moderate |
| Cooling Effect | Mild | Mild to Moderate | Moderate |
| Duration of Cooling | Short | Short to Medium | Medium |
| Portability | High | High | Medium |
| Humidity Impact | Minor Increase | Minor Increase | Minor Increase |
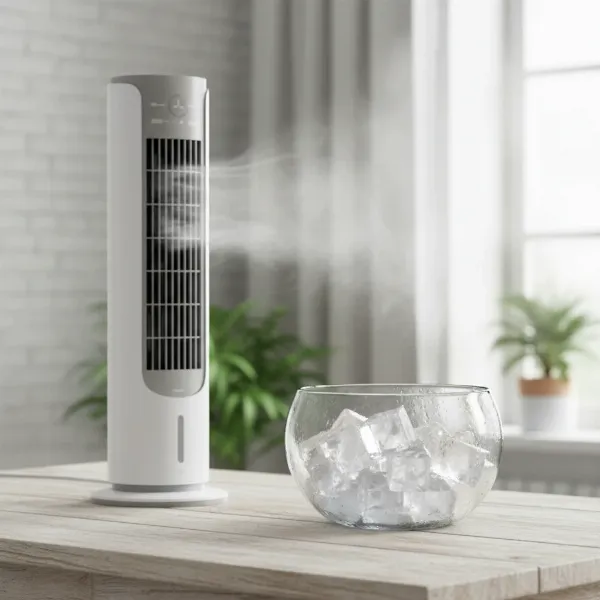 A fan blowing air over a bowl of ice, cooling a warm room
Conclusion
Battling the summer heat doesn’t always require a costly investment in a full air conditioning system. With a little ingenuity and readily available materials, you can transform your everyday fan into an effective DIY cooling solution using ice. Whether you opt for the simplicity of an ice bowl, the directed airflow of attached frozen bottles, or the more robust cooling of a bucket AC, these methods offer a welcome respite from scorching temperatures. While they serve as excellent temporary fixes and personal cooling aids, remember their limitations compared to traditional AC. Embrace these clever hacks to create your own oasis of cool and stay comfortable all season long. Which DIY fan and ice method will you try first to beat the heat?
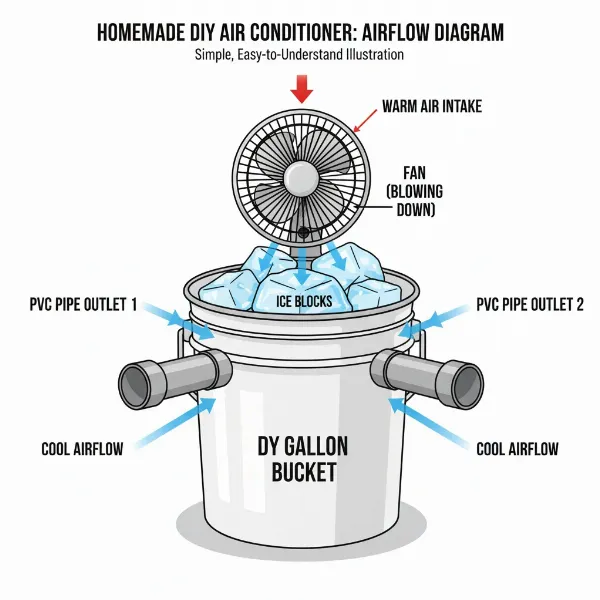 A diagram or illustration of a DIY bucket air conditioner with a fan and ice
Frequently Asked Questions
Is a fan with ice as effective as an actual air conditioner?
No, a fan with ice is not as effective as an actual air conditioner. While it can create a localized cool breeze and lower the perceived temperature, it cannot achieve the significant, consistent temperature reduction or dehumidification capabilities of a traditional AC unit.
How long does the cooling effect last with ice and a fan?
The duration of the cooling effect depends on the amount of ice used, its size (larger blocks last longer), the ambient room temperature, and the method of setup. Typically, a simple ice bowl might last for 1-2 hours, while a more elaborate cooler/bucket setup with larger ice blocks could provide cooling for 3-5 hours.
Can adding salt to the ice really make it colder?
Adding salt to water before freezing can lower its freezing point, causing the resulting ice to be colder than regular ice. This can lead to a slightly more intense cooling effect and potentially extend the ice’s melting time when used in a DIY setup.
What’s the best type of ice to use for this method?
Larger blocks of ice, frozen water bottles, or bags of ice last much longer than small ice cubes, providing a more sustained cooling effect. You can freeze water in plastic jugs or containers specifically for this purpose.
Will a DIY fan and ice setup increase humidity in my room?
As ice melts, it releases water vapor into the air, which can slightly increase the humidity in your room. This effect is usually minor and often offset by the cooling sensation, but it’s something to consider in already very humid environments.
Is it safe to put ice in front of an electric fan?
Yes, it is generally safe to place ice in front of an electric fan, provided you take precautions to prevent water from coming into contact with the fan’s electrical components. Always use a stable bowl or container for the ice and place a towel or drip tray underneath to catch any condensation or spills.