Bringing both comfort and elegance to any room, a ceiling fan is a home essential. But the thought of wiring one, especially to a wall switch, can seem like a daunting electrical puzzle. Whether you’re upgrading an existing fixture or embarking on a new installation, understanding the correct wiring process is crucial for both functionality and safety. This comprehensive guide will illuminate the path, transforming a complex task into an achievable DIY project.
Ceiling fans have evolved dramatically, from simple models with pull chains to sophisticated smart devices that integrate seamlessly into modern homes. As an Admin for ElectricFant.com with over a decade in the electric fan industry, I’ve witnessed this evolution firsthand. From basic ceiling installations to advanced dual-switch setups, the core principles of electrical safety and connection remain vital. This article will equip you with the knowledge to confidently wire your ceiling fan, ensuring it operates smoothly and safely, enhancing your living space with a refreshing breeze and ample light.
Exploring the World of Electric Fans
Before delving into the specifics of wiring, it’s helpful to understand the broader landscape of electric fans. Each type serves a unique purpose and fits different needs and spaces.
Table Fan
Table fans are compact and portable, ideal for personal cooling in small areas like desks, nightstands, or countertops. Their main advantages include easy placement and direct airflow. However, their coverage is limited, and they often lack advanced features found in larger units. Use a table fan when you need targeted cooling and flexibility.
Pedestal Fan
Pedestal fans offer adjustable height and oscillation, making them suitable for cooling larger areas like living rooms or bedrooms. They provide a broader reach than table fans and can be moved between rooms. The drawbacks include their footprint, which can take up floor space, and a generally higher noise level compared to ceiling fans. Choose a pedestal fan for versatile area cooling.
Wall-Mounted Fan
Wall-mounted fans are excellent for saving floor or desk space while providing strong airflow. They are typically installed in areas where direct, consistent airflow is needed, such as garages, workshops, or small commercial spaces. Their primary limitation is their fixed position, requiring careful planning for optimal placement. Install a wall-mounted fan where space is at a premium and a permanent cooling solution is desired.
Ceiling Fan
Ceiling fans are a popular choice for whole-room air circulation, creating a comfortable environment by distributing air evenly. They often come with integrated lighting, offering dual functionality. While installation is more complex than portable fans, they are energy-efficient and can contribute to lower heating and cooling costs. Opt for a ceiling fan for comprehensive room cooling and an integrated light source.
Tower Fan (Air Cooler)
Tower fans are sleek, vertical units designed to provide a column of airflow, often with oscillation. They are space-saving and blend well with modern decor. Many include features like air purification or humidification (sometimes called air coolers, though true air coolers use water to cool). They are generally quieter than traditional fans but offer less powerful airflow than pedestal or ceiling fans. A tower fan is ideal for discreet, quiet area cooling in contemporary spaces.
Comparative Overview of Electric Fans
Choosing the right fan depends on your specific needs, budget, and space. Here’s a comparative look at common types:
| Feature | Table Fan | Pedestal Fan | Wall-Mounted Fan | Ceiling Fan | Tower Fan |
|---|---|---|---|---|---|
| Price Range | Low | Medium | Medium | Medium to High | Medium to High |
| Airflow | Localized, direct | Broad, directional | Strong, fixed | Whole room, gentle | Vertical column |
| Noise Level | Moderate | Moderate to High | Moderate to High | Low to Moderate | Low |
| Portability | High | Medium | Low (fixed) | None (fixed) | High |
| Space Saving | Low (desktop space) | Low (floor space) | High (wall-mounted) | High (ceiling-mounted) | High (slim profile) |
| Installation | None (plug-and-play) | None (simple assembly) | Moderate (drilling) | High (electrical work) | None (plug-and-play) |
| Key Features | Basic controls | Oscillation, height | Remote, oscillation | Light, remote, speed | Oscillation, air filter |
Essential Features When Buying an Electric Fan
When selecting a fan, consider more than just its type. Certain features significantly enhance comfort, convenience, and efficiency. For ceiling fans, these choices can also influence the wiring complexity.
- Power and Performance: Look for appropriate cubic feet per minute (CFM) ratings for ceiling fans, indicating how much air they move. For other fans, wattage gives a general idea of power.
- Noise Level: Especially important for bedrooms or offices, seek models with quiet operation. DC motors in ceiling fans are generally quieter and more efficient.
- Speed Settings: Multiple speed options allow you to tailor airflow to your comfort needs.
- Timer Function: Useful for setting the fan to turn off automatically after a certain period, saving energy.
- Remote Control: A convenience feature that allows you to adjust settings without reaching for the unit or wall switch.
- Energy Efficiency: Look for ENERGY STAR certified models, particularly for ceiling fans, to reduce electricity consumption.
- Smart Features: Integration with smart home systems, voice control, or app control offers ultimate convenience. This often involves a receiver unit that connects directly to your home’s wiring.
- Light Kit: Many ceiling fans include integrated lighting, which will require separate wiring connections if you desire independent control from the fan motor.
- Reversible Blades: For ceiling fans, this allows you to change the direction of airflow, pushing cool air down in summer and circulating warm air in winter.
Your Ultimate Buying Guide for Electric Fans
Making the right choice for an electric fan involves a blend of understanding your needs, budget, and the features that matter most.
- Assess Your Needs:
- Room Size: Larger rooms require fans with higher airflow (e.g., larger ceiling fans or powerful pedestal fans).
- Location: Will it be in a bedroom (quiet operation is key), living room (aesthetics matter), or workshop (durability and power)?
- Existing Wiring: For ceiling fans, check if your ceiling box is fan-rated and if you have appropriate wiring (e.g., 14/3 Romex for separate fan/light control). If not, plan for an upgrade.
- Functionality: Do you need just air, or a combination of air and light? Do you prefer manual controls, remote, or smart features?
- Set Your Budget: Fan prices vary widely based on type, brand, features, and materials. Define a realistic budget to narrow down your options.
- Research Reputable Brands: Stick with established manufacturers known for quality and reliability. Some popular brands include Hunter, Casablanca, Kichler, Emerson, and Westinghouse for ceiling fans, and Dyson, Lasko, Vornado, or Honeywell for portable fans.
- Read User Reviews: Online reviews provide valuable insights into real-world performance, noise levels, ease of installation, and customer service experiences.
- Check Warranty and Return Policy: A good warranty offers peace of mind. Understand the return policy in case the fan doesn’t meet your expectations.
Top Electric Fan Brands
Here are some of the most popular and trusted brands in the electric fan market, known for their innovation, quality, and range of products:
- Hunter Fan Company: A leader in ceiling fans, known for classic designs, quiet operation, and smart home compatibility.
- Casablanca Fan Company: Offers high-end, stylish ceiling fans with advanced features and exceptional craftsmanship.
- Kichler Lighting: Provides a wide array of ceiling fans, often with sophisticated lighting options, blending well with various interior designs.
- Emerson Fans: Valued for their durable and performance-oriented ceiling fans, suitable for both residential and commercial applications.
- Westinghouse Lighting: Offers a diverse selection of ceiling fans and accessories, known for reliability and value.
- Dyson: Famous for innovative, bladeless tower fans and air purifiers that offer advanced technology and sleek aesthetics.
- Lasko: A popular brand for affordable and functional portable fans, including box fans, pedestal fans, and tower fans.
- Vornado: Known for its unique “Vortex Action” technology, which circulates air more effectively throughout a room.
- Honeywell: Offers a range of home comfort products, including reliable and efficient portable fans.
How to Wire a Ceiling Fan to a Wall Switch
Wiring a ceiling fan is a project that requires careful attention to detail and, most importantly, adherence to safety protocols. If you’re uncomfortable with electrical work, it’s always best to consult a licensed electrician.
Safety First: Your Absolute Priority
Before you touch any wires, ensure the power is off. This is non-negotiable.
- Locate Your Circuit Breaker: Go to your home’s main electrical panel.
- Turn Off Power: Flip the breaker switch that controls the circuit where you will be working (usually labeled for the room or specific fixture). If labels are unclear, turn off the main breaker for your entire home.
- Verify Power is Off: Use a non-contact voltage tester to confirm that there is no power in the wires at both the ceiling electrical box and the wall switch box. Never skip this step.
- Secure the Panel: Consider taping the breaker switch in the “off” position or placing a “Do Not Operate” tag to prevent accidental re-engagement of power.
- Gather Tools: Have all necessary tools within reach, including a screwdriver set (Phillips and flathead), wire strippers, electrical tape, needle-nose pliers, and wire connectors (wire nuts).
Understanding Common Wire Colors
Standard North American AC wiring uses specific color codes:
- Black Wire: This is the “hot” or live wire that carries power from the source.
- White Wire: This is the “neutral” wire, completing the circuit back to the electrical panel. In some switch loop configurations, a white wire may be used as a hot wire; if so, it should be marked with black electrical tape on both ends.
- Green or Bare Copper Wire: This is the “ground” wire, providing a safe path for electricity in case of a fault, preventing shocks.
- Red Wire (from ceiling/wall): Often found in 14/3 or 12/3 Romex cable, this wire typically serves as a second “switched hot,” commonly used to control a fan light independently from the fan motor.
- Blue Wire (from fan): On the fan unit itself, the blue wire almost always controls the light kit.
- Black Wire (from fan): On the fan unit, the black wire typically controls the fan motor.
 Common electrical wire colors in US wiring, including black, white, green, bare copper, red, and blue.
Preparing the Electrical Boxes
Ensure your ceiling electrical box is rated to support a ceiling fan’s weight and dynamic movement. Standard light fixture boxes are often not sufficient. If your existing box isn’t fan-rated, it must be replaced.
At the ceiling, carefully lower the existing fixture (if any) and expose the wires. At the wall, remove the cover plate and switch, exposing the wires in the switch box.
Scenario 1: Wiring a Ceiling Fan with Light to a Single Wall Switch
This setup means both the fan and its light will turn on and off together with one switch. You will typically find one black (hot), one white (neutral), and one bare copper/green (ground) wire coming from your ceiling and also from your wall switch feed.
At the Ceiling Fan Box:
- Ground Wires: Connect the bare copper or green ground wire from the ceiling to the green ground wire from the fan (and also to the fan’s mounting bracket). Secure with a wire nut.
- Neutral Wires: Connect the white neutral wire from the ceiling to the white neutral wire from the fan. Secure with a wire nut.
- Switched Hot Wires: Connect the black “switched hot” wire coming from your wall switch (which will be live when the switch is on) to both the black wire (for the fan motor) and the blue wire (for the light kit) from the ceiling fan. Secure all three wires together with a single wire nut.
- Tuck Wires: Carefully tuck all connections back into the electrical box.
At the Wall Switch Box:
- Ground Wires: Connect all bare copper or green ground wires together, including one to the ground screw on the switch. Secure with a wire nut.
- Incoming Hot: Connect the incoming black “line” hot wire from your power source (which is always live) to one of the screw terminals on the single-pole switch.
- Outgoing Switched Hot: Connect the black wire that runs up to the ceiling fan (your “load” or “switched hot”) to the other screw terminal on the switch.
- Neutral (if present): If there’s a neutral wire in the switch box (common in newer wiring or if power comes to the switch first), connect it to the other neutral wires in the box. It will not connect to the switch itself.
- Mount Switch: Secure the switch in the box and replace the cover plate.
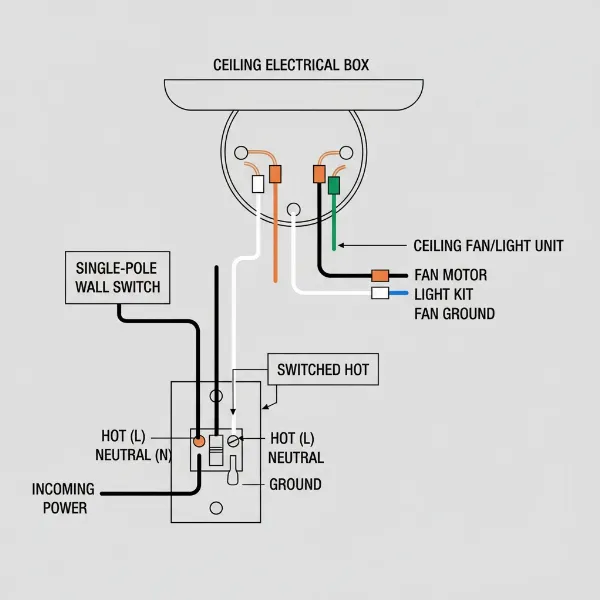 Wiring diagram for a ceiling fan with light controlled by a single wall switch.
Scenario 2: Wiring a Ceiling Fan with Light to Dual Wall Switches (Separate Control)
This configuration allows you to control the fan motor and the light kit independently using two separate wall switches. This typically requires a 14/3 (or 12/3) Romex cable running from your switch box to the ceiling fan box, which contains black, red, white, and bare ground wires.
At the Ceiling Fan Box:
- Ground Wires: Connect the bare copper/green ground wire from the ceiling to the green ground wire from the fan (and to the fan’s mounting bracket). Secure with a wire nut.
- Neutral Wires: Connect the white neutral wire from the ceiling to the white neutral wire from the fan. Secure with a wire nut.
- Fan Motor Hot: Connect the black wire from the ceiling (which is the switched hot for the fan) to the black wire from the fan motor. Secure with a wire nut.
- Light Kit Hot: Connect the red wire from the ceiling (which is the switched hot for the light) to the blue wire from the fan light kit. Secure with a wire nut.
- Tuck Wires: Carefully tuck all connections back into the electrical box.
At the Wall Switch Box:
- Ground Wires: Connect all bare copper/green ground wires together, including pigtails to the ground screws on both switches. Secure with a wire nut.
- Incoming Hot (Line): Connect the incoming black “line” hot wire from your power source to a short jumper wire (pigtail). Then, use two more short jumper wires to connect this pigtail to one screw terminal on each of your two switches (these are the “common” terminals).
- Outgoing Switched Hot (Fan): Connect the black wire running to the ceiling fan to the remaining screw terminal on the first switch (this switch will control the fan).
- Outgoing Switched Hot (Light): Connect the red wire running to the ceiling fan to the remaining screw terminal on the second switch (this switch will control the light).
- Neutral (if present): As with the single switch, if a neutral wire is in the switch box, connect it to other neutrals but not to the switches themselves.
- Mount Switches: Secure both switches in the box and replace the cover plate.
Connecting the Fan Unit
After wiring, carefully lift the fan assembly and attach it to the mounting bracket. Ensure all wires are safely tucked into the electrical box and not pinched. Assemble any fan blades or light kits according to the manufacturer’s instructions.
Testing the Installation
Once everything is securely mounted and covered:
- Restore Power: Go back to your electrical panel and turn the circuit breaker back on.
- Test the Fan:
- For a single switch: Flip the switch on. The fan and light should both turn on.
- For dual switches: Flip the fan switch on. The fan motor should operate. Flip the light switch on. The light kit should illuminate.
- Check Speeds and Controls: Use any pull chains or remote controls to test all fan speeds and light settings.
If anything doesn’t work as expected, immediately turn off the power at the breaker and re-check your connections.
Troubleshooting Common Wiring Issues
Even with careful installation, issues can arise. Here are some common problems and troubleshooting tips:
- Fan or Light Doesn’t Turn On:
- No Power: Check the circuit breaker. Has it tripped?
- Loose Connections: Power off, then re-check all wire nuts and connections at both the ceiling and switch boxes.
- Incorrect Wiring: Ensure hot, neutral, and ground wires are connected to their proper counterparts. Verify fan’s black wire to fan power, blue to light power.
- Remote/Receiver Issues: If your fan uses a remote, ensure the receiver unit is wired correctly and the remote has fresh batteries.
- Light Works, but Fan Doesn’t (or vice-versa):
- This often indicates incorrect wiring for separate controls. Power off and double-check which switched hot wire (black or red from the ceiling) is connected to the fan’s black wire and which to the fan’s blue wire.
- Ensure any pull chains on the fan are in the “on” position.
- Fan Wobbles or Is Noisy:
- Loose Mounting: Power off and ensure the mounting bracket is securely fastened to the ceiling joist and the fan is correctly attached to the bracket.
- Unbalanced Blades: Check that all blades are securely attached and that no blades are bent or damaged. Balance kits are available for minor wobbles.
- Humming Noise:
- Could be an incompatible fan speed control switch (dimmer switches not rated for fans) or loose motor components.
Always remember to turn off the power at the circuit breaker before attempting any troubleshooting steps.
Tips for Using and Maintaining Your Ceiling Fan
Proper use and maintenance extend the life and efficiency of your ceiling fan.
- Regular Cleaning: Dust can accumulate on blades and motor housing, reducing efficiency and potentially causing imbalance. Wipe blades and the motor casing regularly with a damp cloth (ensure power is off).
- Blade Direction: Change the blade rotation seasonally. In summer, blades should turn counter-clockwise to push air down, creating a cooling effect. In winter, turn them clockwise (usually at a low speed) to pull cool air up and push warm air down the walls, recirculating heat.
- Lubrication: Older fan models might require periodic oiling, typically found on the top of the motor housing. Consult your fan’s manual. Newer models often have sealed bearings that don’t require lubrication.
- Tighten Screws: Over time, vibrations can loosen screws on blade holders, canopies, or light kits. Periodically check and tighten them (with power off) to prevent wobbling and noise.
- Professional Inspection: Consider having an electrician inspect your fan and wiring every few years, especially if you notice flickering lights, unusual noises, or inconsistent performance.
Proper wiring and diligent maintenance ensure your ceiling fan provides reliable comfort for years to come.
Conclusion
Wiring a ceiling fan to a wall switch, whether for a single unified control or separate fan and light operation, is a manageable home improvement project when approached with knowledge and caution. By meticulously following safety precautions, understanding wire color codes, and making precise connections, you can confidently install your new fan. This not only enhances your room’s comfort and aesthetics but also adds value to your home.
From the quiet hum of a well-balanced fan to the gentle illumination of its integrated light, mastering your ceiling fan wiring empowers you to create the perfect ambiance. Are you ready to take control of your indoor climate and lighting with a perfectly wired ceiling fan?
Frequently Asked Questions
What wire colors are typically used for ceiling fan wiring in the US?
In the US, standard wiring includes black for hot (power), white for neutral, and green or bare copper for ground. For ceiling fans with lights, a blue wire from the fan usually controls the light, and a red wire from the ceiling often provides a separate switched hot for the light.
Can I wire a ceiling fan and light to a single wall switch?
Yes, you can wire both the ceiling fan motor and its light kit to operate from a single wall switch. This involves connecting the fan’s black (motor) and blue (light) wires together to the single switched hot wire from the wall switch.
What is the purpose of the red wire in ceiling fan wiring?
The red wire typically runs from the wall switch box to the ceiling fan box as a second “switched hot” conductor. This allows for independent control of the fan motor (using the black switched hot) and the light kit (using the red switched hot) from separate wall switches.
Do I need a special electrical box for a ceiling fan?
Yes, a ceiling fan must be installed on a fan-rated electrical box. These boxes are specifically designed to support the fan’s weight and absorb its rotational forces, ensuring it remains securely mounted and preventing hazards.
What tools are essential for wiring a ceiling fan?
Key tools include a screwdriver set (Phillips and flathead), wire strippers, electrical tape, needle-nose pliers, wire connectors (wire nuts), a sturdy ladder, and critically, a non-contact voltage tester to ensure power is off.
How do I troubleshoot if my ceiling fan light works but the fan doesn’t?
First, turn off the power. Then, check the wiring connections at both the fan and the switch. Ensure the fan’s black wire (for the motor) is correctly connected to its dedicated switched hot wire. Also, verify that any pull chains on the fan itself are set to the “on” position for the fan function.
Is it safe to wire a ceiling fan myself, or should I hire an electrician?
If you are comfortable with basic electrical work, understand wiring diagrams, and strictly follow safety precautions (like turning off power and verifying with a voltage tester), wiring a ceiling fan can be a DIY project. However, if you have any doubts, lack experience, or encounter old or complex wiring, it is always safest to consult a licensed electrician.