Few things are more frustrating than reaching for your ceiling fan’s pull chain only to find it snapped off or entirely missing. Whether it’s an older fan showing signs of wear or a simple mishap, a broken pull chain can render your fan or light inoperable, leaving you in a quiet, un-aerated, or dimly lit room. The good news? You don’t always need to call an electrician or replace the entire unit. With a little guidance, replacing a broken ceiling fan pull chain switch is a manageable DIY project that can restore your fan’s functionality and save you money. This comprehensive guide will walk you through every step, ensuring a safe and successful replacement, bringing comfort and control back to your space.
Why Your Ceiling Fan Pull Chain Needs Replacing
Ceiling fan pull chains are a common point of failure due to their frequent use and the mechanical stress they endure. Over time, the internal mechanism of the pull chain switch can wear out, leading to inconsistent operation, or the chain itself can break off, often retracting completely into the fan housing. While a simple chain extension might suffice if a small portion of the chain is still visible, the most common scenario, and the focus of this guide, involves the chain pulling out entirely, necessitating a full pull chain switch replacement. This internal breakage is usually caused by repeated tugging, metal fatigue, or sometimes, a manufacturing defect, making the entire switch unit inoperable.
Safety First: Essential Steps Before You Begin
Before you even think about touching your ceiling fan, prioritize safety. Working with electricity can be hazardous if proper precautions aren’t taken.
Always turn off the power completely at your home’s circuit breaker before starting any electrical work.
Locate your electrical service panel, often in a basement, garage, or utility closet, and identify the breaker switch that controls your ceiling fan. Flip it to the “off” position. To double-check that the power is indeed off, try flipping the wall switch for the fan or light, or briefly test the fan’s functionality with the pull chain (if any part remains visible). Using a non-contact voltage tester to confirm that no power is flowing to the fan’s wiring is an additional, highly recommended safety measure. Your safety is paramount; never skip this crucial step.
Gathering Your Tools and Supplies
Having the right tools and replacement parts on hand will make the job much smoother and safer. Before you begin disassembling your fan, gather everything you’ll need.
Here’s a list of essential tools and supplies:
- Screwdrivers: Philips head and flathead, for removing fan covers and switch housing screws.
- Wire Strippers: To strip the insulation from electrical wires.
- Wire Nuts: For securely connecting new wires.
- Needle-Nose Pliers: Useful for gripping small wires or tightening the switch collar.
- Non-Contact Voltage Tester: To confirm power is off.
- Step Ladder: For safe access to your ceiling fan.
- Replacement Pull Chain Switch: This is the most crucial item.
When selecting a replacement switch, it’s vital to choose one that matches your original. Pull chain switches come in different configurations, primarily distinguished by the number of wires and their function (fan speed control or light on/off). Most fan speed switches are “3-speed, 4-wire,” while light switches are typically “on/off, 2-wire.” Check the original switch for a model number or clearly note the wire colors and how they are connected. Taking a picture of the original wiring can be incredibly helpful.
Step-by-Step Guide: Replacing a Ceiling Fan Pull Chain Switch
Replacing a ceiling fan pull chain switch involves a series of straightforward steps. Approach each one carefully, ensuring accuracy and safety throughout the process.
Accessing the Switch
|
Our Picks for the Best electric fan in 2026
As an Amazon Associate I earn from qualifying purchases.
|
||
| Num | Product | Action |
|---|---|---|
| 1 | Dreo Tower Fan for Bedroom, 90° Oscillating Standing Fans for Room with 4 Speeds, 3 Modes, 28dB Quiet for Sleep, 25ft/s Velocity, 8H Timer, Remote, Living Room, Office, Home, Black |

|
| 2 | LEVOIT Tower Fan for Bedroom, 25ft/s Velocity Standing Fan with 28dB Quiet for Sleep, Remoter, 12H Timer, 5 Speeds, 4 Modes, 90° Oscillation for Home, Office, Indoor, Bladeless 36 inch, White |
|
| 3 | Lasko 2520 Oscillating Stand Fan,White 16 Inch |
|
| 4 | Dreo Tower Fan for Bedroom, 25ft/s Velocity Quiet Floor Fan, 90° Oscillating Fans for Indoors with 4 Speeds, 4 Modes, 8H Timer, Standing Fans, Bladeless Fan, Black, Nomad One (DR-HTF007) |
|
| 5 | 10\" Modern Standing Fan for Bedroom, Sleek Oscillating Pedestal Fan, 3-Speed & Height Adjustable Compact Floor Fan for Home Office & Dorm |
|
| 6 | Amazon Basics Air Circulator Fan, Desk Fan for Bedroom, Home and Office, With 90-Degree Tilt Head, 3 Speed Settings, Lightweight (3 LBS), 35 Watts, Black, 11.1\"W x 6.3\"D x 10.9\"H |
|
| 7 | Dreo Fan for Bedroom, 12 Inches, 70ft Powerful Airflow, 28db Quiet Table Air Circulator Fans for Whole Room, 120° Adjustable Tilt, 3 Speeds, Desktop Fan for Home, Office, Kitchen |
|
| 8 | Amazon Basics 16\" Pedestal Fan with Remote, Floor Fan, Standing Fan for Bedroom, Living Room, Office, with 3 Speeds, 3 Modes, Timer, Dual-Layered Blades, Adjustable Height, Tilt Head, 60W, Black |
|
| 9 | Dreo Fan for Bedroom, 120° Oscillating Standing Fans, Quiet Floor Fan with DC Motor, 100ft Pedestal Fans for Room, 9 Speeds, 4 modes, 20dB, 120° Manual Vertical, 37-42\" Adjustable Height, 9H Timer |
|
| 10 | Amazon Basics 20\" High Velocity Industrial Fan, Floor Fan, with 3 Speeds, Tilt Head, ETL-Listed Safety Compliance, Metal Housing/Blades, Ideal for Industrial/Commercial Space/Garage/Gym, 125W, Black |
|
With the power off at the breaker, begin by gaining access to the fan’s internal components. This usually means removing the light kit or the decorative cover plate beneath the fan motor. Look for small screws around the perimeter of the light fixture or cover. Gently unscrew these and lower the light kit or cover. Often, these components will remain connected by wires, so avoid pulling them completely away. Once the cover is off, you’ll see the internal wiring and the pull chain switch, typically a small, plastic box from which the chain emerges (or once emerged). You may also need to unscrew a small metal collar or nut that secures the switch to the fan housing.
Removing the Old Switch
Carefully pull the old switch down from its mounting, observing how it’s connected. You’ll notice several wires leading into the switch, often secured with wire nuts. Before disconnecting anything, take a clear photograph of the existing wiring configuration. This image will be your roadmap for connecting the new switch. Once documented, use your wire strippers or small pliers to carefully cut the wires connecting the old switch to the fan’s internal wiring. Leave at least an inch or two of wire attached to the fan’s main wiring for easier reconnection. After cutting, unscrew the collar or nut that holds the switch to the fan housing, and remove the old switch entirely.
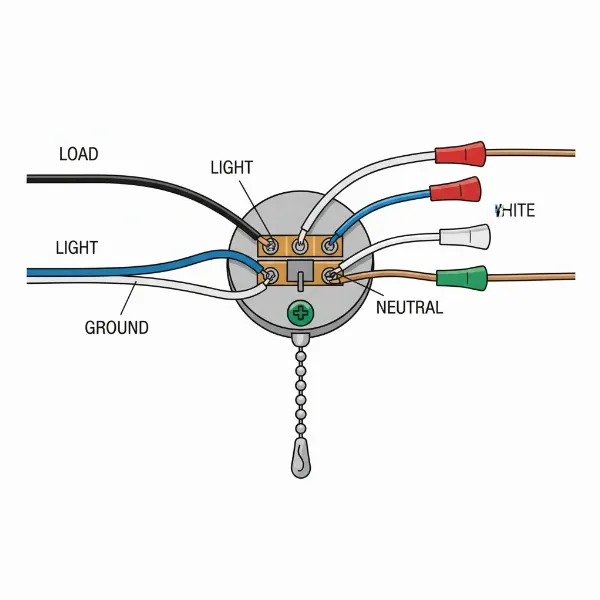 Detailed wiring diagram for a ceiling fan pull chain switch replacement showing connections
Wiring the New Switch
Now it’s time to connect the new pull chain switch. Strip about 1/2 to 3/4 inch of insulation from the ends of the wires leading from the fan and the corresponding wires on your new switch. Refer to your photo of the old wiring. Typically, for a fan speed switch, you’ll see wires like “L” (line in), “1”, “2”, “3” (speeds), or sometimes “H”, “M”, “L” (high, medium, low). For a light switch, it’s usually two wires. Match the wires from the fan to the corresponding wires on the new switch. Twist the bare ends of each pair of wires together clockwise, then securely screw a wire nut over each connection. Give each connection a gentle tug to ensure it’s secure. Proper wiring is critical for the fan and light to function correctly and safely.
Reassembling the Fan
Once the new switch is securely wired, carefully push it back into its housing within the fan. Thread the new pull chain through the hole in the fan’s lower cover or light fixture. Screw the metal collar or nut back into place, hand-tightening it first, and then gently with pliers if needed, but avoid overtightening. Reattach the light kit or fan cover, aligning it carefully and replacing all screws. Ensure all wires are tucked neatly inside the housing and not pinched by any fan components. Finally, screw any light bulbs back into their sockets.
Understanding Different Types of Pull Chain Switches
Not all pull chain switches are created equal. Knowing the difference is key to a successful replacement. Ceiling fan systems typically use two main types:
- Fan Speed Switches: These often have four wires and control the fan’s various speeds (e.g., off, low, medium, high). The common wiring configurations might be a black wire for power input and then three other wires for the different speed windings (e.g., yellow, purple, orange, or other colors). When replacing, ensure the new switch has the same number of wire terminals and positions as the old one. These are sometimes labeled as 3-speed, 4-wire switches.
- Light Switches: These are simpler, usually having two wires, and function as a basic on/off control for the fan’s light fixture. One wire will be for power, and the other for the light fixture itself. These are straightforward to replace as long as you match the wire count.
Some ceiling fans might have both types of switches, one for the fan and one for the light, each with its own pull chain. It’s crucial to correctly identify which switch you are replacing and purchase an exact match in terms of wiring and function. Taking your old switch to a hardware store can help ensure you get the right replacement.
Troubleshooting Common Replacement Problems
Even with careful execution, sometimes things don’t go as planned after replacing a pull chain switch. Here are a few common issues and how to troubleshoot them:
- Fan or Light Not Working:
- Check the circuit breaker: Ensure power has been fully restored.
- Verify wire connections: Carefully inspect each wire nut connection. A loose connection is the most frequent culprit. Untwist, re-strip, and re-connect if necessary, making sure the wires are twisted tightly together before applying the wire nut.
- Test the new switch: Use a multimeter to test for continuity through the new switch if you suspect it might be faulty.
- Fan Running at Incorrect Speeds or Light Flickering:
- Incorrect wiring: For fan speed switches, ensure the speed wires are connected in the correct sequence as per the original setup. An incorrect order can cause the fan to cycle through speeds improperly.
- Loose bulb or connection: For lights, ensure the bulb is screwed in tightly and the light switch wires are securely connected.
- Chain Snapped Again (Immediately):
- Overtightened collar: If the metal collar holding the switch to the fan housing is too tight, it can put undue stress on the chain. Loosen it slightly.
- Chain rubbing: Ensure the chain moves freely through the hole and isn’t snagging on internal components.
When troubleshooting, always turn off the power at the circuit breaker again before attempting any adjustments or re-inspections.
When to Call a Professional Electrician
While replacing a ceiling fan pull chain switch is often a DIY task, there are specific situations where calling a professional electrician is the safest and smartest course of action. If you encounter any of the following, it’s best to seek expert help:
- Complex or Unfamiliar Wiring: If your fan’s wiring differs significantly from typical setups, or if you’re unsure about any connections, a professional can correctly diagnose and repair it.
- Lack of Confidence with Electrical Work: If you feel uncomfortable or uncertain at any point during the process, don’t hesitate to call an expert. Electrical work can be dangerous, and safety should always come first.
- Persistent Issues After Replacement: If the fan or light still doesn’t work correctly after you’ve followed all troubleshooting steps, there might be a more significant electrical problem that requires professional diagnosis.
- Damaged Fan Components: If you notice other parts of the fan (such as the motor housing or electrical box) are damaged, it might indicate a more extensive repair or replacement is needed.
A licensed electrician has the expertise and specialized tools to handle complex electrical repairs safely and efficiently, ensuring your ceiling fan operates correctly and your home’s electrical system remains secure.
Conclusion
A broken ceiling fan pull chain doesn’t have to mean the end of your fan’s useful life or an expensive service call. By understanding the common causes, prioritizing safety, gathering the right tools, and following a clear, step-by-step guide, you can successfully replace a faulty pull chain switch yourself. This accessible DIY project empowers you to restore comfort and functionality to your living space, giving new life to your ceiling fan. Remember to always turn off the power at the circuit breaker, carefully match your replacement switch, and don’t hesitate to seek professional help if the task feels beyond your comfort level.
What part of your ceiling fan do you find most challenging to maintain, and why?
Frequently Asked Questions
Can I fix just the chain without replacing the switch?
Yes, if a piece of the chain is still visible extending from the fan, you can often attach a chain extension connector to it. However, if the entire chain has retracted inside the fan housing, the internal switch mechanism is likely broken, requiring a full switch replacement.
How do I know what kind of pull chain switch to buy?
Inspect your existing switch. Note the number of wires (typically 2 for lights, 4 for fan speeds) and any model numbers printed on the switch body. It’s best to take a photo or bring the old switch to a hardware store to ensure you purchase a compatible replacement.
What if my ceiling fan has two pull chains?
Many ceiling fans have two pull chains: one for controlling the fan’s speed and another for the light fixture. If both are broken, you will need to replace both switches, ensuring you get the correct type (fan speed control vs. light on/off) for each.
Is it dangerous to replace a pull chain switch myself?
Any electrical work carries inherent risks. However, by strictly following safety protocols like turning off power at the circuit breaker and using a voltage tester, replacing a pull chain switch is generally safe for DIYers with basic electrical aptitude. If unsure, consult an electrician.
How long does a pull chain switch replacement take?
For most DIY enthusiasts, replacing a ceiling fan pull chain switch can typically be completed within 30 minutes to an hour, assuming you have all the necessary tools and the correct replacement part on hand. The time can vary depending on fan model complexity and your experience.