Is your ceiling fan doing a dizzying dance instead of providing a steady breeze? A wobbly ceiling fan isn’t just an annoying distraction; it can signal underlying issues that affect performance, increase wear on the motor, and even pose a safety risk. Fortunately, most wobbling issues can be resolved with a few simple tools and a clear, step-by-step approach. This guide will walk you through troubleshooting and fixing your unstable ceiling fan, restoring its smooth operation and ensuring your comfort and safety.
Understanding the Wobble: Common Causes of an Unstable Ceiling Fan
Before diving into repairs, it’s helpful to understand why your ceiling fan might be wobbling in the first place. Several factors can contribute to an imbalanced fan:
- Loose Fasteners: Over time, the constant vibration of a ceiling fan can cause screws to loosen. This includes screws on the mounting bracket, downrod, blade arms, or even the light kit.
- Uneven or Warped Blades: Humidity changes, temperature fluctuations, or minor impacts can cause fan blades to warp or bend. When blades are not uniformly aligned, they create an uneven weight distribution, leading to a wobble.
- Dust Accumulation: Believe it or not, a significant buildup of dust and debris on one or more fan blades can add enough uneven weight to throw the fan off balance.
- Improper Installation: If the fan was not installed correctly, the mounting bracket might not be secure, or the hanger ball may not be properly seated in its groove.
- Bent Blade Irons: The metal arms (blade irons) that connect the blades to the motor can sometimes become bent, causing the blades to sit at different heights.
Safety First: Before You Begin Your Ceiling Fan Repair
Working with any electrical appliance requires prioritizing safety. Always follow these essential precautions before attempting to fix your wobbly ceiling fan:
- Turn Off the Power: Crucially, switch off the electricity to the ceiling fan at your home’s circuit breaker. Do not rely solely on the wall switch. It’s a good practice to test the fan’s switch and pull chain after turning off the breaker to ensure no power is reaching the unit.
- Use a Stable Ladder: Ensure you have a sturdy step ladder or scaffold that allows you to comfortably and safely reach all parts of the fan without overstretching. Avoid standing on chairs or unstable surfaces.
- Allow Blades to Stop: Wait for the fan blades to come to a complete stop before approaching the fan.
Step-by-Step Guide: How to Fix a Wobbly Ceiling Fan in 5 Steps
With safety measures in place, you’re ready to tackle the wobble. Here’s how to fix a wobbly ceiling fan using a systematic approach:
Step 1: Power Down and Clean Up
|
Our Picks for the Best electric fan in 2026
As an Amazon Associate I earn from qualifying purchases.
|
||
| Num | Product | Action |
|---|---|---|
| 1 | Amazon Basics 16\" Pedestal Fan with Remote, Floor Fan, Standing Fan for Bedroom, Living Room, Office, with 3 Speeds, 3 Modes, Timer, Dual-Layered Blades, Adjustable Height, Tilt Head, 60W, Black |

|
| 2 | 10\" Modern Standing Fan for Bedroom, Sleek Oscillating Pedestal Fan, 3-Speed & Height Adjustable Compact Floor Fan for Home Office & Dorm |
|
| 3 | Dreo Tower Fan for Bedroom, 90° Oscillating Standing Fans for Room with 4 Speeds, 3 Modes, 28dB Quiet for Sleep, 25ft/s Velocity, 8H Timer, Remote, Living Room, Office, Home, Black |
|
| 4 | LEVOIT Tower Fan for Bedroom, 25ft/s Velocity Standing Fan with 28dB Quiet for Sleep, Remoter, 12H Timer, 5 Speeds, 4 Modes, 90° Oscillation for Home, Office, Indoor, Bladeless 36 inch, White |
|
| 5 | Amazon Basics 20\" High Velocity Industrial Fan, Floor Fan, with 3 Speeds, Tilt Head, ETL-Listed Safety Compliance, Metal Housing/Blades, Ideal for Industrial/Commercial Space/Garage/Gym, 125W, Black |
|
| 6 | Dreo Tower Fan for Bedroom, 25ft/s Velocity Quiet Floor Fan, 90° Oscillating Fans for Indoors with 4 Speeds, 4 Modes, 8H Timer, Standing Fans, Bladeless Fan, Black, Nomad One (DR-HTF007) |
|
| 7 | Dreo Fan for Bedroom, 120° Oscillating Standing Fans, Quiet Floor Fan with DC Motor, 100ft Pedestal Fans for Room, 9 Speeds, 4 modes, 20dB, 120° Manual Vertical, 37-42\" Adjustable Height, 9H Timer |
|
| 8 | Lasko 2520 Oscillating Stand Fan,White 16 Inch |
|
| 9 | Dreo Fan for Bedroom, 12 Inches, 70ft Powerful Airflow, 28db Quiet Table Air Circulator Fans for Whole Room, 120° Adjustable Tilt, 3 Speeds, Desktop Fan for Home, Office, Kitchen |
|
| 10 | Amazon Basics Air Circulator Fan, Desk Fan for Bedroom, Home and Office, With 90-Degree Tilt Head, 3 Speed Settings, Lightweight (3 LBS), 35 Watts, Black, 11.1\"W x 6.3\"D x 10.9\"H |
|
Your first line of defense against a wobbly fan is ensuring it’s safe to work on and free from common imbalances caused by dirt.
- Cut the Power: Locate the circuit breaker that controls the room where your fan is installed and switch it to the “off” position. If unsure which breaker it is, turn off the main breaker to the entire house. Double-check the fan’s wall switch and pull chain to confirm power is cut.
- Clean the Blades: Using a damp cloth, gently wipe down the top and bottom of each fan blade to remove any accumulated dust, dirt, or debris. Even a small amount of uneven buildup can cause an imbalance. For very dusty blades, a pillowcase can be useful: slide a blade into the pillowcase, then pull it back out, trapping dust inside.
Step 2: Tighten All Loose Connections
Loose screws are one of the most frequent culprits behind a wobbly fan. Inspect and tighten all visible fasteners from the ceiling mount down to the blade arms.
- Mounting Bracket & Downrod: Carefully lower the fan’s canopy (the decorative cover against the ceiling) to expose the mounting bracket. Ensure the screws holding the mounting bracket to the electrical box in the ceiling are tight. Next, check the downrod (the pole connecting the fan to the mounting bracket) and tighten any set screws or bolts that secure it. Also, verify that the hanger ball at the top of the downrod is firmly seated in its groove within the mounting bracket.
- Blade Arm Screws: Examine where each blade arm attaches to the fan’s motor housing and where each blade attaches to its respective blade arm. Tighten all screws securely with a Phillips head screwdriver. Be careful not to overtighten, which could strip the screws or damage the fan components.
- Light Kit Screws: If your fan has an integrated light kit, check the screws that hold the light fixture to the fan motor assembly. Loose light kits can also contribute to a perceived wobble.
Once all screws are tightened, reattach the canopy cover. Restore power to the fan at the breaker and test the fan on its highest setting. If the wobble persists, move on to Step 3.
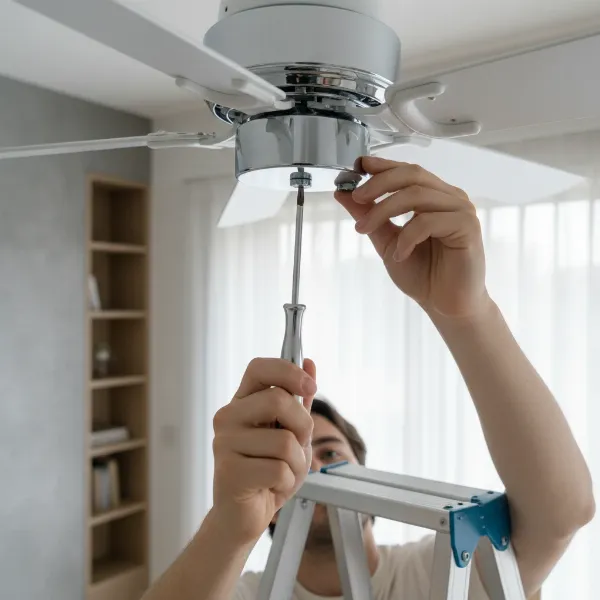 A person tightening screws on a ceiling fan blade arm with a screwdriver, emphasizing DIY repair and precision.
Step 3: Check Blade Alignment and Height
Even if all screws are tight, blades can become misaligned or warped, causing an imbalance. This step helps identify and correct those issues.
- Measure Blade Height: Turn off the power at the breaker again. Place a yardstick or tape measure against the ceiling and measure the distance from the ceiling to the leading edge (tip) of one fan blade. Rotate the fan and repeat this measurement for every other blade. All blades should measure the exact same distance from the ceiling.
- Adjust Blade Irons (if applicable): If you find a blade that is noticeably higher or lower than the others, the metal blade iron connecting it to the motor might be bent. For minor discrepancies, you can sometimes gently bend the blade iron back into alignment by hand or with pliers, taking extreme care not to break it. If a blade itself is warped (e.g., sagging), it may need to be replaced.
- Test Again: After making any adjustments, restore power and test the fan on high. If the wobble lessens but doesn’t disappear, proceed to Step 4.
Step 4: Utilize a Ceiling Fan Balancing Kit
If tightening screws and adjusting blade heights don’t completely eliminate the wobble, a ceiling fan balancing kit is your next tool. These kits typically include a weighted clip and several adhesive weights.
- Attach the Balancing Clip: Turn off the power to the fan. Take the plastic clip from your balancing kit and attach it to the trailing edge of one fan blade, midway between the blade arm and the blade tip.
- Identify the Culprit Blade: Restore power and turn the fan on to a high speed. Observe the wobble. If it improves, you’re on the right track with that blade. If it worsens or stays the same, turn off the power, move the clip to the next blade, and repeat the process. Continue this for all blades until you identify the blade where the wobble is significantly reduced or eliminated when the clip is attached. This is your “problem” blade.
- Find the Optimal Weight Placement: Once you’ve identified the problem blade, turn off the power. With the clip still on that blade, slowly slide it along the trailing edge (moving it closer to or further from the motor) in small increments. After each adjustment, restore power and test the fan. The goal is to find the exact spot on the blade where the fan runs most smoothly with the clip attached.
- Apply the Adhesive Weight: Once the optimal spot is found, turn off the power. Remove the clip. Peel the backing from one of the adhesive weights and firmly press it onto the top surface of the blade, directly in line with where the clip was positioned. Many kits recommend placing the weight on the top of the blade near the center, or as close as possible to the identified spot.
- Final Test: Restore power and run the fan on high. The wobble should now be significantly reduced or gone. If a slight wobble remains, you may need to repeat the process with a smaller weight or try placing weights on other blades if indicated by the kit’s instructions.
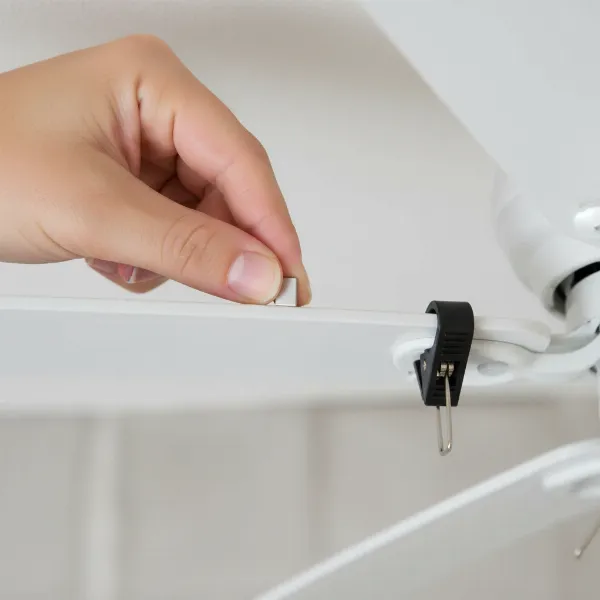 Close-up of a hand attaching a balancing weight to a ceiling fan blade with a balancing clip, demonstrating precision and DIY spirit.
Step 5: Test and Re-evaluate
After completing the previous steps, it’s time for a thorough final assessment.
- Run on All Speeds: Turn the fan on and allow it to run on all speed settings, especially the highest, to confirm the wobble has been resolved or significantly reduced.
- Observe for Noise: A balanced fan should also run more quietly. Listen for any new or persistent rattling, clicking, or grinding noises, which could indicate other issues.
- Ongoing Maintenance: To prevent future wobbles, consider regular cleaning of your fan blades and periodically checking for loose screws.
When to Call a Pro or Consider Replacement
While most wobbly ceiling fan issues are DIY-friendly, there are instances when professional help or even a full replacement might be necessary:
- Persistent Wobble: If you’ve diligently followed all the steps and the wobble remains severe, there might be an internal motor issue, a seriously bent component, or improper wiring that requires an electrician.
- Damaged Components: If you discover cracked blade arms, severely warped blades that cannot be straightened, or a visibly damaged motor housing, replacement parts or a new fan might be the most cost-effective and safest solution.
- Installation Issues: If you suspect the fan was never properly installed on a secure ceiling brace, an electrician or handyman can assess and correct the mounting.
- Old or Low-Quality Fans: Older fans or those of lower quality may inherently be more prone to wobbling due to wear and tear or less robust construction.
Conclusion
A wobbly ceiling fan can be more than just an annoyance; it can signal structural or mechanical issues that, if left unaddressed, could lead to further damage or even become a safety concern. By systematically cleaning the blades, tightening all fasteners, checking blade alignment, and using a balancing kit, you can often restore your fan to smooth, quiet operation. Taking these proactive steps not only enhances your comfort but also extends the life of your appliance. Don’t let a wobbly fan disrupt your peace – a stable ceiling fan ensures a more efficient and enjoyable home environment.
What steps will you take first to fix your wobbly ceiling fan this weekend?
Frequently Asked Questions
Is a little wobble normal for a ceiling fan?
A very slight wobble (less than 1/8 inch) can be normal, especially on higher speed settings or with older fans. However, any noticeable shaking, noise, or excessive movement indicates an imbalance that should be addressed to prevent damage or safety risks.
What tools do I need to fix a wobbly ceiling fan?
You’ll typically need a Phillips head screwdriver, a sturdy step ladder, a tape measure or yardstick, a cleaning cloth, and a ceiling fan balancing kit (which includes a clip and adhesive weights).
Can dust really cause a ceiling fan to wobble?
Yes, absolutely. An uneven accumulation of dust and debris on one or more fan blades can add enough weight to create an imbalance, causing the fan to wobble. Regular cleaning is a simple preventative measure.
How long does it take to fix a wobbly ceiling fan?
For most common issues, fixing a wobbly ceiling fan can take anywhere from 30 minutes to an hour, depending on how quickly you identify the problem and if you need to use a balancing kit.
Should I try to bend a warped fan blade back into shape?
For minor bends in the blade iron (the metal arm), gentle adjustment is sometimes possible. However, if the blade itself is significantly warped or cracked, attempting to bend it may cause further damage. In such cases, replacing the blade or the entire fan is often the safer option.