Is the once soothing hum of your electric fan now a grating, persistent squeak? A noisy fan isn’t just annoying; it often signals that your electric fan motor’s internal components, primarily its bearings or bushings, are struggling from a lack of lubrication. Over time, dust, grime, and the natural evaporation of lubricants can lead to increased friction, causing that tell-tale squeal. This guide will walk you through the process of diagnosing, disassembling, oiling, and reassembling your electric fan motor, helping you restore its quiet, efficient operation and extend its lifespan. Get ready to reclaim your peace and cool comfort with a few simple steps.
Understanding the Squeak: Why Your Electric Fan Motor Needs Oil
The persistent squeaking from your electric fan is a clear sign that something isn’t moving as smoothly as it should. At the heart of most electric fans lies a motor with rotating parts that rely on lubrication to function silently and efficiently. When this lubrication depletes or becomes contaminated, friction increases, leading to the irritating noise you hear.
Lack of Lubrication: The most common culprit behind a squeaking electric fan motor is insufficient lubrication. Over years of use, the oil in the motor’s bearings or bushings can dry out, evaporate, or become gummy. These components are designed to allow the motor shaft to spin freely with minimal resistance. Without adequate lubrication, metal-on-metal contact occurs, producing friction and the characteristic squeal. This friction also generates heat, which can further accelerate wear and tear, eventually leading to motor failure if left unaddressed.
Dust and Debris Accumulation: Electric fans, by their very nature, circulate air and, unfortunately, airborne dust and debris. This particulate matter can infiltrate the motor housing and bearings, mixing with the existing lubricant to form an abrasive paste. This grime acts like sandpaper, increasing friction and causing noise, even if some lubricant is still present. A thorough cleaning is often a crucial first step before applying new oil.
Worn-Out Bearings or Bushings: While lubrication can fix many squeaking problems, it’s important to recognize when it might be too late. If the fan has been running dry for an extended period, the bearings or bushings themselves might be physically worn down. These components, often made of porous bronze in older fans (sintered bronze bushings), or sealed ball bearings in newer models, have a finite lifespan. If they are extensively worn, even fresh oil will only provide a temporary fix, or no fix at all, as the structural integrity is compromised. In such cases, replacing the motor or the entire fan might be the only permanent solution. Some modern fans also come with sealed bearings that are not designed to be oiled, and attempting to force oil into them can cause more harm than good. Identifying your fan’s type and its motor’s design is key to proper maintenance.
Safety First: Essential Precautions Before You Begin
Working with any electrical appliance, even a seemingly simple electric fan, requires strict adherence to safety protocols. Neglecting these steps can lead to electrical shock, injury, or further damage to your appliance. Prioritize safety above all else.
Always Unplug the Fan: This is the most crucial step. Before you begin any disassembly, cleaning, or oiling, ensure the fan is completely disconnected from its power source. Simply turning the fan off is not enough, as residual current can still be present. Pull the plug from the wall outlet to eliminate any risk of accidental startup or electrical shock.
Discharge Capacitors (for AC/HVAC Fans): If you are working on a larger fan, such as an air conditioner unit’s fan motor, an HVAC blower, or even some heavy-duty standing fans, it might contain a capacitor. Capacitors store electrical energy even after the appliance is unplugged and can deliver a dangerous shock. If your fan has a capacitor, research how to safely discharge it using a properly insulated screwdriver before touching any internal components. This usually involves shorting the terminals of the capacitor. If you are unsure, consult a professional or seek specific guidance for your fan model.
Work on a Stable, Clean Surface: Choose a well-lit, flat, and stable workspace. A workbench or sturdy table is ideal. Lay down an old towel, newspaper, or a clean cloth to protect both your work surface and the fan components from scratches and oil spills. This also helps keep small screws and parts from rolling away and getting lost.
Wear Protective Gear: While not always mandatory for simple fan oiling, wearing appropriate personal protective equipment (PPE) is always a good practice. Safety glasses can protect your eyes from dust or errant oil sprays. Rubber gloves can protect your hands from grease, dirt, and potentially irritating oils.
Take Photos During Disassembly: Modern fans can be complex, and remembering how every screw, wire, and panel fits back together can be challenging. Use your smartphone or a digital camera to take pictures at each stage of disassembly. These photos will serve as an invaluable visual guide during reassembly, helping you avoid mistakes and ensure everything goes back in its correct place.
Tools and Materials You’ll Need
Gathering all necessary tools and materials before you start will streamline the process and prevent interruptions. Here’s a list of what you’ll typically need to oil your electric fan motor:
- Screwdrivers: A basic set including Phillips-head and flat-head screwdrivers of various sizes will be essential for removing fan grilles, housings, and motor covers.
- Pliers: Especially useful if your fan uses C-clips or other small fasteners that require careful prying or gripping.
- Cleaning Supplies:
- Microfiber Cloths or Rags: For wiping away dust and debris from fan blades, grilles, and motor components.
- Soft Brush or Small Paintbrush: Ideal for dislodging dust from crevices and around the motor.
- Vacuum Cleaner (with brush attachment) or Compressed Air: To remove stubborn dust buildup from within the motor housing and around the bearings.
- Brake Cleaner or Electrical Contact Cleaner (Optional): If the old lubricant has turned into a gummy varnish, a small amount of brake cleaner can help dissolve it. Use sparingly and ensure proper ventilation.
- Appropriate Oil for Electric Motors: This is perhaps the most critical item. Using the wrong type of oil can do more harm than good.
- Recommended: Non-detergent SAE 15 or 20wt motor oil, Zoom Spout turbine oil (specifically for electric motors/HVAC), blue bottle 3-in-1 oil (specifically labeled for electric motors), or high-quality sewing machine oil. These oils are typically lightweight and designed for the specific needs of small electric motor bearings.
- Avoid: WD-40 (it’s a penetrating fluid, not a lasting lubricant), standard black bottle 3-in-1 oil (often too thin or has detergents), multi-grade automotive engine oil (contains detergents and can be too thick), cooking oils, or greases (too thick for most small fan motor bushings/bearings).
- Small Applicator: An oiler bottle with a fine tip, a small syringe, or even a toothpick can help you precisely apply oil to hard-to-reach areas without over-oiling.
- Paper Towels or Absorbent Rags: To catch any drips and clean up excess oil.
- Camera or Smartphone: For taking photographs at each stage of disassembly, which will be invaluable during reassembly.
Having these items on hand will ensure a smooth and efficient repair process, allowing you to quickly get your fan back to quiet operation.
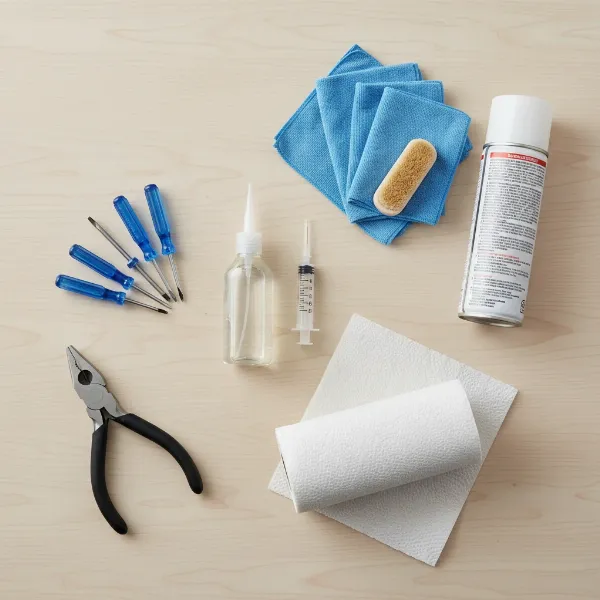 Essential tools and materials for electric fan motor oiling, including screwdrivers, oil, and cleaning supplies.
Step-by-Step Guide: Disassembling Your Electric Fan
Accessing the motor of an electric fan typically requires some disassembly. The exact steps can vary slightly depending on the fan’s design (box, pedestal, tower, or ceiling fan), but the general principle involves removing outer coverings to reach the internal components. Remember to keep your camera handy and take photos at each stage!
- Unplug the Fan: Reiterate this crucial safety step. Ensure the fan is completely disconnected from the power source before touching any part of it.
- Remove Outer Grills and Guards:
- Front Grille: Most fans have a front grille that either clips on, screws on, or uses a combination of both. Look for clips around the edge, screws on the outer rim, or a central cap that twists off. Gently pry clips or unscrew fasteners and carefully remove the front grille.
- Spinner Nut/Blade Cap: Once the front grille is off, you’ll likely see a spinner nut or cap holding the fan blades onto the motor shaft. This often unscrews in the opposite direction of normal threads (clockwise to loosen, counter-clockwise to tighten), but check for arrows or markings. Remove this and set it aside.
- Fan Blades: Carefully grasp the fan blades firmly and pull them straight off the motor shaft. They might be a snug fit. If there’s a small C-clip, you might need pliers to gently pry it off first. Avoid bending the blades, as this can cause imbalance and new noises.
- Rear Grille/Guard: Behind the blades, there’s usually a rear grille or guard covering the motor. This is typically held by a large nut or several screws. Remove these fasteners and take off the rear guard.
- Accessing the Motor Housing:
- With the blades and guards removed, you should now see the main motor housing. Depending on your fan, you might need to further disassemble the fan’s body (e.g., detach the head from the stand of a pedestal fan, or remove the back panel of a box fan).
- Look for screws that hold the two halves of the motor housing together, or that secure the motor unit within the fan’s frame. Carefully unscrew these fasteners.
- Crucial Tip: As you remove screws and panels, lay them out in the order you removed them, or place them in labeled containers. This will simplify reassembly.
- Gently separate the motor housing. You might need to wiggle it a bit to free it from any internal clips or alignment pins. Be mindful of any wires connected to the motor; avoid pulling on them forcefully.
- Disconnecting Wires (If Necessary):
- For some fans, especially if the motor is deeply embedded or requires significant rotation, you might need to disconnect electrical wires.
- BEFORE disconnecting any wires, take multiple, clear photos of the wiring connections. Note the color of each wire and where it connects. This is paramount for correct reassembly and to prevent electrical hazards.
- Use small pliers or a screwdriver to carefully detach wire connectors. Avoid cutting wires unless absolutely necessary and you are confident in re-splicing them safely.
By following these steps and documenting your progress with photos, you’ll safely and effectively gain access to the motor bearings, ready for the next stage of lubrication.
Locating and Lubricating the Motor Bearings
Once you have safely disassembled your electric fan and accessed the motor, the next critical step is to identify the lubrication points and apply the oil correctly.
- Identify Bearing Locations:
- Most electric fan motors use sleeve bearings or bushings (often made of porous bronze, sometimes called “Oilite” bearings), which are essentially sleeves that the motor shaft spins within. There will typically be one bearing at the front of the motor (behind where the fan blades attach) and another at the back.
- Look for Oil Ports: Older fans often have small, visible oil holes or refillable cups on the top or sides of the motor housing, near the shaft. These are direct access points for lubrication.
- No Visible Ports?: Many newer fans lack dedicated oil ports due to “planned obsolescence” or sealed bearing designs. In these cases, you will need to access the bearings directly by gently separating the motor’s end bells (the covers on each side of the motor). You will find the motor shaft passing through these bushings.
- Clean the Area Around the Bearings:
- Before applying any new oil, thoroughly clean away any dust, grime, or old, gummy lubricant from around the shaft and bearings. Use a soft brush, a vacuum with a narrow attachment, or compressed air.
- If the old lubricant is particularly sticky or varnished, you can use a small amount of electrical contact cleaner or brake cleaner on a rag to gently clean the shaft and the visible parts of the bushing. Be cautious not to let any cleaner get into the motor windings. Allow any cleaner to completely evaporate before proceeding.
- Apply the Oil:
- For Fans with Oil Ports: Place 1 to 2 drops of the recommended electric motor oil into each oil port. Do not over-oil; a small amount is sufficient. The oil needs to soak into the porous bushing material.
- For Fans Without Oil Ports (Direct Bearing Access): Apply 1 to 2 drops of oil directly onto the motor shaft where it enters each bearing (front and back). The oil will wick into the bushing.
- Be Precise: Use a fine-tipped oiler bottle or a syringe to ensure precise application. Avoid getting oil on the motor’s electrical windings, as this can damage the protective coating and potentially shorten the motor’s life.
- Allow Oil to Penetrate:
- After applying the oil, manually rotate the motor shaft several times to help distribute the lubricant throughout the bearing.
- Allow the oil some time (5-10 minutes, or even an hour if possible, especially if the bearings were very dry) to fully penetrate the porous material of the bushings. You might even observe the oil slowly draining into the bushing.
- Wipe away any excess oil from the exterior of the motor and shaft with a clean rag to prevent dust from accumulating and creating new problems.
Proper lubrication at these critical points will drastically reduce friction, eliminate the squeaking noise, and allow your fan motor to operate smoothly once more.
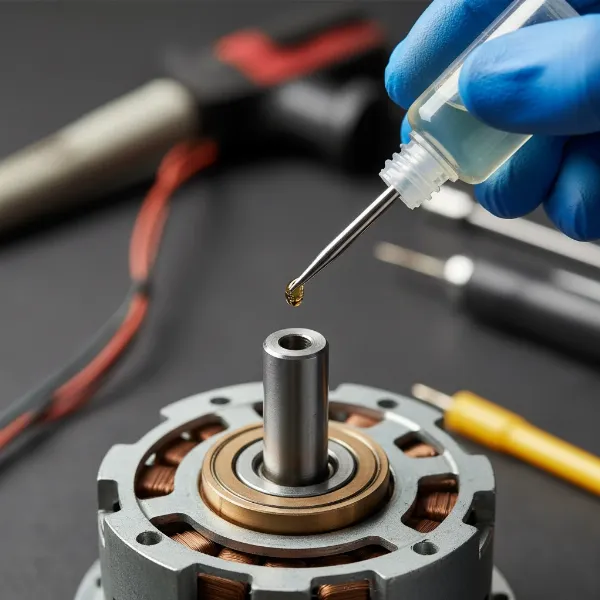 Close-up of a hand applying oil to an electric fan motor bearing with a fine-tipped oiler bottle.
Choosing the Right Oil for Your Electric Fan Motor
The type of lubricant you use is paramount for the longevity and quiet operation of your electric fan motor. Using the wrong oil can damage the motor, attract more dust, or even exacerbate the squeaking.
Recommended Oils for Electric Fan Motors:
- Non-Detergent Motor Oil (SAE 15 or 20wt): This is often considered the gold standard. Look for oils specifically labeled as “non-detergent” or “electric motor oil” with a light viscosity like SAE 15 or 20. Detergents in standard automotive oils can break down existing lubricants and leave behind deposits that can damage small motor bearings.
- Zoom Spout Turbine Oil: This brand is frequently recommended, particularly the “turbine oil” variant, which is designed for electric motors and HVAC systems. The “Zoom Spout” typically refers to the bottle design, so ensure the label specifies suitability for electric motors.
- Blue Bottle 3-in-1 Oil (Electric Motor Oil): While the generic black bottle 3-in-1 oil is often unsuitable, the blue bottle version from the same brand is specifically formulated for electric motors. It’s a lightweight, non-detergent oil that works well for fan bearings. Always check the label to confirm it’s for electric motors.
- Sewing Machine Oil: This is another excellent choice for small electric motors. It’s typically a light, high-quality mineral oil that provides good lubrication without leaving sticky residues.
Oils and Products to Avoid:
- WD-40: This is a penetrating fluid designed to free rusted parts, displace water, and clean. It is not a long-term lubricant for bearings. It evaporates quickly, often leaving behind a sticky residue that can attract dust and eventually cause more friction and noise than before.
- Standard Black Bottle 3-in-1 Oil: While widely available, this variant is often too thin for lasting lubrication and may contain properties more akin to a penetrating oil than a dedicated motor lubricant. Stick to the blue bottle version for electric motors.
- Detergent Motor Oils (Automotive Engine Oil): Car engine oils contain detergents designed to clean engine internals, which can be detrimental to the delicate bushings and felt wicks found in many small electric fan motors. They can also be too thick for the precise clearances in fan bearings.
- Grease: For most small electric fan motors with sleeve bearings or bushings, grease is too thick. It can impede the motor’s rotation and doesn’t properly penetrate the porous materials. Grease is typically reserved for heavier equipment with ball bearings.
- Cooking Oils (e.g., vegetable oil, olive oil): These oils are not stable lubricants and will quickly break down, become rancid, and gum up the motor, causing more problems than they solve.
By selecting the correct type of oil, you provide the best possible lubrication for your fan motor, ensuring its quiet operation and extending its useful life.
Reassembling Your Electric Fan
After successfully oiling the motor bearings, the next step is to carefully reassemble your electric fan. This is where your diligently taken photos will come in handy. Take your time and ensure all components are properly aligned and secured.
- Reconnect Wires (If Disconnected): If you disconnected any electrical wires during disassembly, refer to your photos to reconnect them exactly as they were. Ensure all connections are snug and secure to prevent electrical issues or malfunctions.
- Secure the Motor Housing:
- Carefully bring the halves of the motor housing back together, aligning any internal clips or pins.
- Replace all the screws that hold the motor housing together or secure the motor unit within the fan’s frame. Tighten them firmly but avoid overtightening, which can strip the threads or crack plastic components.
- Reattach the Rear Grille/Guard: Position the rear grille or guard back onto the motor housing, ensuring it’s oriented correctly. Replace any screws or fasteners that hold it in place.
- Install the Fan Blades:
- Carefully slide the fan blades back onto the motor shaft. Ensure they are seated correctly and firmly.
- If there was a C-clip, reattach it.
- Replace the spinner nut or blade cap, tightening it securely. Remember that some spinner nuts tighten counter-clockwise. Make sure the blades are snug and don’t wobble.
- Attach the Front Grille: Position the front grille over the blades and secure it. Reattach all clips or screws, ensuring the grille is firmly in place and doesn’t rattle.
- Final Checks:
- Once fully reassembled, double-check that all screws are tightened, all clips are engaged, and no parts are loose or rattling.
- Manually spin the fan blades to ensure they rotate freely and don’t hit any part of the housing or grilles. They should spin smoothly with little resistance.
Reassembly is essentially the reverse of disassembly. By working methodically and using your photographic references, you can ensure your fan is put back together correctly and safely, ready for testing.
Testing Your Fan and Troubleshooting Minor Issues
After reassembling your electric fan, it’s time to test if your lubrication efforts have paid off. This final stage involves checking for proper operation and addressing any lingering problems.
- Initial Test Run:
- Plug the fan back into a power outlet.
- Turn the fan on to its lowest speed setting.
- Listen carefully. Ideally, the squeaking noise should be gone, replaced by a smooth, consistent hum.
- Gradually increase the fan speed, observing its operation at each setting. The fan should run quietly and powerfully across all speeds.
- If Squeaking Persists:
- Insufficient Oil: If the squeak is still present, it’s possible the bearings were extremely dry and need more time to absorb the oil, or a few more drops might be necessary. Unplug the fan, allow the motor to cool, and carefully reapply a small amount of oil to the bearings. Rotate the shaft manually and wait before testing again.
- Improper Cleaning: Old, gummy residue might still be present, hindering the oil. Consider disassembling again for a more thorough cleaning with a suitable solvent, ensuring all residue is gone before re-oiling.
- Worn Bearings: If the squeaking returns quickly or persists despite proper oiling and cleaning, it’s likely the bearings or bushings are too worn and require replacement. In many cases, replacing the entire motor or the fan unit is more practical than sourcing and replacing individual bearings.
- Other Noises to Troubleshoot:
- Rattling or Vibrating: If you hear rattling or excessive vibration, it typically indicates loose components. Unplug the fan immediately and check for:
- Loose Screws: Go over all the screws you tightened during reassembly, ensuring they are snug.
- Loose Grilles or Housing Panels: Make sure all fan grilles and housing panels are properly clipped or screwed into place and aren’t vibrating against each other.
- Unbalanced Blades: Bent or dirty fan blades can cause vibration. Clean the blades thoroughly. If a blade is visibly bent or damaged, it might need to be carefully straightened or replaced.
- Wobbling Fan Blades: If the blades appear to wobble excessively, ensure they are securely fastened to the motor shaft and that the spinner nut or cap is tightly secured. A severely unbalanced blade set can also cause this and might require rebalancing or replacement.
- Grinding or Scraping: These sounds are more serious and suggest metal-on-metal contact due to misaligned parts, foreign objects, or severely damaged bearings. Unplug the fan immediately and investigate the source of the noise. Continued operation could cause significant damage or even a fire hazard.
- Rattling or Vibrating: If you hear rattling or excessive vibration, it typically indicates loose components. Unplug the fan immediately and check for:
A successfully oiled electric fan motor should provide many more hours of quiet, efficient cooling. By carefully testing and addressing any remaining issues, you ensure your fan is operating at its best.
Preventative Maintenance for a Quiet Fan
Keeping your electric fan running quietly and efficiently over the long term involves more than just a one-time fix. Regular preventative maintenance can significantly extend its lifespan and prevent those annoying squeaks from returning.
Regular Cleaning: Dust is the enemy of any fan. Make it a habit to clean your fan regularly, especially during periods of heavy use.
- Exterior: Wipe down the fan blades and grilles with a damp cloth to remove accumulated dust.
- Interior: Periodically (e.g., once every few months or before and after seasonal storage), unplug the fan and use a vacuum cleaner with a brush attachment or compressed air to clean dust from inside the grilles and around the motor housing. This prevents dust from entering the bearings and mixing with the lubricant.
Periodic Oiling: Even with the best oil, lubrication will eventually diminish.
- Frequency: For heavily used fans or older models, consider re-oiling the motor bearings every 6-12 months. Fans used occasionally might only need it every 1-2 years. Pay attention to any subtle changes in sound – a slight hum turning into a faint squeak is your fan’s way of asking for more oil.
- Method: Follow the same precise application steps: apply 1-2 drops of appropriate electric motor oil to the bearings, allow it to penetrate, and wipe away excess.
Check for Loose Fasteners: Vibrations from regular use can loosen screws and bolts over time.
- Routine Inspection: Every few months, quickly inspect your fan. Gently wiggle the grilles, check the stability of the stand, and ensure all visible screws are snug. Tighten any loose fasteners to prevent rattles and reduce stress on the motor.
Proper Storage: If you store your fan seasonally, ensure it’s clean and covered.
- Clean Before Storage: Give your fan a thorough cleaning before putting it away for the off-season.
- Cover It: Use a plastic bag or a fan cover to protect it from dust accumulation during storage. This reduces the amount of dust that needs to be cleaned later and minimizes the risk of dust working its way into the motor.
When to Consider Professional Repair or Replacement:
While routine maintenance can work wonders, there comes a point when a fan might be beyond DIY repair.
- Persistent Noise: If, despite thorough cleaning and correct oiling, the squeak or other grinding noises persist or return very quickly, it suggests severely worn bearings or other internal motor damage.
- Overheating/Burning Smell: If your fan motor becomes excessively hot or emits a burning smell, stop using it immediately. These are serious indicators of motor failure and potential fire hazards.
- Sealed Bearings: Many modern fans are designed with sealed bearings that cannot be oiled. Attempting to force oil into them is futile and could damage the motor. If such a fan develops a squeak, motor replacement is typically the only option.
- Cost vs. New Fan: Weigh the cost and effort of replacing a motor or seeking professional repair against the price of a new fan. For inexpensive fans, replacement is often the more economical choice.
By integrating these preventative maintenance tips into your routine, you can enjoy a consistently quiet and cool environment, making your electric fan a reliable companion for years to come.
Conclusion
A squeaking electric fan doesn’t have to be relegated to the junk pile. By understanding the common causes of motor noise—primarily a lack of proper lubrication—and following a few careful steps, you can often restore your fan to its original, quiet operation. The process involves safely disassembling the unit, thoroughly cleaning away accumulated dust, precisely applying the correct type of non-detergent electric motor oil to the bearings, and carefully reassembling your fan.
Regular maintenance, including periodic cleaning and re-oiling, is key to preventing future squeaks and extending the lifespan of your cooling companion. Remember that not all fans are designed for lubrication, especially newer models with sealed bearings, and sometimes, a motor is simply beyond repair. However, for many fans, this simple act of care can make a significant difference, saving you money and providing uninterrupted comfort.
So, next time your fan starts to complain, are you ready to silence the squeak and enjoy the blissful hum of a well-oiled machine?
Frequently Asked Questions
How often should I oil my electric fan motor?
|
Our Picks for the Best electric fan in 2026
As an Amazon Associate I earn from qualifying purchases.
|
||
| Num | Product | Action |
|---|---|---|
| 1 | Dreo Fan for Bedroom, 12 Inches, 70ft Powerful Airflow, 28db Quiet Table Air Circulator Fans for Whole Room, 120° Adjustable Tilt, 3 Speeds, Desktop Fan for Home, Office, Kitchen |

|
| 2 | Amazon Basics 16\" Pedestal Fan with Remote, Floor Fan, Standing Fan for Bedroom, Living Room, Office, with 3 Speeds, 3 Modes, Timer, Dual-Layered Blades, Adjustable Height, Tilt Head, 60W, Black |
|
| 3 | Dreo Tower Fan for Bedroom, 90° Oscillating Standing Fans for Room with 4 Speeds, 3 Modes, 28dB Quiet for Sleep, 25ft/s Velocity, 8H Timer, Remote, Living Room, Office, Home, Black |
|
| 4 | 10\" Modern Standing Fan for Bedroom, Sleek Oscillating Pedestal Fan, 3-Speed & Height Adjustable Compact Floor Fan for Home Office & Dorm |
|
| 5 | Amazon Basics 20\" High Velocity Industrial Fan, Floor Fan, with 3 Speeds, Tilt Head, ETL-Listed Safety Compliance, Metal Housing/Blades, Ideal for Industrial/Commercial Space/Garage/Gym, 125W, Black |
|
| 6 | Lasko 2520 Oscillating Stand Fan,White 16 Inch |
|
| 7 | Amazon Basics Air Circulator Fan, Desk Fan for Bedroom, Home and Office, With 90-Degree Tilt Head, 3 Speed Settings, Lightweight (3 LBS), 35 Watts, Black, 11.1\"W x 6.3\"D x 10.9\"H |
|
| 8 | Dreo Fan for Bedroom, 120° Oscillating Standing Fans, Quiet Floor Fan with DC Motor, 100ft Pedestal Fans for Room, 9 Speeds, 4 modes, 20dB, 120° Manual Vertical, 37-42\" Adjustable Height, 9H Timer |
|
| 9 | Dreo Tower Fan for Bedroom, 25ft/s Velocity Quiet Floor Fan, 90° Oscillating Fans for Indoors with 4 Speeds, 4 Modes, 8H Timer, Standing Fans, Bladeless Fan, Black, Nomad One (DR-HTF007) |
|
| 10 | LEVOIT Tower Fan for Bedroom, 25ft/s Velocity Standing Fan with 28dB Quiet for Sleep, Remoter, 12H Timer, 5 Speeds, 4 Modes, 90° Oscillation for Home, Office, Indoor, Bladeless 36 inch, White |
|
For frequently used fans, consider oiling the motor bearings every 6 to 12 months. For fans used occasionally or stored seasonally, once every 1 to 2 years should suffice. Listen for any subtle squeaks, which are early indicators that it’s time for lubrication.
Can I use car engine oil for my electric fan?
No, it’s generally not recommended. Most car engine oils contain detergents and are formulated for higher temperatures and pressures, which can be detrimental to the smaller, more delicate bearings and bushings in electric fan motors. Always opt for non-detergent oils specifically designed for electric motors or lightweight machine oils.
What if my fan still squeaks after oiling?
If the squeaking persists after proper cleaning and oiling, the bearings might be severely worn or damaged. In such cases, lubrication may only offer a temporary fix or none at all. Other potential causes include loose components, unbalanced blades, or an un-oilable sealed motor. You might need to consider replacing the motor or the entire fan.
Are all electric fan motors designed to be oiled?
No. While many older fans and some industrial fans have visible oil ports or accessible bearings for lubrication, many modern, inexpensive fans are designed with “sealed bearings” that are not meant to be oiled. Attempting to force oil into these can damage the motor. If your fan has sealed bearings and is squeaking, it typically requires motor replacement.
Is a squeaking fan a fire hazard?
A squeaking fan indicates increased friction and heat, which, if severe and prolonged, can potentially lead to overheating and become a fire hazard, especially in older fans. If your fan motor is getting excessively hot or emits a burning smell along with the squeak, stop using it immediately and unplug it. Address the issue promptly or replace the fan.