Is your kitchen fan struggling to clear cooking odors, or perhaps it’s developed a sticky, greasy coating that’s an unwelcome sight? A neglected kitchen fan isn’t just an eyesore; it’s a less efficient appliance and a potential fire hazard. Over time, grease, steam, and cooking fumes accumulate, turning your fan’s surfaces into a stubborn, sticky mess. This buildup clogs filters, impedes airflow, and can even strain the motor, leading to reduced performance and increased energy consumption. Taking the time to properly clean your kitchen fan not only restores its appearance but also ensures it functions optimally, keeping your kitchen air fresh and safe. This comprehensive guide will walk you through everything you need to know, from identifying the right tools to executing a deep clean that leaves your fan sparkling.
Why Your Kitchen Fan Gets Sticky and Why It Matters
Every time you cook, especially when frying or sautéing, microscopic particles of grease, oil, and moisture are released into the air. Your kitchen fan, also known as a range hood or exhaust fan, is designed to capture these particles and vent them outside or filter them. However, not all particles are fully removed, and many cling to the fan’s surfaces, filters, and internal components. This residue builds up, layer by sticky layer, attracting dust and other airborne debris, creating the notorious “sticky kitchen fan.”
Beyond aesthetics, a greasy, sticky fan significantly impacts your kitchen environment and safety. Reduced airflow means your fan can’t effectively remove smoke, odors, and hot air, leaving your kitchen stuffy and odorous. More critically, accumulated grease is highly flammable. Should a stovetop flare-up occur, thick grease deposits inside your fan can ignite, posing a serious fire risk. Signs that your fan is desperately needing a clean include:
- A noticeable reduction in suction power.
- Unpleasant odors lingering long after cooking.
- Visible grease or dust clinging to the filters and blades.
- Increased noise or vibration from the fan motor as it struggles against buildup.
Essential Tools and Cleaning Supplies
Before you begin your deep clean, gathering the right tools and supplies will make the process smoother and more effective. Safety should always be your top priority, so start there.
Safety Gear
- Rubber Gloves: Essential for protecting your hands from harsh degreasers and greasy grime.
- Safety Glasses (Optional): Recommended if using strong chemical cleaners or if there’s a risk of splashes.
|
Our Picks for the Best electric fan in 2026
As an Amazon Associate I earn from qualifying purchases.
|
||
| Num | Product | Action |
|---|---|---|
| 1 | Lasko 2520 Oscillating Stand Fan,White 16 Inch |

|
| 2 | Dreo Tower Fan for Bedroom, 90° Oscillating Standing Fans for Room with 4 Speeds, 3 Modes, 28dB Quiet for Sleep, 25ft/s Velocity, 8H Timer, Remote, Living Room, Office, Home, Black |
|
| 3 | Amazon Basics Air Circulator Fan, Desk Fan for Bedroom, Home and Office, With 90-Degree Tilt Head, 3 Speed Settings, Lightweight (3 LBS), 35 Watts, Black, 11.1\"W x 6.3\"D x 10.9\"H |
|
| 4 | 10\" Modern Standing Fan for Bedroom, Sleek Oscillating Pedestal Fan, 3-Speed & Height Adjustable Compact Floor Fan for Home Office & Dorm |
|
| 5 | Dreo Fan for Bedroom, 120° Oscillating Standing Fans, Quiet Floor Fan with DC Motor, 100ft Pedestal Fans for Room, 9 Speeds, 4 modes, 20dB, 120° Manual Vertical, 37-42\" Adjustable Height, 9H Timer |
|
| 6 | LEVOIT Tower Fan for Bedroom, 25ft/s Velocity Standing Fan with 28dB Quiet for Sleep, Remoter, 12H Timer, 5 Speeds, 4 Modes, 90° Oscillation for Home, Office, Indoor, Bladeless 36 inch, White |
|
| 7 | Dreo Tower Fan for Bedroom, 25ft/s Velocity Quiet Floor Fan, 90° Oscillating Fans for Indoors with 4 Speeds, 4 Modes, 8H Timer, Standing Fans, Bladeless Fan, Black, Nomad One (DR-HTF007) |
|
| 8 | Amazon Basics 20\" High Velocity Industrial Fan, Floor Fan, with 3 Speeds, Tilt Head, ETL-Listed Safety Compliance, Metal Housing/Blades, Ideal for Industrial/Commercial Space/Garage/Gym, 125W, Black |
|
| 9 | Amazon Basics 16\" Pedestal Fan with Remote, Floor Fan, Standing Fan for Bedroom, Living Room, Office, with 3 Speeds, 3 Modes, Timer, Dual-Layered Blades, Adjustable Height, Tilt Head, 60W, Black |
|
| 10 | Dreo Fan for Bedroom, 12 Inches, 70ft Powerful Airflow, 28db Quiet Table Air Circulator Fans for Whole Room, 120° Adjustable Tilt, 3 Speeds, Desktop Fan for Home, Office, Kitchen |
|
Basic Cleaning Tools
- Microfiber Cloths: Soft, absorbent, and effective for wiping surfaces without scratching.
- Sponges (Non-abrasive): Ideal for scrubbing without damaging finishes.
- Scrubbing Brush or Old Toothbrush: Useful for reaching into crevices and tackling stubborn spots.
- Paper Towels: Great for wiping away initial layers of grease.
- Large Basin or Sink: For soaking removable components.
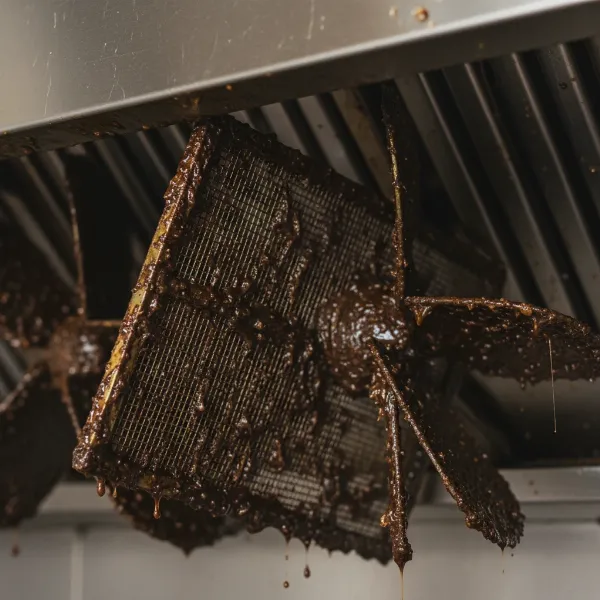 Close-up of a kitchen exhaust fan with heavy grease buildup needing cleaning
Cleaning Solutions (DIY & Commercial)
You have several effective options, ranging from homemade concoctions to powerful commercial degreasers.
- Hot Water: The foundation for most cleaning solutions, as heat helps break down grease.
- Dish Soap: Brands like Dawn are highly praised for their grease-cutting capabilities. Use full strength for tough spots or diluted in hot water for soaking.
- Baking Soda (Bicarbonate of Soda): A natural alkaline powerhouse that dissolves grease. Can be used as a paste with water or added to soaking solutions.
- White Vinegar: An acidic cleaner that helps cut through grease and neutralize odors. Works synergistically with baking soda.
- Soda Crystals: An alternative to baking soda, effective in hot water for stubborn grime.
- Commercial Kitchen Degreasers: Products like WD-40 Specialist Industrial-Strength Cleaner & Degreaser, Krud Kutter, Easy Off Specialty Kitchen Degreaser Cleaner, Fantastik All Purpose Cleaner, or Goo Gone Kitchen Degreaser can provide extra strength for severe buildup. Always check product labels for compatibility with your fan’s materials, especially if it contains aluminum, as some harsh chemicals can cause damage.
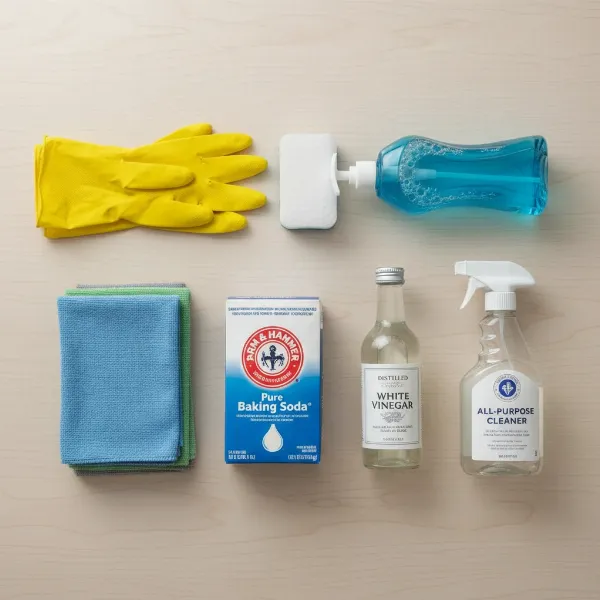 Essential cleaning supplies for a sticky kitchen fan
Step-by-Step Guide to Deep Cleaning a Sticky Kitchen Fan
Ready to reclaim your kitchen fan? Follow these steps for a thorough and effective clean.
Step 1: Safety First – Disconnect Power
This is the most crucial step. Always turn off the power to your kitchen fan at the main circuit breaker before you begin any cleaning or disassembly. This prevents accidental activation and eliminates the risk of electric shock. Do not simply rely on the fan’s control switch.
Step 2: Disassemble the Fan Components
Most kitchen fans have removable filters and sometimes detachable fan blades or covers. Consult your owner’s manual for specific instructions on how to safely remove these components without causing damage. Typically, filters can be unclipped or slid out. If possible and safe to do so, carefully remove fan blades or protective grilles to allow for better access to greasy areas.
Step 3: Tackle the Greasy Filters
Filters are often the greasiest part of your fan.
- Soaking Method: Fill a large sink or basin with very hot water. Add a generous amount of dish soap (about 1/2 cup), 1/2 cup of baking soda, and an optional splash of white vinegar. Submerge the filters completely in this solution. Let them soak for at least 15-30 minutes, or even longer for heavily caked-on grease. The hot water and cleaning agents will work to break down the sticky residue.
- Scrubbing and Rinsing: After soaking, use a non-abrasive brush or sponge to scrub away any remaining grease. For tough spots, apply a paste of baking soda and a little water directly to the grime and let it sit before scrubbing. Rinse the filters thoroughly under hot running water until all soap residue and grease are gone.
- Drying Thoroughly: Place the filters on a clean towel to air dry completely. Avoid putting them back in wet, as moisture can lead to corrosion or attract dust quickly. Many advise against cleaning filters in a dishwasher, as the intense grease can clog your dishwasher’s internal components.
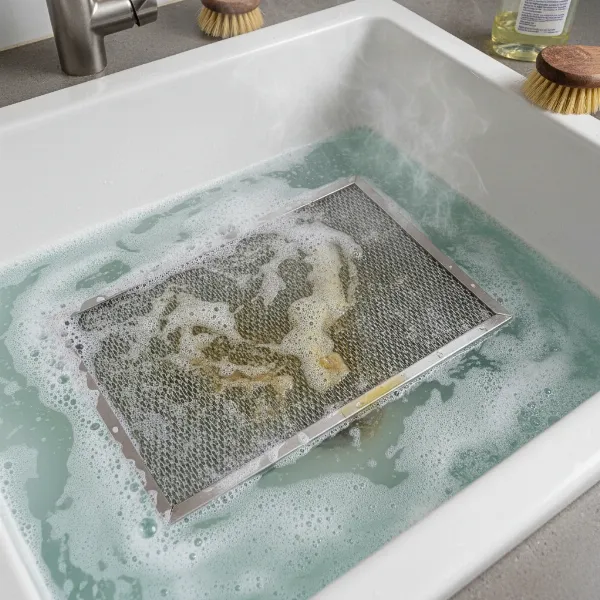 Kitchen fan filters soaking in hot, soapy water
Step 4: Clean the Fan Blades and Housing
With the filters removed, you’ll have better access to the fan blades and the interior/exterior housing of the hood.
- For Detachable Blades: If you’ve safely removed the fan blades, treat them similarly to the filters: soak them in your hot, soapy, baking soda solution, then scrub gently with a soft brush and rinse thoroughly. Ensure they are completely dry before reassembly.
- For Non-Detachable Blades and Motor Casing: This area requires more caution. Never spray water or cleaning solutions directly into the motor. Instead, dampen a microfiber cloth with a degreasing solution (either diluted dish soap or a commercial degreaser). Carefully wipe down each fan blade, the interior of the housing, and any accessible surfaces. Use an old toothbrush for tight spots. For stubborn, thick grease, apply a baking soda paste and let it sit for a few minutes before wiping away. Follow with a clean, damp cloth to remove any residue, then dry with another clean cloth.
- Cleaning the Hood Exterior: For the visible exterior of your range hood, spray your chosen degreaser onto a microfiber cloth (not directly onto the hood to avoid drips or streaks, especially on stainless steel). Wipe in the direction of the grain for stainless steel to prevent streaks. Remove any cleaning solution residue with a damp cloth and buff dry for a sparkling finish.
Step 5: Reassemble and Test
Once all components are clean and completely dry, carefully reassemble your kitchen fan. Make sure everything is securely in place. Then, switch the power back on at the circuit breaker. Turn on your fan to test its operation. You should immediately notice improved airflow and a quieter, more efficient performance.
Natural vs. Commercial Degreasers: Choosing the Right Solution
When faced with a sticky kitchen fan, you have a choice between readily available natural solutions and specially formulated commercial degreasers. Each has its advantages and considerations.
Natural Cleaning Solutions (Baking Soda, Vinegar, Dish Soap):
- Pros: Cost-effective, non-toxic, eco-friendly, and safe for use around food preparation areas. They are generally gentle on most surfaces.
- Cons: May require more “elbow grease” and soaking time for heavily neglected grease buildup. The smell of vinegar can be strong temporarily.
Commercial Degreasers:
- Pros: Often more powerful and faster-acting, capable of dissolving very thick and old grease with less effort. Many are designed for specific types of grime.
- Cons: Can contain harsh chemicals that require good ventilation and protective gear. Some may not be suitable for all surfaces (e.g., certain degreasers can damage aluminum or painted finishes). Always read the product label carefully and test in an inconspicuous area first.
For routine cleaning or moderate grease, natural solutions are often sufficient and preferred for their safety. For exceptionally heavy, baked-on grease, a targeted commercial degreaser might be necessary, but always prioritize safety and surface compatibility.
Preventing Future Stickiness: Maintenance Tips
Consistent maintenance is key to preventing your kitchen fan from becoming a sticky, greasy nightmare again.
- Regular Wiping: After each cooking session, especially after frying, give the visible surfaces of your hood and the underside of the filters a quick wipe with a damp, soapy cloth. This prevents grease from hardening.
- Frequent Filter Cleaning: Aim to clean your filters every month or two, depending on your cooking frequency. If you cook often or deep fry, a monthly cleaning is advisable. This proactive approach prevents grease from building up to unmanageable levels.
- Run Your Fan: Always use your exhaust fan while cooking and let it run for 5-10 minutes afterward. This helps clear residual steam and odors, reducing the amount of airborne grease that settles.
- Deep Clean Schedule: Plan a comprehensive deep clean of the entire fan unit, including internal components (if detachable), every 3-6 months.
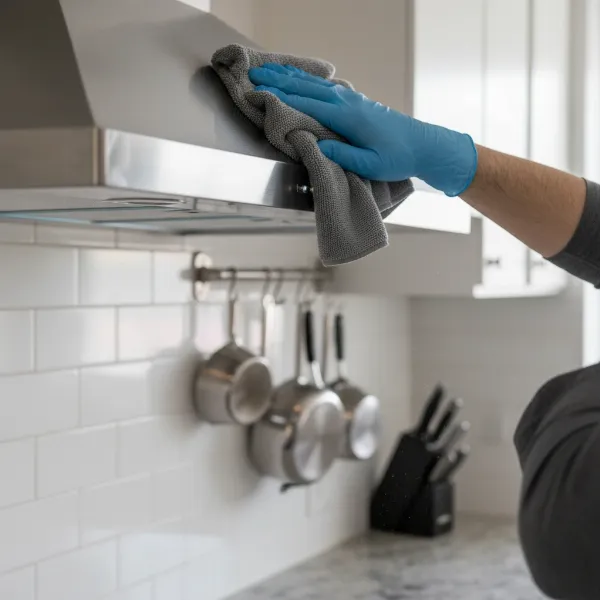 Someone wiping down the exterior of a clean range hood
When to Call a Professional
While most kitchen fan cleaning can be a DIY project, there are instances when calling a professional is the best course of action.
- Complex Disassembly: If your fan unit has intricate parts or you’re unsure how to safely disassemble it without damaging electrical components.
- Heavy, Neglected Buildup: For years of accumulated, rock-hard grease that DIY methods can’t budge, professionals have industrial-strength tools and solutions.
- Motor or Electrical Concerns: If you notice electrical issues, unusual noises, or problems with the fan’s motor, a professional can diagnose and repair it safely.
- Duct Cleaning: If the issue extends beyond the fan unit into the exhaust ducts, specialized duct cleaning services may be required.
Conclusion: Keep Your Kitchen Air Clear
A clean kitchen fan is more than just a matter of hygiene; it’s crucial for maintaining a healthy and safe cooking environment. By regularly cleaning the sticky grease and grime that accumulates, you ensure optimal performance, extend the lifespan of your appliance, and significantly reduce fire risks. Remember the power is in your hands – whether you opt for natural degreasers or commercial products, consistent effort will keep your kitchen air fresh and your fan sparkling.
Don’t let a sticky kitchen fan compromise your cooking experience. What’s your go-to trick for keeping your kitchen exhaust fan impeccably clean?
Frequently Asked Questions
How often should I clean my kitchen fan?
For optimal performance and safety, clean your kitchen fan filters every 1 to 2 months if you cook regularly, or weekly if you fry frequently. A deep clean of the entire unit, including blades and housing, should be done every 3 to 6 months.
Can I put my fan filters in the dishwasher?
While some manufacturers claim their filters are dishwasher-safe, it’s generally not recommended for heavily greased filters. The intense grease can clog your dishwasher’s drain and spray arms, leading to costly repairs. Hand-soaking and scrubbing are often more effective and safer for your appliance.
What if my fan is still sticky after cleaning?
If your fan remains sticky after a thorough clean, you might be dealing with very old, hardened grease. Try allowing degreasing solutions to soak longer, or consider using a stronger commercial degreaser specifically designed for tough kitchen grease. For extremely stubborn cases, or if you’re hesitant to use stronger chemicals, it might be time to call a professional cleaning service.
Are there any eco-friendly degreasers for kitchen fans?
Yes, many natural ingredients are excellent degreasers. A combination of hot water, dish soap, baking soda, and white vinegar is a highly effective and eco-friendly solution. Additionally, some commercial brands offer plant-based, biodegradable degreasers. Look for products labeled “non-toxic” and “biodegradable.”
What supplies do I need to clean a kitchen fan?
You’ll need rubber gloves, non-abrasive sponges, microfiber cloths, an old toothbrush or small brush for crevices, a large basin or sink for soaking, and your chosen cleaning solution – which could be a mixture of hot water, dish soap, baking soda, and vinegar, or a commercial kitchen degreaser. Always have paper towels on hand for initial grease removal.