Picture this: it’s a hot, stuffy day, and your room feels more like an oven than a sanctuary. You look up at that lonely light fixture, wishing for a refreshing breeze. Installing a ceiling fan is a fantastic way to transform your living space, providing improved air circulation, enhancing energy efficiency, and giving your room an aesthetic upgrade. While the idea of electrical work might seem daunting, learning how to install a ceiling fan is a manageable DIY project with the right guidance and a focus on safety.
This comprehensive guide will walk you through every step of the process, from selecting the right fan and gathering your tools to wiring it correctly and troubleshooting common issues. By following these instructions carefully, you’ll soon be enjoying the comfort and style your new ceiling fan brings.
Preparing for Installation: Safety First
Before you even unbox your new ceiling fan, proper preparation and a strong emphasis on safety are paramount. Working with electricity requires caution, and taking the necessary steps beforehand can prevent accidents and ensure a smooth installation.
Turn Off Power at the Circuit Breaker
The absolute first and most critical step is to turn off the power to the specific circuit at your home’s main electrical panel. Locate the breaker that controls the light fixture or outlet where you intend to install the fan. Don’t just rely on a wall switch; always cut power at the source to eliminate any risk of electrical shock. Once switched off, consider placing a piece of electrical tape over the breaker to prevent it from being accidentally switched back on while you work.
Verify with a Voltage Tester
After turning off the power, use a non-contact voltage tester to confirm that no electricity is flowing to the wires in the ceiling box. Touch the tester to each wire you’ll be handling. If the tester remains silent or unlit, the power is safely off. If it beeps or lights up, double-check your circuit breaker and try again until no power is detected.
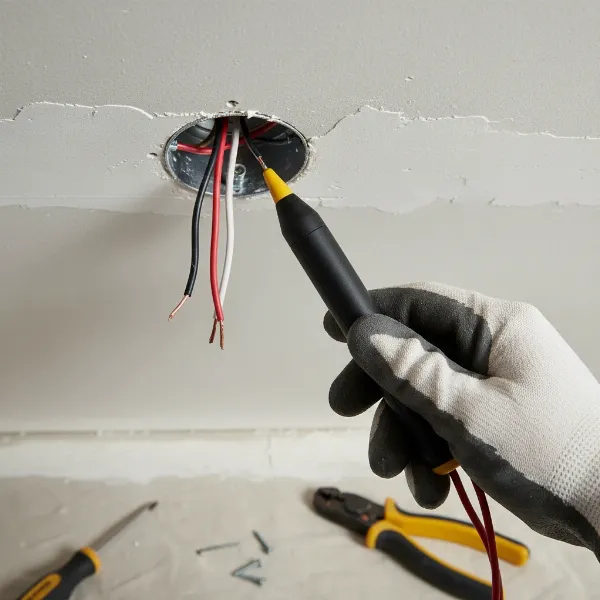 A hand using a non-contact voltage tester to verify no power in ceiling wires.
Gather Your Tools and Materials
Having all your tools and materials ready before you start will streamline the installation process. You’ll need:
- New Ceiling Fan: Ensure it’s appropriate for your room size and ceiling height.
- Ladder: Sturdy and stable for working at ceiling height.
- Screwdrivers: Phillips-head and flat-head.
- Wire Strippers/Cutters: For preparing electrical wires.
- Pliers: Needle-nose or lineman’s pliers for bending and securing wires.
- Voltage Tester: To confirm power is off.
- Electrical Tape: For added insulation on wire connections.
- Wire Nuts: Typically included with your fan, but good to have extras.
- Adjustable Wrench: For tightening nuts and bolts.
- Safety Glasses and Gloves: To protect your eyes and hands.
- Drill with Bits: If drilling pilot holes for the mounting bracket.
- Fan Balancing Kit (optional): Handy for correcting wobbling after installation.
Check the Electrical Box
Ceiling fans are significantly heavier and exert more force than standard light fixtures due to their rotation. Therefore, the existing electrical box in your ceiling must be fan-rated. This means it’s designed and tested to safely support the weight and movement of a ceiling fan, typically rated for at least 50-70 pounds. Look for a label on the box that explicitly states “Rated for Fan Support.” If your box isn’t fan-rated, it must be replaced with one that is, securely anchored to a ceiling joist or an adjustable fan brace. Ignoring this crucial step can lead to safety hazards.
Choose the Right Ceiling Fan
Selecting the correct fan for your space ensures optimal performance and safety. Consider:
- Room Size & Blade Span: Larger rooms require larger fans. A general guide suggests a 36-inch fan for rooms up to 100 sq ft, 42-48 inches for rooms up to 225 sq ft, and 60 inches or larger for spaces over 400 sq ft.
- Ceiling Height: Fan blades should be at least 7 feet from the floor for safety. If your ceiling is higher than 8 feet, a downrod is needed to bring the fan closer to the living space. For low ceilings, a flush-mount or “hugger” fan is ideal.
- Motor Type: ENERGY STAR®-rated fans with DC motors are often more efficient and quieter.
- Light Kit: Decide if you need integrated lighting or prefer a fan-only model.
- Control Options: Pull chains, wall switches, or remote controls offer different levels of convenience.
Step-by-Step Ceiling Fan Installation Guide
With safety precautions in place and tools at hand, you’re ready to begin the physical installation. Always refer to your specific fan’s instruction manual, as models can vary.
1. Remove Existing Fixture (If Applicable)
If you’re replacing an old light fixture or fan, start by carefully removing it. Ensure the power is OFF and verified with your voltage tester. Disconnect any wires by untwisting wire nuts and remove the screws that secure the old fixture to the ceiling box. Have a helper assist you with heavier fixtures. Once removed, take this opportunity to visually inspect the electrical box to confirm it is indeed fan-rated.
2. Install or Upgrade the Ceiling Box
If your existing electrical box is not fan-rated, it must be replaced. This often involves installing a fan brace that spans between two ceiling joists, providing robust support. Insert the fan brace through the ceiling opening, center it, and rotate it until its teeth firmly lock into the joists. Attach the U-bolt bracket to the brace, thread the electrical wires into the new fan-rated box, and secure the box to the U-bolt. If this step seems beyond your comfort level, it’s advisable to consult a licensed electrician.
3. Secure the Mounting Bracket
Most ceiling fans come with a specific mounting bracket. Thread the household electrical wires through the center opening of this bracket. Align the bracket with the holes in your fan-rated electrical box and secure it tightly using the screws provided by the fan manufacturer. Ensure the bracket is perfectly level and firmly attached, as a poorly secured bracket can lead to a wobbly fan later on.
4. Assemble the Fan
The assembly process can vary based on your fan model (downrod, flush-mount).
- For Downrod Fans: Feed the fan’s electrical wires through the downrod, then insert the downrod into the motor housing and hand-tighten it securely. Insert clevis and cotter pins if your model requires them. Tighten any setscrews with pliers to ensure the downrod is stable. You may need to cut and strip the wires, leaving about 8 inches of wire from the top of the downrod, and strip 3/8 inch of insulation from the ends. Slide the decorative canopy over the downrod.
- For Flush-Mount/Low-Profile Fans: These fans typically attach directly to the mounting bracket without a downrod. Follow your specific manual for assembling the motor housing to the fan body.
5. Wire the Ceiling Fan
This is a critical step that requires careful attention. If your mounting bracket has a hook, use it to hang the fan while you make the connections. Otherwise, a helper will be invaluable for holding the fan steady.
Identify the wires from your ceiling and the fan:
- White: Neutral (from ceiling) connects to White (from fan).
- Black/Red: Hot/Power (from ceiling) connects to Black (from fan motor).
- Green/Bare Copper: Ground (from ceiling) connects to Green/Bare Copper (from fan and mounting bracket).
- Blue (if present): This is usually for the light kit. It connects to a separate hot wire (often red or blue) from the ceiling if you have a dual-switch setup, or to the black (hot) wire from the ceiling if you’re using a single switch or remote control.
Match the corresponding wires, twist their bare metal ends together, and secure each connection firmly with a wire nut, twisting clockwise until tight. For added safety, wrap electrical tape around each wire nut and exposed wire. Carefully tuck all connected wires up into the electrical box, ensuring they won’t interfere with the fan’s operation or get pinched.
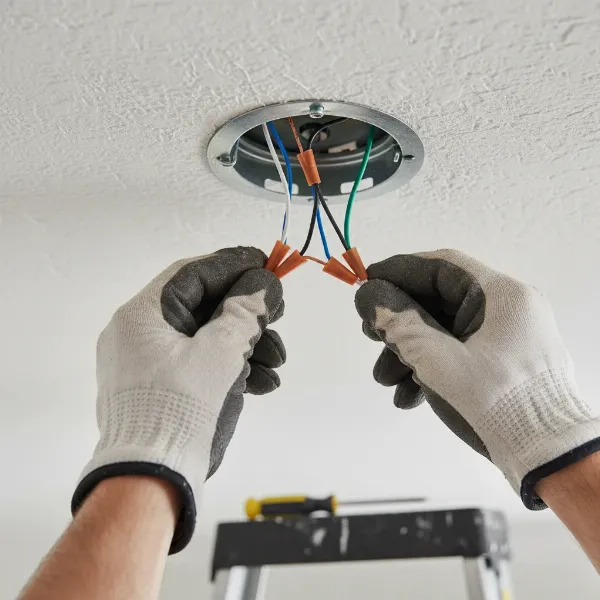 Hands connecting ceiling fan wires with wire nuts inside an electrical box.
6. Mount the Fan Motor Housing/Canopy
Once the wiring is complete and neatly tucked away, lift the fan assembly and align it with the mounting bracket. For downrod fans, the hanger ball sits in the bracket slot. For flush-mount fans, align the screw holes of the motor housing with the bracket. Secure the fan motor or canopy to the mounting bracket using the provided screws. Ensure all screws are tightened to prevent any movement.
7. Attach the Fan Blades
Most fans require individual blade attachment. Insert any grommets into the blade holes. Attach each blade to its blade iron (if your fan uses them) with the designated screws. Then, attach the blade irons to the fan motor housing, ensuring all screws are securely fastened. For quick-install blades, simply align and snap them into place. Make sure the blades are evenly secured to prevent wobbling.
8. Install the Light Kit (If Applicable)
If your fan includes a light kit, this is the next step. Connect the light kit’s wires to the corresponding wires on the fan (typically blue to the fan’s blue/light wire, and white to the fan’s white/neutral wire). Secure the light kit housing to the bottom of the fan with screws, then install the light bulbs and any decorative covers or globes. Follow your fan’s manual closely, especially for quick-connect or integrated LED light kits.
9. Test and Final Adjustments
With everything installed, it’s time to test your work.
- Restore Power: Go back to your electrical panel and flip the circuit breaker back on.
- Test Functionality: Use the wall switch or remote control to turn on the fan and lights. Check all fan speeds to ensure smooth operation. Verify that the lights turn on and off correctly, and dim if applicable.
- Check for Wobbling: If the fan wobbles excessively at higher speeds, turn off the power, then check that all blade screws and mounting bracket screws are tight. If wobbling persists, use a fan balancing kit (often included or sold separately) to identify and correct the imbalance.
- Adjust Fan Direction: Most ceiling fans have a small switch on the motor housing to change the blade rotation direction. During warmer months, set the fan to rotate counterclockwise to create a cooling downdraft. In colder months, set it to rotate clockwise (on a low speed) to gently push warm air down from the ceiling without creating a strong breeze.
When to Call a Professional Electrician
While installing a ceiling fan is a common DIY project, certain situations warrant calling a licensed professional.
- No Existing Wiring: If you’re installing a fan in a location without pre-existing electrical wiring.
- Non-Fan-Rated Box: If your current electrical box is not fan-rated and you’re uncomfortable replacing it.
- Complex Wiring: If your home’s wiring is old, complex, or you’re unsure about the wire identification.
- High or Angled Ceilings: These can require specialized mounting hardware and techniques that might be challenging for a novice.
- Any Discomfort or Uncertainty: If you feel uncomfortable or unsafe at any point during the installation process, it’s always best to stop and call a professional. Your safety is paramount.
Common Troubleshooting Tips
Even with careful installation, you might encounter minor issues. Here are quick fixes for common ceiling fan problems:
- Wobbly Fan:
- Tighten Screws: Ensure all blade screws, blade arm screws, and mounting bracket screws are secure. Loose fasteners are a primary cause of wobbling.
- Balance Blades: If tightening doesn’t help, use a fan balancing kit. It involves attaching small weights to the blades to achieve equilibrium.
- Check Blade Arms: Ensure blade arms are not bent or warped.
- Noisy Fan (Humming, Clicking, Rattling):
- Loose Screws: Again, check and tighten all screws on the fan body, blades, and light kit.
- Wiring: Ensure wires are neatly tucked into the junction box and not vibrating against the canopy or motor housing.
- Lubrication: Older fans might need motor lubrication (check your manual).
- Rubber Washers: Installing rubber washers between the mounting hardware and motor can reduce vibrations.
- Fan Not Turning On / Lights Not Working:
- Circuit Breaker: Verify the circuit breaker is on.
- Wall Switch: Ensure the wall switch controlling the fan is in the “on” position.
- Wire Connections: Turn off power and recheck all wire connections in the electrical box and fan housing. Make sure wire nuts are tight.
- Bulbs: For lights, check if bulbs are securely screwed in or need replacement. Ensure LED bulbs are compatible with your fan’s dimmer if applicable.
- Remote/Receiver: If your fan uses a remote, check batteries. Some remotes and receivers have “dip switches” that need to match settings (consult your manual).
Conclusion
Installing a ceiling fan can seem like a complex task, but by meticulously following a step-by-step guide and prioritizing safety, it’s a rewarding home improvement project you can accomplish yourself. From selecting the perfect fan to carefully wiring it and performing final tests, each stage brings you closer to enjoying enhanced comfort and a more energy-efficient home.
With the right tools and a bit of patience, you’ll be able to enjoy that refreshing breeze in no time. Remember, always consult your fan’s specific manual, and don’t hesitate to call a licensed electrician if you encounter any challenges or feel unsure about any electrical work. Take pride in your newly installed ceiling fan and embrace the improved airflow and ambiance it provides.
Ready to enhance your home’s comfort and style?
Frequently Asked Questions
How long does it typically take to install a ceiling fan?
For a DIY enthusiast with basic electrical knowledge, installing a ceiling fan usually takes between 1 to 2 hours. This duration can vary depending on your experience, whether you’re replacing an existing fixture or installing a new one from scratch, and the specific fan model.
What kind of electrical box do I need for a ceiling fan?
You absolutely need a fan-rated electrical box. These boxes are specifically designed to support the weight and rotational forces of a ceiling fan, typically rated for 50 to 70 pounds. Standard light fixture boxes are not strong enough and can pose a serious safety risk.
Can I install a ceiling fan where there is no existing light fixture?
Yes, it is possible. However, it requires running new electrical wiring to the ceiling location and installing a fan-rated electrical box, which can be a more involved process. If you’re not comfortable with extensive electrical work, it’s highly recommended to hire a licensed electrician for this type of installation.
What should I do if my ceiling fan wobbles after installation?
A wobbly fan is a common issue. First, check and tighten all screws on the mounting bracket, downrod (if applicable), blade irons, and blades. If the wobbling persists, use a fan balancing kit (available at most hardware stores). This kit typically includes clips and weights to help you pinpoint and correct the imbalance on the fan blades.
How do I change the direction of my ceiling fan for summer and winter?
Most ceiling fans have a small slide switch on the motor housing (above the blades) that controls the direction of rotation. For summer, set the switch so the blades rotate counterclockwise, creating a refreshing downdraft. For winter, switch it to clockwise rotation (on a low speed) to gently push warm air down from the ceiling, redistributing heat without creating a chilling breeze.